Monday, September 18, 2023

Safari Slimline Slider Card

Welcome back Scrappin' Cottage friends!

Kris here to share some Monday inspiration with you☺  I made a Safari-themed Pull Tab Slimline Slider card (that's a mouthfull! LOL!)  I made this for my great-nephew's 6th birthday.  

(click the pic to see it larger)

COTTAGECUTZ PRODUCTS:

SUPPLIES:
small magnets
foam tape or strips
ink blending ink pads
glue

CUTTING & SCORING:

• Cut base (green) at 7-3/4" x 9" 
-- score the shorter edge at 3-7/8"
Cut (black) at 8-1/2" x 3-1/2" 
• Cut (black) at 3/4" x 2-1/8" (cut 2 of these)
• Die cut (white) largest Scallop Stitched Rectangle Slimline
• Die cut Safari elements (die cut the cruiser 2x)


DESIGN STEPS:

• With the black layer, use the extended die technique to elongate the cut using the 2nd smallest Nested Rectangles Slimline set as pictured below.


• With the white scalloped layer, die cut the lower portion as pictured using the straightest die from the Hills Slimline set.


• Add vintage photo D.O. ink (or color of your choice) to the lower scalloped part.

• Ink blend the top scalloped part with D.O. wild honey, carved pumpkin, crackling campfire, and candied apple (or colors of your choice).


• Color the Safari die cuts (if cut from white cardstock) 


• Add glue to the TOP only of black layer, leaving 1/8" border around top and sides and add TOP scalloped layer.


• Glue the tree to the bottom of the top scalloped layer as shown below.

• Add glue to bottom of black layer, leaving 1/8" border and add BOTTOM scalloped layer, overlapping the top just a tiny bit.


• Affix the rest of your Safari die cuts.


•  On the back of the safari cruiser, add 2 magnets (I used glue and Scor Tape):  one towards the front and one towards the back.  (I used 3 because I messed up on the placement of my slider wrapper the first time, so I went back and added a 3rd magnet and moved my wrapper.)  


• Add glue and/or Scor Tape to magnets and add the 2nd cruiser on top.  Cover up backside as much as you can w/out adding builk.


• Add glue to the center of both slider wrappers as shown below.


• Add one near the edge of opening on the back and glue the next one 1/2" - 3/4" away from the first (see photo below)

**Important:  the placement of the 2nd Wrapper prevents the Cruiser from running over our baby gorilla when the magnet hits the wrapper!!

• On the front, place cruiser to the far right of card and holding it there, turn card over and place your magnets where they automatically want to attract them.  

•  Add foam strips or tape to the back, around edges and close to the slider opening without hindering it from moving.  


• Add glue to magnets and carefully slide the slider tab thru the wrappers and over the magnets.  You will have 1/4" of the tab sticking out -- this is what you'll need to grab and pull the slider.  


• Pull slider out and write your sentiment, or emboss a stamped sentiment in white!  I used a white and a gold sparkly pen.


• Remove tape backings and attach to center of card front!


I hope you enjoyed this tutorial and that you get crafty with your favorite CottageCutz dies!

~Kristine


Saturday, September 16, 2023

Gate Fold Masculine Birthday

Hello CottageCutz friends! Thanks for taking the time to stop and visit with us today. It's Mary Marsh here bringing you the Saturday edition of the Blog.

Our Folk Art release is still available in the online store at 35% off individual dies. There are 19 new designs that are so perfect for cardmaking, journaling, and scrapbooking.

In fact, all of the releases from 2023 through Halloween of 2022 are currently on sale. Check them out here if you want to pick up any that you may have missed and still want.

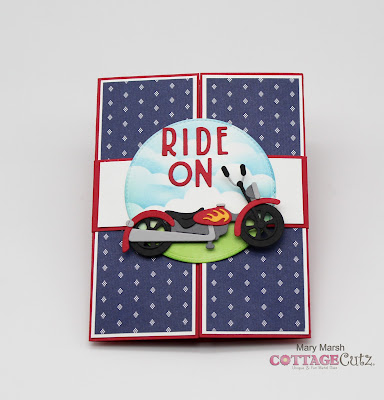
Today for your viewing pleasure, I am featuring a die from our Classic 50's release . It's the Motorcycle die, and I used it for a masculine birthday fun fold card. The fold is a gate fold with a belly band. My friend asked me to make a card for her son who loves to ride his motorcycle.
 
Design Steps:

I started by preparing the card base and the layering panels. 

Card Base - 8 1/2" x 5 1/2". I scored both panels at 2 1/8" on each side.

White Layers - 5 3/8" x 2"
Designer Paper Layer - 5" x 1 7/8"
Next, I adhered these pieces with double sided tape.
Belly Band -11" x 1 1/2" - scored at 7 3/8" & 3 1/8". 
I placed the band around the card front and then folded in on the score lines. I used clear drying glue to form the band. 
I cut the pieces for the motorcycle. I used red and black since that's the color of her son's bike. 
I cut a circle using the 3rd largest Stitched Circle die. Sponged some clouds using Tumbled Glass distress ink and Mowed Lawn distress ink for grass. Attached the motorcycle image with dimensional adhesive. 
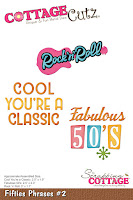
I wanted a sentiment on the front but I didn't have any stamps that would work. So I used the letters from the Cinema Drive-In Sign and Fifties Phrases #2 dies for the "Ride On" phrase. 
I attached the image on the belly band and slid it over the card front. 
I finished the inside of my card using the Happy Birthday w/ shadow die. I also stamped a sentiment. 
That's it for me for this post. See you again next Saturday. 

Reminder: Marla has a new video up on the CottageCutz YouTube channel. Click here. 


Thursday, September 14, 2023

Fall Truck

 Hello Friends

It is Pam creating with you on this wonderful Thursday!  Just to let you know we still have some great sale prices on some of the dies so check it out HERE!

Today,  I have a fall card to share.  I am featuring the Flatbed Truck w/Accessories.  I added some pumpkins to fill up the truck.


Design Steps:

1.  Using the Flatbead Truck die cut out the following colors of card stock: blue, black, white, brown, silver and vellum.  Using the Scarecrow die cut out the pumpkins in orange and green
2.  Ink the truck and pumpkins with coordinating ink colors and then assemble
3.  Use a white card base (4 1/2 x 6 1/4) cut a piece of rust DP 4 1/8 x 6 1/8, cut a piece of white DP 5 1/4 x 3 1/2, cut a piece of corrugated kraft card stock 1 x 5 1/4
4.  Glue the white DP to the rust DP and then glue down the strip of corrugated kraft to the bottom of the white DP. Add a double piece of twine and a bow to the corrugated kraft card stock (as shown above) 
Glue to the white card base
5.  Add dimension dots to the back of the truck (do not put dimension dots on the back of the truck rail so you can slide in the pumpkins) and pop it to the card front (as shown below).  Put dimension dots on the back of the pumpkins and slide them behind the truck rail.  I then added a little glue to the truck rails and glue it to the pumpkins
6.  Add the sentiment and your card is complete


We have more inspiration on our YouTube Channel check it out HERE

Thanks so much for stopping by!  And I will see you next Thursday.

Blessings and Take Care