Monday, May 15, 2023

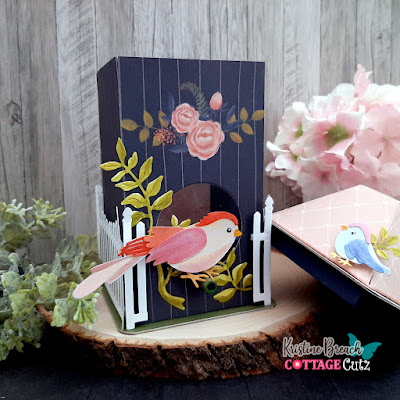
Birdhouse Gift Box

Hi friends! 

Kris here to share some crafty inspiration with you ☺  I had fun making this birdhouse gift box with a couple of the birds from the latest release!  I used the Spring Bird w/ Vine and a smaller bird from the Spring Birdhouse Cup.


The lid comes off and has a smaller box attached under it that fits snug into the top of the box so it won't easily fall off.  


and here is the inside of the gift box!


I created this type of birdhouse box before, following a tutorial I found on Norma's blog here. She shares a lantern with "X"s cut out of 2 sides so you can put those battery operated lights or even fairy lights and it'd shine thru both windows -- excellent idea, especially for winter. But since I wanted mine to be a birdhouse, I adapted the instructions for this tutorial.

DESIGN STEPS:
PLEASE NOTE****  I'm also typing out the text I have on my photos for those who need to translate instructions.  Not meant to confuse you!


• Start with a sheet of 6 x 12" cardstock.  
-- with the short side at top of score board, score at 3/8" & 5-1/2"
-- with long side at top, score at 2 15/16", 5 7/8", 8 13/16" & 11 3/4"


• I covered the sides of my box with decorative paper -- this is totally optional!  Cut (4) panels at 2-15/16" x 5-1/8" and glue them onto each of the front sections. (The one with the floral spray, I adhered to the 2nd panel since that will be the FRONT of my box.) 

• Die cut the 5th smallest circle from the Pierced Circle Set, leaving a li'l room to add a perch for the bird to sit on later.


• Add 1/4" Scor Tape around the circle cutout (on the back) and place a window sheet.
-- Also add 1/4" Scor Tape to the back side of the 3/8" scored flap along the top of box.


• Cut a piece of patterned paper at 2 7/8" x 5" for the inside "back" that will show thru the acetate window from the front.  Since my box is dark colored, I chose something light and pretty for the inside.


• Add 3/8" Scor Tape to the FRONT side of the bottom 1/2" flap
-- then with scissors, cut on each vertical score line, just up to the 1/2" horizontal score line.


• Remove backing of the Scor Tape that is on the backside of the top of box rim and fold it down -- all across the top.  This will strengthen the rim of your box.

• Add 1/4" Score Tape to the front side of the small vertical flap on the end, peel off the backing, and attached the other end of the box.

 • Cut (2) pieces of chipboard and (4) pcs of patterned paper at 3-1/2" square 
-- round the corners of all 6 pieces 
-- glue patterned papers to top and bottom of each of the chipboard squares.


• Peel off the backing of  Scor Tape on bottom of box flaps and adhere to the center of one of the chipboard squares.

• Cut another piece of patterned paper at 2-7/8" square to fit down inside the box & cover the tabs


• Cut a piece of cardstock at 4-3/8" square
-- score at 3/8" and 3/4" along each edge 
-- see reference photo above for where to make your cuts

• Add Scor Tape along the outer flaps, remove backing and adhere flaps of each side to make a box.  *There will be an opening in the center of backside. 


•  Attach to CENTER of the underside of lid (chipboard square)
--make sure it fits snug into the top of your gift box


CREATING THE ROOF:

• Cut a 6" square of cardstock
--score 1/2" in from all 4 sides.
• Measure in 1-1/2" from each corner and cut away the corner squares.


• Turn your roof over to backside and with a ruler and pencil, draw lines at 2-1/2" and 3-1/2" (from the farthest left edge)
-- turn paper 90 degrees and repeat.
• SCORE the intersecting square in the middle.
• From each corner of the middle square, make 3 score lines to the "V" and to each 1/2" score line you already made in pt. 1.
• Turn over (top facing up) and Mountain fold all the score lines that meet your pre-existing 1/2" score line and Valley fold all the shorter middle score lines.


• Once you've cut and scored the roof and mountain and valley folded it, you can add glue in between those valley folds and pinch them together.  Might be good to add binder clips to hold together until glue dries.


DECORATING MY BOX:

• I die cut (4) of the Fence w/ Flower Garland to add around the base of my birdhouse.


• I cut one of the fences down by cutting 2 of the outermost pickets from each end.  The other 3 fences I left whole ~ they fit perfectly and wrapped all the way around the birdhouse!
-- I used 1/8" foam strips to the backside of fence pcs. (just on horizontal slats) to attach to house. 


• I die cut my birds from the  Spring Bird w/ Vine 
and a smaller bird from the Spring Birdhouse Cup
-- then I water-colored all the pieces


• I created a li'l perch for the larger bird by rolling a scrap of the green c.s. around the end of my paintbrush and added glue towards the end to hold it together.  Once dried, I cut it to the length I wanted and attached with glue to the bottom of my window.


• I glued the leaves and added birds with foam strips and done!


PRODUCTS I USED:


I hope enjoyed my tutorial today!

Remember, we have a DESIGN TEAM CALL here!

More inspiration on our YouTube channel with GIVEAWAYS here!

~Kristine


Sunday, May 14, 2023

CottageCutz Design Team Openings


We currently are looking for two designers to join our team. One position would be posting to the CottageCutz Blog and another position as a video designer. The video designer will be posting to the CottageCutz YouTube channel with a how-to tutorial project.

We are looking for Design Team members who are very active on social media. These sites include: Blogger, Facebook (page or groups), Pinterest, and Instagram. The position will be a 3-month term commitment from July -September 2023with an option to extend.

We are looking for dependable, energetic, enthusiastic and talented designers who enjoy papercrafting with die-cutting and can showcase CottageCutz dies in different ways (layouts, cards, altered items, tags, etc.) whatever your style may be, we would love to see what you have to bring to our team.

What we expect:
*Must have a personal active blog, Facebook page, Instagram or Pinterest account.

*Good communicator, reliable, dedicated and on time with deadlines.

*Post to the CottageCutz Blog and your personal blog or Facebook Page 4 times per month using only CottageCutz dies. No other dies are permitted. Video designers will post twice a month.

*Actively promote CottageCutz product on your personal blog, Facebook, Instagram accounts or Pinterest account.

*List all CottageCutz dies used and appropriate links back to the store.

*Be able to give instructions to how you used our CottageCutz dies.

*Access to camera that is able to take high quality well-lit photos.

*Upload to at least 1 online gallery such as Splitcoaststampers, Instagram, Facebook or Pinterest.

*Create at least one project for each die given. All dies & stamps need to be used and featured in a project.

*Team spirit and able to follow directions accordingly

*Support DT members by commenting on their posts on the CottageCutz Blog, Facebook or Instagram accounts.

Selected Designer will receive:

*Generous amount in product each month.

*Your name and picture linked to your blog from the CottageCutz Blog.

*CottageCutz Design badge to feature on your blog.

*Great product discount.

*Bonus given to those who are published in a printed crafting publication. CottageCutz must be listed in the supply list for your project.

To apply, please do the following:

1. Please e-mail Mary Marsh at mrmarsh917@gmail.com with the subject line: CottageCutz Design Team Call.

2. Please attach 2 projects showcasing dies. These can be projects you have already done or current projects. We would like to see Cards, layouts, altered items, etc. For video applications also send a link to your YouTube channel.

3. Links to your personal blog or Facebook Page and any online galleries where you upload your projects.

4. Tell us why you think you would be a perfect fit for the CottageCutz design team.

5. Please list current and past design teams.

** We will be accepting applications until May 31 and the selected stamper will be announced shortly after**.


Saturday, May 13, 2023

Mother's Day Scene

Hello CottageCutz friends! Thanks for taking the time to stop and visit with us today. It's Mary Marsh here bringing you the Sunday edition of the Blog.

Our Easter -Spring release is still available in the online store with 17 new designs. There is something for every card maker with faith-based dies, beautiful floral images, whimsical with bunnies and frogs and several lovely birds and butterflies.

You will be able to take the images beyond the Easter or Spring season. And for a limited time, you can get individual dies at 30% off

Today for your viewing pleasure, I am using the Pond w/Cattails & Lily Pad + the Fence & Grass dies. I created a Mother's Day card for my next-door neighbor. She has 2 little ones so I thought she might like this outdoor scene. 

Design Steps:

I started my card this week with my background. I had this card base in my stash. It's a loose watercolor marsh scene. I thought it would work for my card idea that involved a water scene.
I cut the fence from a papaya shade of cardstock. It coordinates with one of the colors on the card base. 
For the mama duck & ducklings I used some older dies. I cut the smaller duckling from the Mama Duck & Ducklings for the Mama duck. I used the bird from the Birdhouse & Vine die for the little ducklings. Added the arch sun for a corner embellishment and some cattails for behind the fence. 
Now that all my card elements are cut, I am ready to start assembly. I split the fence to make a pathway into the marshy area. I decided to add another rock and grass tuft to the left side of my card after I took this photo.  
Next, I stamped my Mother's Day sentiment with the help of my MISTI.  
To finish off my card, I secured the ducks to the water area, the corner arched sun and a couple of dragonflies. 
That's it for me for this post. I want to wish all of you Mom's & Grandmom's a very happy Mother's Day. See you next Saturday.

Reminder: We have a couple of Design Team openings. Check out this post for all the details.

We also have a new video and giveaway up on the CottageCutz YouTube channel from Marla Harris.  Click here.

Dies I used to create card:


Friday, May 12, 2023

Interactive Mini Slimline Box Card

Hey there crafty friends! 

Kris here.... I'm switching gears a li'l bit today and taking a break from showcasing our fabulous Spring/Easter Release to share a fun interactive mini slimline card that I made as "extra" inspiration using some older dies that are brand new to me... the Arctic Whale & Narwhal and the Waves Slimline dies.  You can see a clip of how it moves by scrolling down a li'l bit.  ☺


 and here it is in action ☺ 
 (sorry for blurriness, got a bit out of focus)


Kids love interactive cards and I really enjoy making them. I should say though, that when I started this card, I was just making it a mini slimline box card.  It wasn't until after I had the box card put together (except for the whales) that I decided it would be so easy to make the whale "jump" out of the water!  So keep in mind, it would be easiest to add the swinging mechanism BEFORE you add the shelves and I will note that below when the time comes. ☺

CUTTING & SCORING:

• From white cardstock, I cut:
-- back panel at 3-1/4" x 4-7/8", then sponged clouds with Distress Oxide Ink and a stencil
-- (1) strip at 1/2" x 4-5/8" to stamp sentiment on front

•  From darker blue (Pacific Point) cardstock, I cut:
-- (2) pieces for the sides of my box at 1-1/2" x 1-3/4" and scored at 1/2" along the short edge
-- (1) strip for the front at 3/4" x 5-5/8" and scored at 3/8" from each end
-- (1) piece 4-7/8" wide x 2-1/2" tall, then die cut the top with the Waves Slimline

•  From Lighter Blue (Tahitian Tide) cardstock, I cut:
-- (2) pieces at 4-7/8" wide and differing heights, then die cut with Waves Slimline
-- (2) pieces at 5-5/8" wide x 3/4" tall and scored at 3/8" from each end 
*not pictured in 1st photo, but shown in the 4th one down. 


 For the side pieces, I placed a mark at 3/4" from the opposite edge of the score line.  
--You'll want to measure one of the pieces 3/4" from the right edge, and the other 3/4" from the left edge.  


 Then I CUT diagonally from that mark up to the top of the score line. 
--You can do this with a trimmer or with your scissors.


 After I cut those diagonals on the side pieces, I erased my pencil marks and folded them so they are descending toward the middle as shown below.  

I stamped a sentiment onto my white strip and adhered it to my blue front piece.


Next, I glued my 2 side pieces to the sides of my cloud layer so that the score line is on the edge of the cloud layer and the bottom edge is even with the bottom of cloud layer as shown below.  

I then glued my darker blue waves panel so that the lowest dips of the waves are covering the flaps of my side panels as shown.


***NOTE:  if you want to make it interactive, NOW would be a great time to add your mechanism!  I added it after my box card was glued together, so you can scroll down to see how I made that and you can insert those steps here to make it easier if you'd like.  
Scroll until you see the 3 ***s 
------
Next, I added glue to the left flap of my front blue panel and attached it to the inside of my left side piece as shown below.  


Next, I added glue to only the left flap of my 2 lighter blue shelves and attached the first one so that the edge of my flap bumps up against the left edge of my blue wave and lower than my side piece.  The front blue shelf, I bumped up against the fold of the previous shelf, and lower than the side piece as shown below. 


I folded all 3 to the right and added glue to the right flaps at the same time.


Then I folded the right side piece over onto them.  
It should line up perfectly with the front panel.


Next, I decided to add some white pigment ink to the tops of my lighter blue waves with a blending brush.


Then I added glue to my 2 lighter blue shelves and attached my waves.


Next, I die cut my Arctic Whale & Narwhal, and a red heart from the Stitched Heart Set.  I colored the narwhal with Copics.


***This is the part where I added a swinging mechanism to my Orca whale.  You can do this BEFORE you add your shelves to make it easier, but if you've already done that part like I did, this is still pretty easy to do. 

I cut a piece of heavy acetate into a strip about 3/4" wide and punched a hole towards the bottom using a hole punch.  You might need to use a small circle die.  *It doesn't show in this picture, but I ended up trimming the bottom a li'l closer to the circle cutout and rounded the corners so they don't show when it is swinging.


I then glued a spinner disc (a small circle plastic disc) as shown.  If you don't have these, you can use any small circular thing with dimension like a tiny button!  Make sure you wipe away any glue that leaked after you press the disc to adhere.  


Next, I laid my acetate strip with the hole over the disc (or button) then I cut a li'l bit larger circle disc (the smallest from the Pierced Circle Set) to glue on top of the button.  This circle prevents the acetate strip from popping off our disc/button!  


Next, I brought the acetate strip up --- it should be between our back darker blue wave and the lighter blue wave just in front of it, and I added 2 pieces of Scor Tape where I wanted my whale to be.  Then I trimmed my acetate strip just above the tape and attached my whale to the strip.


One last piece.... to prevent the whale from diving down past the bottom of the card, I inserted a foam strip to the left of the acetate strip at the point I wanted it to stop.  See photo below. 


and done!  ☺ 


It's a lot of photos, but it comes together super quick!  
I hope you enjoyed this tutorial and you'll give it a try.
Happy Crafting!
~Kristine

PRODUCTS I USED: