Tuesday, December 06, 2022

Peace and Joy Wreath

Hello CottageCutz friends! Thanks for taking the time to stop and visit with us today. It's Mary Marsh here bringing you the Tuesday edition of the Blog.

I hoped you enjoyed all the cards and projects the DT has shown with the Classic 50's release. We are heading back to Christmas designs now for even more inspiration. The Christmas Part 1 and Christmas Part 2 dies are still 30% off individual dies. It's only for a limited time so don't delay.

Today I am featuring the new Peace and Joy Wreath die. I thought the wreath should have a bow so I used the Halloween Wreath die. I created a quick and easy Christmas card that would be easy to make multiples of, if you are running short on time for Christmas. 
I also chose an easy layout that features designer paper. That always ups the look of a clean and simple card. It's from a Christmas collection that has lots of greenery, foliage and pinecones. I chose the pinecone pattern. 
Light Green Card Base: 5 3/4" x 4 1/2"
Designer Paper Layer: 5 1/2" x 4 1/4"
White Image Panel: 4" x 3 3/4"
The wreath is cut in a dark green cardstock, and I used red for my berries, bow and the peace and joy phrase. That completed this card. 

dies used to create card:


Monday, December 05, 2022

Snowy Drive thru the Pines

Happy Monday CottageCutz friends!  Kris here with you today, sharing a card using the Classic 50's Release!  


My dad and hubby's birthdays are in December, so this card works for either one!  It's a Bridge Fold card and I'll show you how I made it, but if you'd like a video, there's a great one on Splitcoast Stampers here.
DESIGN STEPS:
Step 1
Cut a cardstock base to 5 1/2" x 9”.
Score at 3” and 6". Fold into a Z and burnish.

Step 2
Center one of the Clouds Slimline Dies (or die of your choice) over the Z folded piece at the top. Secure with Post it notes or Washi tape and run thru machine back and forth a few times to go thru all 3 sections.


Step 3
Cut 3 pieces of white cardstock to 2-3/4” x 5". Using the same cloud die you used on your folded piece, and in the same position, die cut the tops of all 3 pieces.   


Step 4
Score down the center of the outside two pieces of card base and 2 of the white pieces, and mountain fold them. Adhere the non-folded white piece to the center of card and the folded ones to the outside panels.


Step 5
Cut a piece of white cardstock that is 4" x 1-1/2" and score 1/2" on each end.  

Cut another piece of white that is 4" wide by about 2" tall and score 1/2" on each end.  Then cut the top with one of the cloud dies.


Step 6
Add glue to the side flaps of the straight-topped piece and adhere to the inside sides and so the bottom is flush with the bottom of the white sides as shown below.

Adhere the cloud-topped piece half-way between the front "bridge" piece and the back, but up higher, but so the bottom is hidden below the top of the front piece.  (See photo in Step 9)


Step 7
Die cut pieces from Classic Car (front), Woodland Pine Trees, and the Fifties Phrases #2 and assemble.


Step 8
I added Snow Writer to the pine trees for a puffy snowy effect!  


Step 9
Adhere one tree to the center back of card with a foam strip/dot, and then glue 2 trees to the cloud-topped center piece.

Glue "You're a Classic" down the side panels.


Step 10
Add foam strips to the bottom portion of the back of car and adhere to the front center piece.


How CUTE are those dice hanging from the mirror? {♥♥}

PRODUCTS I USED:


I hope you're inspired to create something fabby with your favorite CottageCutz dies!

Need more inspiration?  Hop on over to our YouTube channel here!  

Sunday, December 04, 2022

Polar Bear Trio Slimline

Hello CottageCutz friends! Thanks for taking the time to stop and visit with us today. It's Mary Marsh here bringing you the Sunday edition of the Blog.

I hoped you enjoyed all the cards and projects the DT has shown with the Classic 50's release. We are heading back to Christmas designs now for even more inspiration. Today I am featuring the new Polar Bear Trio & Igloo die. 

I started my card with the colors from the Splitcoaststampers color challenge #923. We were to use the colors of pacific point, fresh freesia and balmy blue. Optional was to add your favorite pink. I chose polished pink.
I decided to go with a slimline card. I started with the background designer paper. I just bought this new pack of Christmas themed slimline card fronts. The patterns are so pretty and perfect for creating outdoor scenes.

I used the challenge colors for their hats & scarves. For the North Pole sign, I used balmy blue and then merry merlot for the pole. It is a candy cane after all. That's an allowed neutral in this challenge. Not wild about the shade-just a bit dark.

The sentiment phrase is the new Season's Greetings die. I cut that in pacific point cardstock. Added a few more pine trees in white to finish off my card. 

That's it for this post. See you again on Saturday.

dies I used to create card:


Saturday, December 03, 2022

We Wish You A Merry Christmas Owl Card.

Happy Saturday Cottage Cutz Friends!
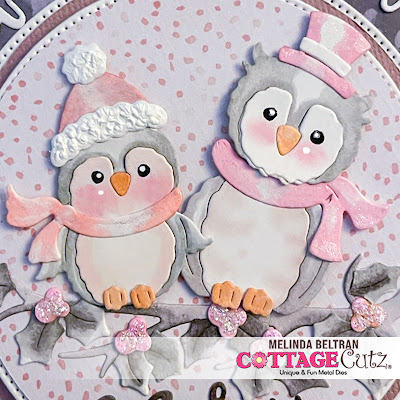
Melinda here with you, and today I am sharing a simple but effective Christmas themed card I created featuring the cute Christmas Owl die from the FABULOUS Christmas release!
My card is a standard A4 size: 4.25 x 5.5. This card is a regular side fold card. I thought these Owls were adorable. I wanted to make them in  my favorite color...pink. So I ended up with this very non-traditional looking Christmas card. 

I started by die cutting all of my pieces in white cardstock. I then proceeded to color the various pieces in. I wanted to keep my little owls on the lighter colored side. So I used shades of gray and light pink-peach for their bodies. I used some chalks for their cheeks. I also added some stickles to the berries and some puffy paint to the little owl with the hat on the left. I added the paint to the rim and the pom pom of the hat and it gave it the perfect texture and dimension.  


I mounted the adorable owls onto a pierced circle mat cut from white cardstock. I used some pretty patterned paper for the mat layer. I then repeated that with the largest pierced circle die cut in white cardstock and to that I added a mat of some rusty pink cardstock. I then used the phrase We Wish You A Merry Christmas from the Merry Christmas tree die. I curved the letters around the large circle die. 


Here is a closer look at the work merry. I colored that in some dark gray marker and it matched the leaves and theme of the card perfectly.


Here is one last look at the completed card. I loved the way this turned out!


Don't forget to head over to the CottageCutz YouTube channel and check out all of the amazing projects on there. Our video team is doing a wonderful job of filling the channel with all sorts of creative content! You don't want to miss it!

Dies I Used
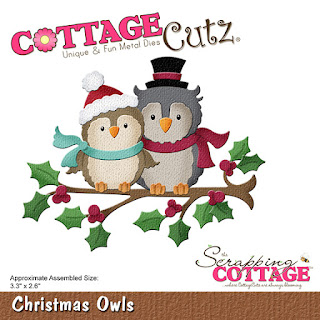
Christmas Owls

Merry Christmas Tree


Pierced Circle Set

Here's a look at the entire release. Be sure to head over and grab them while they last!

Well that about covers it for today! Until the next time, have a wonderfully craft-die day!
Melinda Beltran

Thursday, December 01, 2022

Christmas Owls

Hello CottageCutz Friends,

It is Pam sharing with you today!

TOMORROW at 9:00 PST IS THE LAST DAY OF THE BLACK FRIDAY SALE!  Don't miss out on all the incredible bargains.  You can save up to 85% on some of the items in the store!  Time to stock up or buy your crafty friends an amazing Christmas gift!!

Today,  I am using the Christmas Owls.  


Design Steps

1.  Cut out the pieces using the Christmas Owls die and the following colors of card stock: green, red, brown, light gray, dark gray, white, brown, tan, yellow, and black.  Use DP for the scarfs light red snow and stripes.  Shade the pieces if desired with the matching ink colors and a small applicator.  Assemble the pieces with a fine tip glue
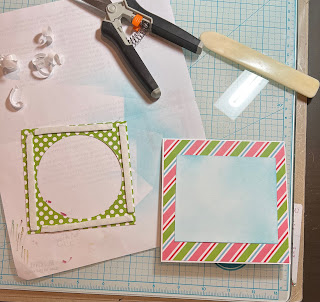
2.  Use a white card base measuring 5 x 5 folded, a piece of striped DP 4 7/8 x 4 7/8, a piece of snowy DP 4 1/4 x 4 1/4. Cut a circle in the middle using the second to the largest Pierced Circle die.  Also cut a piece of white 4 1/8 x 4 1/8 and ink with blue
3.  Glue the striped DP to the white card base and then glue the inked blue piece onto the stripes directly in the center of the card.  Place dimension tape on the back of the piece with the circle cut out and then pop it over the blue
4.  Glue the branch with the holly leaves inside of the circle.
5.  Glue down the owls onto the branch as shown above.  Add the bow and the sentiment and your card is complete

CottageCutz Products


We have more inspiration on our YouTube Channel check it out HERE

Thanks so much for stopping by!  And I will see you next Thursday.

Blessings and Take Care