Tuesday, October 18, 2022

Sweet Gingerbread and Cocoa Card

Happy TuesDIE Cottage Cutz Friends!
Melinda here with you on this terrific Tuesday. Today I am sharing a cute Christmas card I created with some dies from the FABULOUS Part2 Christmas release!
Here is my finished card. It is an A4 sized card. It features one of the super adorable Ginger friends. I also included the phrase die, Cookies & Cocoa with those cute chocolate chip cookies and that adorable cup of cocoa. I mounted all of these onto the smaller Square Scalloped eyelet mat. 

Here's a closer look at the gingerbread guy. I cut him out of some gingery brown cardstock. I edged him with some chalk and then added the cute little stitch lines. I colored his ear muffs and scarf with some aqua markers and my spectrum noir glitter pen. The photo doesn't capture the subtle glitter on his scarf and muffs.

Here's a closer look at the adorable cup of cocoa and chocolate chip cookies. You can't see the glitter on the whipped cream on top of the cocoa, but it is there and adds a nice touch.

Here's a closer look at the title Cookies & Cream. As I mentioned, I mounted all the dies onto a piece of pretty patterned paper. All of that I mounted onto the larger scalloped eyelet square. I used some dark brown paper for the mat on that one.

Here is one last look at my card. I think it turned out super cute and they are easy enough that you could make several of them in a variety of color themes.

Don't forget to head over to the CottageCutz YouTube channel and check out all of the amazing projects on there. Our video team is doing a wonderful job of filling the channel with all sorts of creative content! You don't want to miss it!

Here's a look at the entire release. Be sure to head over and grab them while they last!

Well that about covers it for today! Until the next time, have a wonderfully craft-die day!
Melinda Beltran

Monday, October 17, 2022

Christmas Kitty Car

Happy Monday friends!   Kris here with a cute and simple card using the Christmas Kitty Car, from the Christmas 1 Release!   We do have a 2nd Christmas Release that is now live and on SALE so be sure to go check that out HERE!  All the individual dies from the 2nd release are 30% OFF for a limited time!  

I love this fun car with the wonky wheels and kitty driving.  ☺  Reminds me of driving to the woods with the kids to chop our own Christmas tree.


Design Steps:

1. I sponged some Wilted Violet Distress Ink onto a 5-1/4" x 4" white cardstock.


2.  I die cut some tree from the Woodland Pine Trees set, and another white piece with the Hills Slimline set.  They are not attached at this point, just laid them on there.


3. I colored up the trees, and then I misted my purple background with water and let dry. I then added some white gel pen dots for additional snow.


4.  I glued my trees and snow border onto the purple snow panel.  Then I attached that piece to an A2 lime green card.

5.  I die cut my Christmas Kitty Car and colored it with Copics.  

6.  I cut a grey pc. to 5-1/4" wide and die cut the top with a Hills Slimline die.

7.  I cut a pc. of white cardstock to 5-1/4" wide, stamped the bottom right portion, then die cut the top with another die from the Hills Slimline set.


8.  I then attached the grey then the white layers onto my card and popped the car up with foam tape. 


THANK YOU for taking time to visit today!

I hope I inspired you to get crafty with your favorite CotageCutz dies ~ Have a blessed week ☺
~Kristine

PRODUCTS I USED:


Sunday, October 16, 2022

Vintage Halloween Card


Hi my crafty friends!  Marla here to share a card I created using dies from the new CottageCutz Halloween release.  I followed a sketch from my friend Kendra's card challenge for the layout.  I used pattern paper from my stash to follow the simple design.   The sketch called for a 2.75" x 2.75" square that gave me the perfect place to build a scene.

For the Halloween scene I used the "Jack-O-Lantern Witch" die and inked the pieces with various Distress Oxide inks.  The sketch called for a shape to be in the upper right-hand corner of the square, so I knew the "Web" would fit perfectly with the theme. I cut it out with vellum.  

After assembling all of my images I adhered them to the card adding foam tape behind the pumpkin witch and a double layer behind my cat.  I still felt like the scene needed something else, so I added one of the ghosts from the "Haunted Ghost House" die and tucked it behind the pumpkin and above the sweet cat.

If you would like to see more details, you can head over to my YouTube Channel MAD About Cards and Crafts to watch.  

Thanks for stopping by today.  Until next time....Marla


Saturday, October 15, 2022

Halloween Treats in a Pillow Box

Hello CottageCutz friends! Thanks for taking the time to stop and visit with us today. It's Mary Marsh here bringing you the Saturday edition of the Blog.

It's new release time!!! We have new dies in the online store. Our Christmas Part 2 release with 36 new designs is available and ready for shipment. There are 3 different bundles available. The individual dies are on sale for 30% off.  It's only for a limited time so don't delay.  You are going to love all the whimsical designs that are available in this release. There is something for everyone.

And we still have the Halloween release with 22 new designs. They are on a 30% off sale as well. So many fun and spooky designs that are perfect for your Halloween card-making, Scrapbooking or making treat boxes. The CottageCutz dies are so versatile, and the DT has been showing samples of all these different ways of crafting. 

Today I am featuring a Halloween pillow box. A friend asked if I could make a treat holder to send into her son's 2nd grade class for a Halloween party. I used an older die -the Pillow Box Plus to create the treat holder. It's retired and available at 72% off retail. It could be used for so many occasions not just Halloween. 

Design Steps:

I started by cutting the pillow box. I used various Halloween themed designer paper from my stash. The die cuts in one piece with the fold lines scored for you. You simply fold, tape and the box is done and ready for decorating. I used Scor-tape to make sure the box stays together after adding the treat. 
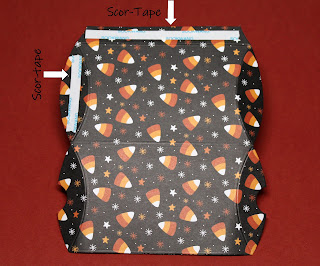
On this photo I turned the designer paper over so you can see the fold lines the die creates. 
This photo shows where I applied the Scor-tape to secure the box. I only taped one of the flaps so my friend can fill these with the treats.
Next, I cut images from the Potions Bottles in cardstock for my first box. I thought these bottles would definitely appeal to the boys in the class. I found some cork paper in my class and used that for the bottle corks. 
I stamped several different sentiments. This one is on a label that is part of the Pillow Box die. Some of the sentiments I stamped on labels that were part of a Halloween collection kit from my stash.  
Now I am ready for the assembly of the boxes. This is the first box design. I used one of the potions bottles, bat designer paper and a stamped trick or treat phrase. 
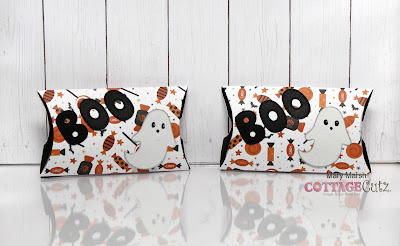
This is the 2nd box design. For this one I used the Cute Ghosts die and the Stitched Alphabet die. 
The 3rd design is using the Potions Bottles and a sentiment stamped on one of the labels from my stash. 
The 4th design is using the Web & Halloween Wreath dies. I just used the spider and bats from this die. 
Well, that's it for me for this post. I hope I have given you some ideas for ways to use these new Halloween dies. There is still time to order and receive these dies to make your projects for Halloween.
See you next Saturday when it will be back to Christmas.

Dies I used to create projects:


Friday, October 14, 2022

Knock Knock...

BOOS there!   LoL!! Okay, you have to see my card for that PUN to make sense!   Just a li'l Halloween fun to kick off the weekend! ☺

Happy Friday y'all!  Kris here with a fun interactive card featuring the Cute Ghosts die from this month's Halloween Release!  These dies are still 30% Off, so if you are needing some super cute dies to make those adorable projects for the kiddos or your co-workers, now is a great time to shop!  

This card is going to my great-nephew... he's 5 and loves to get happy mail, especially if it's interactive! 


I used some designer paper from Doodlebug Designs' Happy Haunting pack and the green is from the coordinating textured 12" pack. Since the ghosts on the background paper were white, I decided to cut my Cute Ghosts from fun colors so they would pop! This card folds down to a 5" x 7" card and will easily fit into an envelope!

Thanks for taking a peek today!

Kristine

CC Products used: