Saturday, October 08, 2022

Cute Halloween

Hello CottageCutz friends! Thanks for taking the time to stop and visit with us today. It's Mary Marsh here bringing you the Saturday edition of the Blog.

It's new release time!!! We have new dies in the online store. Our Christmas Part 2 release with 36 new designs is available and ready for shipment. There are 3 different bundles you can pick up at 50% off retail.  It's only for a limited time so don't delay.  The individual dies are on sale for 30% off. You are going to love all the whimsical designs that are available in this release. There is something for everyone. 

And we still have the Halloween release with 22 new designs. They are on a 30% off sale as well. So many fun and spooky designs that are perfect for your Halloween card-making. 

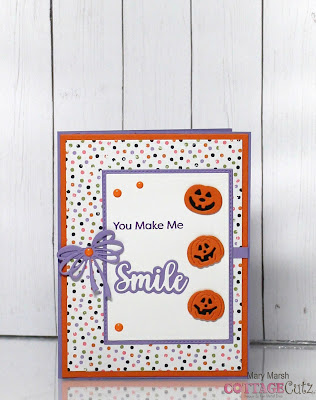
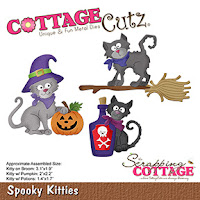
For today's card I am featuring the Spooky Kitties & Cute Witchy dies but just using the smiling pumpkins.  I wanted to make a simpler card that would be easy to make multiples of and isn't scary. Maybe you want to send a card to school with your child with a treat attached. Or maybe you're a teacher and you want to give a card to your students. Or you send out cards to your family or neighbors. There are lots of possibilities here. 

Design Steps:

I started by selecting my papers from a cute Halloween collection I had from last year. I thought the dotted designer paper would just add to the fun of the card. I paired it with the bright colors that are in the designer paper.  

Light purple card base: 4 1/4" x 5 1/2"
Pumpkin layering panel: 4 1/8" x 5 3/8"
Designer paper panel: 4" x 5 1/4"
Image Panel: purple layer - Stitched Rectangle die (2nd largest - 2 7/8" x 3 7/8") 
White Layer: 2nd largest Rectangle die (2 3/4" x 3 3/4") 
Next, I cut the pumpkin images with orange & black cardstock. 
I stamped my sentiment in a grape ink with the help of my MISTI. It did require a 2nd inking. The sentiment had some other words on it that I didn't want to use so I just masked them off and inked the part that I did want. 
Now that all my elements are prepared, I am ready to start card assembly. I attached the pumpkins to the image panel. I added my smile phrase using the Smile w/Shadow die.  
This panel was added to the card base with double sided tape. I wanted to add some ribbon to my card but since this is going out in the mail, I knew that would make it a bit bulky. So I added a 3/8" strip of purple cardstock across the panel and then cut the bow from the Halloween Wreath die. 
To finish off the card, I added a few pumpkin-colored enamel dots. 
Well, that's it for me for this week. Make sure you visit again tomorrow; we are having Part 2 of the DT group post. The team has created some great samples.

Reminder:  Our YouTube Channel has a new video featuring a princess card using the Halloween dies from Linh Van. There is a giveaway for being a subscriber, liking the video and leaving a comment. Click here.

Dies used to create card:


Friday, October 07, 2022

Princess Castle Featuring the Halloween Release!


Hi everyone! Linh here and I have a new video up on the Cottage Cutz YouTube channel. Whether you make Halloween cards or not, I hope you'll check out this latest release from Cottage Cutz! There are several sets that be easily generalized to use for any and all occasions! Today I'm using a few sets to create a Princess-themed castle scene. I hope you enjoy it!


Here's a close up of this beautiful castle & gate. I love these sets!


Thursday, October 06, 2022

Halloween Kitties

Hello Scrapping Cottage Friends

Super Excited to announce we have a brand new release just in time for all of those amazing Halloween cards everyone makes!! The collection has 22 fabulous dies that are going to make those scrapbook layouts and cards look SPOOKTACULAR!!!  The dies are currently on sale so make sure you get them while they last at this special introductory offer!!

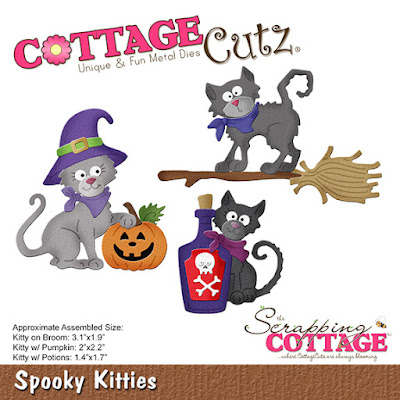
Today, I am using the Spooky Kitties.  It has so many cute pieces.  These pieces could be used in a variety of different ways!  For this card I decided to make a slimline.

Designer Steps:

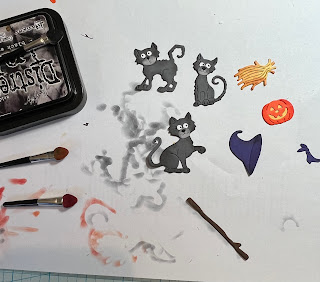
1.  Using the Spooky Kitties die cut out the following colors of card stock:  orange, purple, brown, light and dark gray, yellow and white.  Ink the various pieces with TH inks and then assemble with a fine tip, fast drying glue.  I used a black Glaze Sakura pen for the eyes

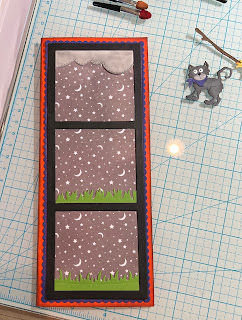
2.  Use an orange 3 1/2 x 8 1/2 card base, cut a piece of purple card stock using the largest of the Slimline Scallop Stitched Rectangle dies, Cut a piece of DP 2 3/4 x 7 3/4,  and finally cut a piece of black using the Window Slimline.  Ink the edges of the orange base in black ink
2.  Glue the purple scalloped rectangle to the orange base then glue down the DP.  Before adhereing the black window frame to the base cut two pieces of green grass using the Grass Slimline die and cut a light gray cloud  using the Clouds Slimline.  Glue the pieces to the back of the black windows as shown above and cut off the extra.  Ink the clouds with a black TH ink
3.  Glue the black windows to the card base do not glue the tops of the grass so you can tuck your cats down into the grass
4.  Arrange your kitties in each of the window glueing the pieces flat to the card base make sure you tuck the kitties feet into the grass.  Add the sentiment and your card is complete

CottageCutz Products


Please make sure to check out this amazing Halloween release right HERE!


We have more inspiration on our YouTube Channel check it out HERE

Thanks so much for stopping by!  And I will see you next Thursday.

Blessings and Take Care


Wednesday, October 05, 2022

Witching You A Happy Halloween


Hey Krafty Friends, Jen from Katahdin Krafts, back with another  CottageCutz YouTube  video on the CottageCutz Channel This week I'm using two of the designs from the latest "Halloween" release.  Halloween is one of my favorite times of the year, so I was really excited to work with these dies.  


My card features the "Cute Witchy" die, along with the "Halloween Chair."  I had so much fun coloring this adorable witch and planning out her little outfit.  


You can find my tutorial with all the details over on the YouTube Channel!

While over on the channel, make sure you like and comment for a chance to win the "Cute Witchy" die!

The winner of the "Jolly Santa Gnome" from my last video is Annette Hatcher, you can find all the details over on YouTube!  Thanks for stopping in, and happy krafting!


Tuesday, October 04, 2022

Halloween Treat Box and Card Set

Happy TuesDIE Cottage Cutz Friends!
Melinda here with you on this terrific Tuesday. Today I am sharing a fun and very easy card I created featuring dies that are part of the new Halloween Release.

Here's a look at my card and treat box. 


Here's a look at the card. It is a standard A4 Top Folding card. I started with a black cardstock base. I then adhered a purple mat and a yellow mat. I used the Spooky Kitties die to create the adorable kitties. The die includes the pumpkin, the bottle and the broom. I added a Web to the background. I mounted them onto a pierced circle and then mounted all of that onto a scalloped circle.

For the background I added a couple of cut webs for the top corners and then I added 


Here's a look at just the box. It was made to fit 5 little mini candy treats like the kind you get in the bulk bags. The little mini milky ways is what I used.

To create the box
For the base you start with 4.25 x 8.5
To create the box you need to score it along the 4.25 side at 1.25, 2, 3.25 and 4
for the 8.5 width you need to score it at .5 and 1.25 on each end.
Then you will need to cut it on both sides where I have the "X's" 

Here's a picture of what it looks like when you cut it on both ends.
Then you apply adhesive to the .25 piece and fold up to create the body of the box.

This is what it will look like when you have glued the two long ends together.
Then all you have to do is close the ends.

Here's a look at my black box and the mats. For the mats I just cut them an 1/8 of an inch smaller than the box sides. You will cut two at 1.125" x 5.825" and the other two are .625 x 5.825

Not pictured above is the little mat for the top of both flaps. You will need to cut two at 1.1/8 x 6.25
Of course the mats can be whatever size you like depending on how thick you want the borders to be.


Here's what the flaps on both ends will look like.


After I completed the body of the box, I used the cute Jack O Lantern Witch to create the cute little pumpkin lady. I added a little gathered tool to create a sort of tutu skirt for her. I then added some legs and decorated her. I mounted her onto a pierced circle mat cut from some cute yellow diagonal plaid patterned paper and then all of that onto a purple circle pierced mat and all of that onto another scalloped circle. I did this to kind of match the look of my card.

I then added the kitty, the tiny spider and web to the top. I added glitter and white gel pen lines to give it all a little extra decorative touch,

Here is one last look at both projects

Don't forget to head over to the CottageCutz YouTube channel and check out all of the amazing projects on there. Our video team is doing a wonderful job of filling the channel with all sorts of creative content! You don't want to miss it!


Dies I Used


Web


Nested Scallop Die set


Pierced Circle Set


Here's a look at the entire release. Be sure to head over and grab them while they last!

Well that about covers it for today! Until the next time, have a wonderfully craft-die day!
Melinda Beltran