Now that all elements are cut and stamped it's time to start card assembly. I wasn't sure what pattern to use for element 1 of the sketch. I decided to go with the wonky stripes pattern.
Saturday, December 05, 2020
Safari Giraffe Birthday
Now that all elements are cut and stamped it's time to start card assembly. I wasn't sure what pattern to use for element 1 of the sketch. I decided to go with the wonky stripes pattern.
Friday, December 04, 2020
A Big Bird Birthday
Happy Friday! I'm enjoying this new release of Safari dies immensely! They are wonderful for so many occasions and are perfect for both children and adults, and for male or female. Today is the last day of the big Black Friday Blowout Sale where you can get these dies at a great discount so make sure to visit the store!
Now on to my really big bird birthday card.
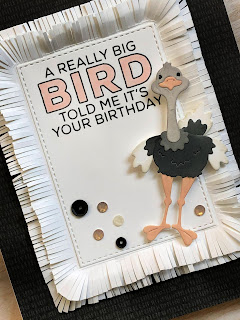
I wanted my card to have the feel of ostrich feathers so I created panels with fringe to frame the ostrich. It took a little planning but was actually quite easy and did not take much time at all.
I cut a panel from a black and charcoal grey patterned paper 4 1/4 x 5 1/2 inches to cover the front of my A2 card. I then cut a rectangle from white cardstock using the third largest of the Stitched Rectangle dies and stamped my sentiment. I also cut two rectangles 3 x 4 inches and 3 1/4 x4 1/4 inches. I placed the die cut piece in the center of each rectangle and lightly traced around the die cut piece in pencil.Using my scoring board I made score lines on my pencil marks then erased them.
I cut my fringe with paper snips, clipping to the score lines. I clipped each corner first since the the fringe there is angled and slightly wider on the outside edge. I gradually made the cut lines perpendicular to the score lines. Below is a finished one and one that I had just started.Each fringe cut is about 2mm wide. It actually went quite fast. You don't want it too even or perfect - you want it organic like feathers!
I folded the edges up and used a bamboo skewer to curl them. A pencil would also work well.
My sentiment is colored in Copic R11 and I used Distress Oxide inks and blending brushes to color the ostrich.
After gluing the black and gray panel to the card I centered each fringe panel and placed the sentiment panel in the middle. Then I popped up the ostrich with two layers of foam dots. She needed two layers to sit up over the fluffy fringe.Finally I added some black, white and pink sequins for a bit of sparkle.
Dies used:
I hope you enjoyed my card and may you have a fun and creative weekend!
Thursday, December 03, 2020
Sweet Baby
Hello Scrapping Cottage Friends
It is Pam sharing a creative design today!
Just for your info we have one more day of our amazing Black Friday Sale. And believe me you do not want to miss these fantastic prices. Today, I am using the little baby zebra from our new Safari Release. And I am really loving how versatile these dies are. Everything from birthdays to babies!
Designer Steps:
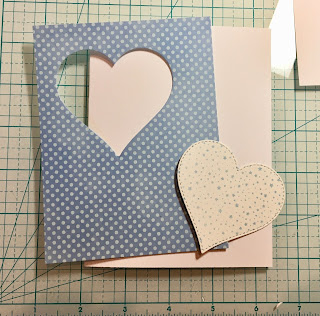
1. Use a white A2 card base and cut a piece of polka dot card stock 4 x 5 1/4. Using the Stitched Heart die second from the largest cut out a heart positioned as shown. Next using the same heart die cut out a piece of star DP.2. Stamp the star heart with the word welcome. Glue the blue polka dot paper to the A2 white card base. Then fill in the heart with the star DP heart3. Next cut out 3 sets of letters using the Stitched Alphabet die. Stack and glue the letters together with the star DP on the top
4. Using the Safari Zebra die cut out the animal using grey, white and black card stock
5. Put together the zebra with glue that has a fine tip for easy and accurate glue placement
Wednesday, December 02, 2020
Adventure Awaits
Hello! This is Sukie and today I'm sharing a fun card featuring several new dies from the new Safari die release. This die release is part of the Black Friday release which is on sale for a couple of more days!
I die cut out the Safari elephant, giraffe, zebra, hippo and lion using white card stock and shaded them with Oxide Inks. The sentiment is from the Safari Phrases die set and the leaves are from the Safari Adventure Gang die set.Monday, November 30, 2020
Party Gorilla
Hello Friends
It is Pam creating with you on the blog today!
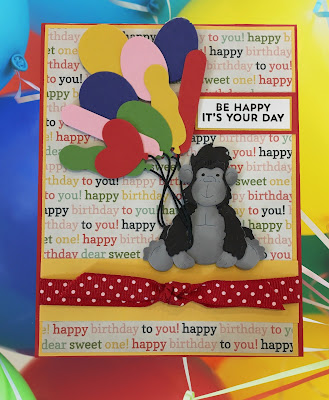
Use a red A2 card base, yellow card stock and a piece of Happy Birthday DP. Before you glue the yellow card stock with the DP to the card front I added a strip of yellow card stock for the gorilla to sit on and a red polka dot ribbon. Next cut, assemble and shade the gorilla and glue him together. Cut out all the balloons and black string then glue them into a cluster and attach to the gorilla's hand. Pop the gorilla to the card and add your sentiment


