Saturday, June 06, 2020

Plant A Garden


Hello Scrapping Cottage friends! Thanks for taking the time to stop and visit with us today. It's Mary Marsh here bringing you the Saturday edition of the Blog.

We have a brand new release of dies in the online store. This one is garden themed and has 19 new designs. These new dies are perfect for Father's Day, birthdays, thank you, or even a thinking of you card for the person who loves to garden.

For my card today, I am featuring the new Gardening Cat die and created a thinking of you card for a friend who loves to garden. I am trying to send cards that have a message of hope with all that's going on in our world. So let's get started with some details on how I created my card. 

Design Steps:
I started this card with my sketch. I had one saved on my computer that I thought would work well with this die image. It's an older one from Splitcoaststampers #696. I used this sketch a couple of years ago and created this card. I linked it just to give you an idea of how you can get a different look from a sketch just by changing up the images.
Before I chose the card colors, I cut the images from various colors of cardstock. The cat is cut from smoky slate cardstock and I used the same color ink to sponge around for depth. I lightly sponged pink on her ears and cheeks. I also used the garden plot from the Gardening Mouse die. 

Next, I looked through my designer papers and found this floral one. It caught my eye almost immediately. I liked the flowers and soft pink background. 

Sweet Sugarplum card base: 4 1/4" x 5 1/2" 
Olive layer 2 + White layer 3 of sketch:  used largest Pierced Rectangle die (4 1/4 x 3 1/4")
For the background layer instead of stenciling clouds, I decided to use a sun rays stencil and sponge the corner with wild honey distress ink. It helped to fill in the white space on the card. 

The sentiment was the next to be completed. I recently bought some garden sentiment stamps and thought this one would work well with the Gardening Cat image. I didn't intend to stamp who the quote was from, but I forgot to tape it off when I inked the stamp. Audrey Hepburn was an actress in the 50's & 60's. It's stamped in chocolate chip ink. 
Now that all the elements of the sketch are cut, stamped and sponged, I am ready for card assembly. 
I attached the images to the white panel with double sided tape.

I did take some liberties with the sketch. I moved element 4 of the sketch to the bottom of the image panel. My garden plot is covering that part of the sketch. 
I finished off my card by attaching the remaining panels to the designer paper and then the card base. Added a couple of heart enamel dots and my card is finished.  
Well that's it for me for this week. I hope I have given you an idea for a way to use this new die. See you next Saturday!

dies I used to create card:


Friday, June 05, 2020

I Dig You

Happy Friday!  It's Jeanne today with a card featuring the adorable tomte from the new Gardening release.  I learned a few things this week. To me the new tomtes look a lot like gnomes. So I wondered - what is the difference? I found that Tomte is a Swedish word for a sprite that is pretty much the same as a gnome.  In Norwegian he would be called a nisse.  Very interesting!
Now, on to my card.

As I often do, I started by choosing my colors which I got from the patterned paper I decided to use.  This paper is one of my favorites and features a combination of coral, light grey and light blue/green.
I cut the pieces from Calypso Coral, Pool Party and Smoky Slate cardstock along with white.  The tomte and accessories use the Flower Power Tomte die and I used the Hat Box w/Flowers die for the foliage.
I edged the beard and mustache in just a bit of Distress Oxide Pumice Stone.  I used Distress Oxide inks in Antique Linen, Tea Dye, Tattered Rose, and Vintage Photo to color his face, shoes and shovel handle.
I cut a panel 4 1/4 x 5 1/2 inches from the grey/white floral.  Using the largest of the wide stitched circle frames I cut three from Calypso Coral cardstock and one from the zig zag patterned paper.  The third largest of the Stitched Circles fits perfectly inside the frame and I used that as I like the sticthing around the edges.  You could also just use the negative from the frame.

The sentiment is heat embossed in white on a half inch strip.
To give some height to the frame I used three corals frame underneath  the patterned one.  I glued that to the panel and then inset the white circle.
I added my tomte, bird and flower to the circle.  I trimmed the strip and glued it directly to the card, adding the foliage.  The whole panel is adhered to an A2 card base.

Dies:
http://www.scrappingcottage.com/
http://www.scrappingcottage.com/cottagecutzhatboxwflowers.aspx
http://www.scrappingcottage.com/cottagecutzstitchedwidecircleframesetbasics.aspx
http://www.scrappingcottage.com/cottagecutzstitchedcirclesetbasics.aspx

I hope you enjoyed my post today and that you have a fun and creative weekend!

Thursday, June 04, 2020

Tulips!

Hello Scrapping Cottage Friends,

It is Pam designing with you on the blog today!

I love tulips!  They are usually one of the first flowers to pop up in the spring! Signaling that the cold winter months are coming to an end.  My favorite tulips are yellow but the red come in a close second!


Background Photo by Wynand van Poortvliet on Unsplash

Design Steps:
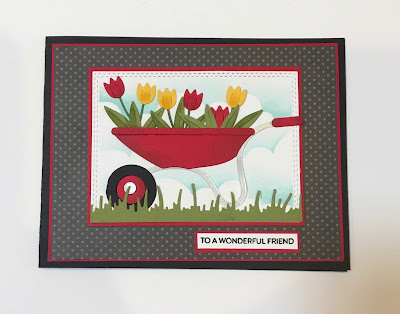
1.  I used a black A2 card base, red card stock 4 x 5 1/4, and polka dot DP  3 3/4 x 5.  Glue the red card stock to the polka dot DP and set aside 

2.  Next cut out a piece of green card stock using the Spring Grass die.  Cut out a white rectangle using the Double Stitched Rectangle die 3rd from the largest.  Use a cloud stencil and blue ink to create the background.  Glue the cloud stitched rectangle onto a red rectangle layer

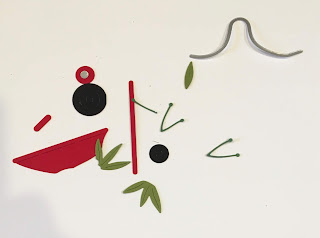
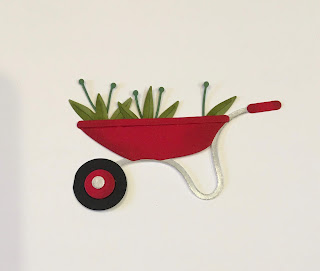
 3.  Using the Garden Wheelbarrow die cut out the pieces in red, black, silver, dark and light green, red and yellow

4.  Shade the pieces and then assemble them using a fine tip glue
5.  Next pop the cloud panel onto the polka dot DP add the grass then the wheelbarrow.  Then carefully arrange the tulips and glue them into the wheelbarrow.  Add the sentiment and glue to the black card base and your card is complete
 CottageCutz Products


Thanks so much for stopping by today.  I appreciate it so much.

Blessings and See You Soon!
Pam

Wednesday, June 03, 2020

Happy Happy Days

Hello!  This is Sukie and today I'm sharing this cheerful card for my design team post. I used a couple of fun dies from the Gardening release.
I selected the Garden Wheelbarrow for the focal point of my card and opted to use the accessories from the Gardening Cat die set.  The grass is from the Spring Grass die set. I went with a rustic theme for all of my die cuts, inking the edges with some Vintage Photo Distress Ink.
I created my own background with a brick themed stencil and some Oxide Ink.  Then I used more Vintage Photo Distress Ink around the edges of my card panel.  I fussy cut a couple pieces of kraft card stock to replicate shelves.
The sentiment was stamped on a piece of card stock and embellished with an extra die cut flower.  I also inked the sentiment tag on the edges.
To create my gardening scene, I placed the strip of grass along the bottom edge of my card base and added the wheelbarrow.  The 2 shelves were floated at the top half of my card.
Each of the shelves were accessorized with the watering can, rain boots, apron and basket of flowers.
The shovel was tucked into the grass.  The sentiment tag was the final finishing accent on my card.
Here are the dies used on my card, available in the store:

Tuesday, June 02, 2020

Garden Cat with a Wagon

Hi Janja here. Welcome to the blog.
Today I would like to share with you a card made with another cute die from the gardening release.


- CottageCutz dies: Garden Cat w/ Wagon, Holiday Gate With Wreath
- blank card: 5 5/16" x 5 5/16" (13,5 x 13,5 cm), folded
- white cardstock: 4 3/4" x 4 3/4" (12 x 12 cm)
- different colors of cardstock
- different colors of ink pads
- enamel dots
- glue, double-sided adhesive tape, self-adhesive foam pads

Start by die-cutting all the pieces for the main image out from different colors of cardstock. Shade all cutouts with ink pads.


Stamp the wood on beige cardstock with coffee-colored ink. Then cut out the gate twice. Use scissors to cut one in half. Assemble the fence.


Trim white cardstock. Use a large brush and blue ink to shade the background.


Paste the main image on the prepared background as shown. 


On the back, add self-adhesive foam over the entire surface and attach to the front of the card.


Lastly add shade under the wagon and shoes. Use a light grey ink pad.


Thank you for stopping by. 
Janja


Monday, June 01, 2020

Father's Day Potting Shed


Hello Scrapping Cottage friends! Thanks for taking the time to stop and visit with us today. It's Mary Marsh here bringing you the Monday edition of the Blog. 

For my card today, I am featuring the new Potting Shed die. I created a Father's Day card for my hubby. He is an avid gardener and has a potting shed, so I thought this image would be perfect for him.

I hosted the color challenge #793 on Splitcoaststampers, and the colors I chose worked great for the potting shed image. For this challenge you can use neutrals and that includes dark green, so that was in my favor as well. 
blueberry bushel, balmy blue, lovely lipstick
I cut the potting shed in the challenge colors plus neutral shades of brown, gray and green. I sponged the flower pot and the watering can with the same color ink as the cardstock to get a deeper shade of blue. Used a cloud stencil for the clouds and lightly sponged the dark green ink for the grass.

I used the stitched sun, clouds & umbrella die for my cloud and stamped the sentiment in blueberry ink. Finished off this card with a few epoxy hearts. That's it for me for this post. See you again on Saturday!
   
dies I used to create card: