Friday, March 13, 2020

May All Your Chocolate Bunnies be Solid

Happy Friday!  It's Jeanne today with a quick and easy Easter card for you.  This one uses the Bunny Backsides dies to make chocolate bunnies - the star of the show in many Easter baskets!
To start, I cut the bunnies from Chocolate Chip cardstock.
I then cut a panel from patterned paper 5.5 x 4.25 inches, a strip of green cardstock 5.5 x 2.5 inches, and a strip of white cardstock 5.5 x 2.25 inches.
To place my sentiment, I placed the bunnies and adjusted where I wanted the sentiment to go.
After stamping the sentiment, I glued the two strips together, added a narrow ribbon...
and attached it to the patterned panel.
When gluing down the three bunnies, I started with the middle one.  When placing groups of three, if you start with the middle one it is much easier to place the other two.  If you happen to be a bit off you can adjust, but if you start at one end it is more difficult to adjust placement if you happen to miss a little.
These chocolate bunnies are just the sweetest and this card is super simple to make!  I hope you will check out the new Spring dies on the website - there is something for everyone!

Die used:
This die is out of stock, but be sure to visit the online store where the current release is on sale for a limited time.

Thanks for stopping by.  I hope you have a fun and creative weekend!

Thursday, March 12, 2020

Froggie Fun!

Hello Everyone!

Just wanted you to know we have great savings in our store on the overstock and retired dies! Along with these savings we have our new release on sale for 25% off!

Today,  I am using the new release dies for a whimsical and cute birthday card.  Check out this adorable die in our store.


Design Steps:

 1.  Cut out all of the pieces using the Spring Frogs die and assorted colored card stock

2.  Shade all of the pieces using matching inks then assemble
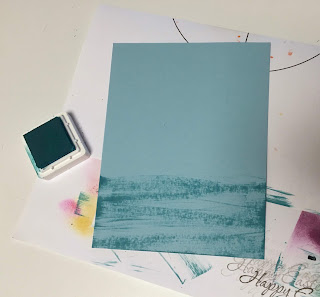
 3.  Cut a piece of light blue card stock 4 x 5 1/4 then use a small teal ink pad to create the water.  I just went direct to paper with the small ink pad
4.  Use an A2 white card base, cut a brown frame using the Wide Rectangle Frame die
 5.  Use dimension tape to attach the frame to the blue card stock
 6.  Glue down the cattails and then pop up the frog
7.  Glue down the dragonfly and pop up the sun and clouds and then attach the blue card panel to the white card base.  Stamp the clouds with Happy Birthday
8.  Next open up the card and use the teal ink pad direct to card stock method and create the water.  Add your frog, lily pad, flower and bug.  Then stamp the sentiment
CottageCutz Products


Thanks so much for stopping by!  I hope you are able to take some time to play in your craft room!
Blessings
Pam

Wednesday, March 11, 2020

Celebrate

Hello!  This is Sukie and I have a fun card to share for my design team post.  The Spring die release has so many wonderful dies that can be used in a variety of ways.
I cut out the pieces from the Rooster & Chick die set and shaded the pieces with some Oxide Inks. The Cross-Stitched Squares were cut out with different pieces of card stock to coordinate with the rooster. The Celebrate sentiment was cut out of some patterned card stock.
I created a simple background with some bright and cheery papers from my stash and layered it with a couple of overlapping squares.
Next, I added the solid square toward the bottom of my card and adhered the sentiment on the other square for a contrasting look.
The sun was layered above the rooster and on top of the larger square.  The sun broke up the bold pattern a bit.
The sweet chick gazing at the rooster was the final finishing accent on my card.
Here are the dies used on my card, available in the store:

Tuesday, March 10, 2020

Spring Frogs

Hi, Janja here with you.
Spring frogs are so incredibly cute that I just couldn't resist them.


- CottageCutz die: Spring frogs
- blank card: 4 1/4 x 5 1/2" (10,8 x 14 cm), folded
- green cardstock in different shades
- colored ink pads
- colored markers
- glue, double-sided adhesive tape, self-adhesive foam pads

First I applied blue ink on a white cardstock. Then I splashed water on it.


While the background was drying, I cut out all the pieces for my card.
I shaded the edges with ink pads and markers. I applied clear glitter to a dragonfly.


Then I attached the prepared background to the front of the card with double-sided adhesive tape. I glued the remaining pieces with glue and foam pads.


Have a nice day.
Janja

Sunday, March 08, 2020

He Has Risen

Hi!

It's Anja here. Today I have a simple Easter card for you.


For this card I used:
- Cottage Cutz die (Calla Lily Cross),
- Distress Inks,
- white card base (15x10,5 cm),
- water color paper (14x9,5 cm),
- green card stock (14,2x9,7 cm),
- white card stock for die cuts,
- brush,
- washi tape,
- water spritzer,
- heat gun,
- Glossy Accents,
- printer,
- paper trimmer,
- paper glue.

First I did the background. I spritzed water over the paper and added color with the brush. Then I dried the paper.


Next I spritzed drops of color over the paper. Again I dried it with the heat gun.


Next I trimmed the paper for the background.


Then I cut four crosses. One from green cardstock, two from heavier cardstock (300 g) and one from the same paper as the card base.


I glued white crosses on top of each other. I glued the green cross a few millimeters over.


Next I printed and trimmed the sentiment.


When I had all the pieces cut and colored I glued it on paper. I added a few drops of Glossy Accents for more interest.


And my card was done.


Have a nice Sunday. See you again next week.

Anja Z.


Cottage Cutz die I used: