Thursday, September 19, 2019

Polar Bear Christmas!

Hello Scrapping Cottage Friends!

It is here! The adorable new Christmas release is available in the store today!  And to make it even better there is a 25% off discount!  Go and check out all of the fantastic new designs.

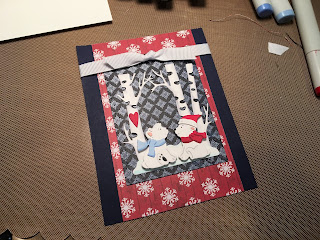
I am using one of the new dies for my card today! The die is Polar Bears w/Birch Trees.

Design Steps:

 1.  Using the Polar Bear w/Birch Trees die cut out all of the pieces in white card stock
 2.  Use your favorite markers to color the pieces and assemble them
 3.  Using the Wacky Stitched Rectangle second from the largest cut out a piece of navy DP
 4.  Assemble the snow and birch trees onto the DP.  Use pop dots and attach the bears

5.  Use an A2 white card base, cut a piece of navy card stock slightly smaller then the card base, cut a piece of red snowflake DP 5 1/4 x 3 1/4 (I have the red DP on the wrong side Hee Hee) Also cut a piece of white ribbon
 6.  Place the red snowflake paper in the center add the navy panel with the bears and finally add your ribbon

CottageCutz Dies


Here is a peek at all of the wonderful Christmas Dies!

Don't miss the 25% off sale for all of these wonderful Christmas Dies!
Blessings
Pam


Wednesday, September 18, 2019

A Christmas Wish Just for You!

Hello!  This is Sukie and today I'm sharing a project created with the new Christmas dies.  There are 25 new dies in this collection and they are perfect for those Christmas creations and they are all on sale right now!
I went with a traditional color palette for my card pulling the colors from the beautiful patterned paper.
The die cuts are from the Christmas Car & Trailer set.  I mixed in some additional patterned papers from my stash for the details on the car & trailer.  I also cut the oval for the background in white card stock from the Double Stitched Oval set.
As I was thinking of my card design, I found a fun sentiment in my stash from the Scrappy Moms (retired) Merry Kissmas stamp set.  I also cut out a frame for my sentiment using the coordinating card stock.  The white oval was given a splash of color with some Oxide Inks.
I pulled my card base together and layered it with the oval which would eventually frame the scene on my card.  The shaded oval helped to mute the fun and vibrant colors of my card.
The trees were placed to the right of the oval frame.  The layering of the trees created a bit of dimension behind the car & trailer.
The sentiment fit perfectly above the Christmas scene which was the final accent on this festive card.
Here are the dies used on my card, available in the shop:

Sunday, September 15, 2019

U Rock!

Hi!

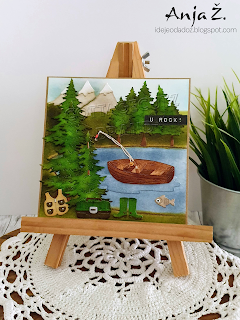
It's Anja here. I have fishing card for you today. I played with different dies to create this idyllic scene.


For this card I used:
- Cottage Cutz dies (Fishing Pole & Boat, Fishing Gear, Snowcapped Mountains, Snowy Tree, Rustic Sign & Trees, Woodland Cabin),
- Distress Inks,
- craft card stock (15x15 cm),
- white card stock for die cuts and background (14,5x14,5 cm),
- silver pigment ink,
- black pigment ink,
-  colored pencils (blue, light brown, dark brown),
-  sentiment stamp,
- scissors,
- paper glue.

First I cut and colored the boat and the fishing pole.


Next the fishing gear.


Then I cut and colored all the trees and the mountains.


And after that I started on the background. I sketched around the arranged die cuts and then colored the lake and the ground around. I used colored pencils to emphasize the edge of the lake.


Last I stamped the sentiment and cut it with the scissors.


And my card was done.


And that is all from me for today. I also invite you to The Scrapping Cottage online store to check out the new Christmas release.

Have a nice Sunday and see you again next week.

Anja Z.


Cottage Cutz dies I used for this card:


Saturday, September 14, 2019

Snowballs 4 Sale (new Christmas die)

Hello Scrapping Cottage friends! Thanks for taking the time to stop and visit with us today. It's Mary Marsh here bringing you the Saturday edition of the Blog. 

We have the new release of 25 Christmas dies in the online store and they are currently on a promo special for 25% off. It's already mid-September and time to start thinking about Christmas cards.

This release has something for everyone. So if you prefer a more religious tone to your cards- we have you covered. If you like a more whimsical design featuring Santa, reindeer, snowmen, penguins or penguins, you will find some really cute dies.

I actually do a combo of religious and whimsical for my Christmas cards. Today, for your viewing pleasure, I am going whimsical with the new Snowman w/Snowballs die. So let's get started with some details on how I created my card.

I started off with my layout this week. This sketch caught my eye. She even gives you the sizes for all the panels which is a plus.

For my card base, layering panels and designer paper I chose balmy blue cardstock. The designer paper reminded me of a snowfall.
Card Base: 5 1/2" x 4 1/4"
Designer Paper: 5 3/8" x 4 1/8"
Other Panels: per sketch-added 1/8" for blue layers


I cut the snowman in red and green. He is a Christmas snowman after all (lol)! I used kraft cardstock on the for sale signs. Did you notice the cute little bluebird?
Decided to use a snow embossing folder for my 2 image panels. It keeps with the snow theme and adds background texture. 
The card elements are done and I am ready to start assembly. I attached the layers with double sided tape. 
My snowman and his for sale signs are attached with dimensional adhesive. I wanted them lifted off the background panels to give some depth. 
To finish off my card, I scattered a few balmy blue sequins. Well that's it for me for this week. I hope I have given you an idea on a way to use this fun new Christmas die.


die I used to create card:


Friday, September 13, 2019

No Tricks, Just Treats

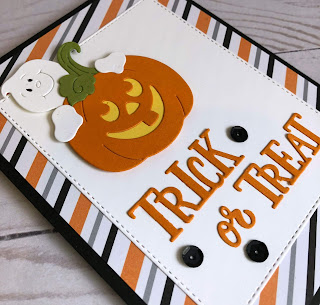
Happy Friday everyone!  It's Jeanne today with a quick, clean and simple card for Halloween.  I love Halloween; not the ghoulish things but all the cute Halloween things - the black kitties, jack-o-lanterns, cute ghosts, trick or treaters, etc.  This card features just such a cute ghost and jack-o-lantern.
I started by making an A2 card base from black cardstock.  I then cut a panel 4 x 5.25 inches from Halloween designer paper.  I used the largest of the stitched rectangle dies to cut a panel from white cardstock.
I used scraps of Pumpkin Pie, Daffodil Delight, Old Olive and white to cut the pieces from the Happy Ghost and Halloween Phrase and More die.
I glued my image together on my silicone mat.  Using the mat allows me to glue all the pieces together without fear of them sticking to whatever is underneath.  The eyes are colored with a fine tip multi-liner pen.
Next, I glued all my panels together and laid the ghost and pumpkin on the white panel so I could get the right placement for the words.  To make sure the words are straight I will use a ruler and my grid paper.  My ruler has a cork backing and does not slip so I can place it straight across my card and use it as a guide for the word.

Finally I popped the ghost off the card with foam dots.
I still felt it needed something so I added a few matte black sequins.

Dies used:
http://www.scrappingcottage.com/cottagecutzhappyghost.aspx

http://www.scrappingcottage.com/cottagecutzhalloweenphraseandmore.aspx

http://www.scrappingcottage.com/cottagecutzstitchedrectanglesetbasics.aspx

Thanks for stopping by today.  There is a new Christmas release in the online store.  Check back with us to see some wonderful cards using these great new dies!

I hope you have a fun and creative weekend!