Tuesday, December 18, 2018

Cards with pets

Hi, Janja is here.
Christmas is almost here and we all probably ended up with our Christmas cards.
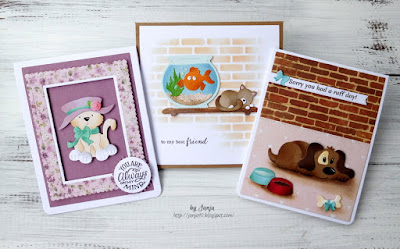
Today, I prepared three cards with some new dies from Pets release.
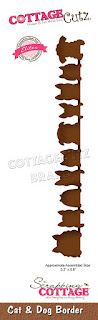

- white card base: 4.25 x 5.35" (10,7 x 13,9 cm), folded
- kraft card base: 5.3 x 5.3" (13,5 x 13,5 cm), folded
- colored card stock
- different ink pads
- plastic stencil: brick wall
- double-sided sticky tape, double-sided foam tape, foam pads, glue
- glossy accents


Start this card by cutting a fish, bowl and cat. 
I used colored card stock. For greater depth, I used different ink pads. On the picture is missing a shelf that I cut out later.


Use a plastic stencil brick wall for the background.
Cut the background to size 5 x 5" (12,7 x 12,7 cm). Paste it with a double-sided sticky tape to the card base. Stamp a sentiment. 
Attach the fish bowl and cat to the shelf with foam pads. 
Use glossy accents for air bubbles.


-------------------

Cut out all the pieces with the die - Rufus The Hound. I used the die - Fireplace with Accessories for small bows.


Cut two patterned papers of this size: 4 x 5.2" (10 x 13,2 cm) and 4 x 2.9" (10 x 7,3 cm). I printed the sentiment in Word. 


For the final touch, draw a shadow around the dog with a brush. Apply a glossy accents to the water in a bowl.


------------------------

Cut out and assemble Miss Kitty. 


Prepare background and two frames. Cut out two circles and stamp a sentiment. Attach frame and Miss Kitty to card base as shown using double-sided foam tape. 
Finally, add a little pearl to the flower.


Have a nice day.


Monday, December 17, 2018

Ruff Day?

Hi, Lois here with a non-holiday card today.  Christmas time is very hectic, and people can get overwhelmed with all the preparations -- shopping, wrapping, food preparation, etc., etc., etc.  My card today is one you could give to a friend who needs a little smile to help with all the madness of the season.  There's plenty of room on the inside of this center-step card to write some encouraging words.


I started my card by constructing the card base, cutting the papers as follows:

White - 5 1/2" x 11"
Black - (2) pieces 3/4" x 4 1/4", (1) piece 3 1/4" x 4 3/8"
Patterned paper - (2) pieces 5/8" x 4 1/8"


I cut a slit at the 1" mark on either side of the card from the 1" mark to the 6 1/2" mark.  Scored from the side of the card in to the slit line at the 1" mark, the 2" mark, and the 6 1/2" mark.  Scored between the slits at the 5 1/2" mark.  To see more detailed instructions for this type of card, see the tutorial on Splitcoaststampers here.

I layered the patterned paper strips onto the black strips and applied to each side, and then adhered the larger black panel to the center section.


Next I cut the die pieces from white, black and green scraps.  Notice that the Spring Grass die was not fully cut out.  By placing the cutting plate above the lower cut line on the die I was able to enlarge the grass section, rather than cutting it out totally.


Using the packaging as a guide, I then colored and constructed that cute dachshund.


I cut another piece of white cardstock 3 1/8" x 4 1/4".  The background sky was created by sponging Ranger Tumbled Glass ink against a cloud stencil.  I went all the way to the bottom because I would be covering the lower section of the panel with the die-cut grass and wanted to make sure the sky was colored low enough on the background.


I then stamped the sentiment at the top and added the die-cut pieces to the panel, popping up the dog with foam pop-dots and adding the pet border across the bottom.


I hope the holidays haven't worn you down; but, if they have, perhaps this card will lift your spirits.

CottageCutz dies used on my card are:

http://www.scrappingcottage.com/cottagecutzdapperdachshund.aspx

http://www.scrappingcottage.com/cottagecutzcatanddogborderelites.aspx

http://www.scrappingcottage.com/cottagecutzspringgrasselites.aspx


Sunday, December 16, 2018

Staring into the Night

Hi!

It's Anja here. Today I have two cards for you. When I saw both dies it only seemed logical to combined it with a landscape background. And with adding different sentiments we could make cards for different occasions.


For two cards I used:
- Cottage Cutz dies (Santa & Reindeer Resting, Loyal Pets),
- Distress Inks (Vintage Photo, Brushed Corduroy, Barn Door, Aged Mahogany, Black Soot, Peeled Paint. Twisted Citron, Stormy Sky, Pumice Stone, Seedless Preserves, Faded Jeans, Chipped Sapphire),
- 2x white card bases (13x13 cm),
- white card stock for die cuts and background,
- watercolor paper for background (12x12 cm),
- dark blue card stock for background (12,3x12,3 cm),
- water spritzer,
- white acrylic paint,
- brush,
- heat gun,
- paper glue.

I started with cutting and coloring the images. First Santa and Reindeer.


And then the dog and the cat.


Next I made the background. I used different shades of Distress Inks and blended it together. I used watercolor paper for background.


Then I spritzed the paper with water and dried it. And next I used white acrylic paint to made the snow. Again I dried it and made one more.


I used white card bases. And I cut two more dark blue background papers.


For the snow I used white paper and cut it with the scissors. I just cut the paper as it would look like the ground where the images sit. I used grey Distress Ink for the edges.


And then I just arranged and glued everything together and two card were made.


And that's all I have for you today. I just want to invite you to the The Scrapping Cottage online store to check out the sales.

Have a nice Sunday.
Anja Z.


Cottage Cutz dies I used:

Saturday, December 15, 2018

Angel Nativity Tree

Hello Scrapping Cottage friends! Thanks for taking the time to stop and visit with us today. It's Mary Marsh here bringing you the Saturday edition of the Blog. 

Well now it's only 10 days until Christmas. Yikes, so much to do and I am still making Christmas cards. This is possibly the last one and then it's onto wrapping Christmas presents. 
And speaking of presents, there is an Almost Christmas - 3 day sale going on right now. It's a great way to save on some really great dies. The savings are up to 50% on some dies. So check out the online store here

Now let's move onto my card for this week. I used the Angel Nativity Tree die to create my card. So let's get started on some details.

Step 1: I have been wanting to use this designer paper that has the words of different Christmas carols in German, French and English. But, I don't usually create black & white cards for Christmas. Then I got the idea of using silver as an accent color, and it was a go for me. 

Silver card base: 4 1/4" x 5 1/2"
Black layering panel: 4 1/8" x 5 3/8"
Designer paper panel: 3 7/8" x 5 1/8"
Step 2:  I cut the Angel Nativity Tree from silver cardstock.
Wanted to layer this on white cardstock but if I added a black layer panel it would cover up to much of the words on the designer paper. I needed a white image panel at least 2 1/2" wide to accommodate the nativity tree.
And, I also wanted to stamp my sentiment on the image panel so that had to be at least 4 1/2" long. So I decided to use black ink and sponge a border around my image panel. I cut a mask 2 3/8" x 4 3/8" and used repositionable tape to secure the mask.
I sponged around the border with the mask in place.
When I had the depth of color that I wanted I removed my mask and I had my black layer.
I stamped my silent night sentiment in black ink with the help of my Misti.
Step 3: Now that all the card elements are complete, I am ready to start the card assembly. I attached the designer paper to the black layering panel with double sided tape. The image panel was added also using double sided tape.
Attached the Angle Nativity Tree using dimensional adhesive. I wanted it lifted somewhat off the white panel. I also sponged a bit of yellow distress ink around the manger.
To complete my card I attached these layers to the silver card base with double sided tape. Scattered a few sequins just for interest.
Well that completes my card for this week. If you have this die, I hope I have given you and idea for using it. See you next Saturday.

die I used to create card: