Friday, November 17, 2017

Gingerbread Spice

Hi Cottage Cutz fans!  It's Jeanne today with a sweet card.  I decided to use pink and pastel green instead of traditional Christmas colors so this could be a thinking of you card, birthday card, or in more traditional colors a Christmas card.
I've collected gingerbread men for years so there are several of this year's Christmas release that I think are really special!  This card uses two of them.
To begin, I cut a piece of background patterned paper to 4 1/4 x 5 1/2 inch to fit on my A2 card base.  I die cut a white panel using the largest of the Nested Stitched Eyelet Rectangle dies.  Then I cut a 1/2 x 5 1/2 inch strip of white card stock and laid down a piece of washi tape.  I used the white base because otherwise the washi tape got lost on the dots of the patterned paper.
I die cut the main pieces of the image from a few colors of card stock and the smaller pieces from white.
I used Copic markers to color in the small bow, whisk and tip on the pastry bag.  And I sponged the edges of the girl, her dress and pocket, and the bowl with their corresponding colors of ink (Baked Brown Sugar, Pistachio Pudding and Mint Macaron - the names of the ink and the subject matter is making me hungry as I write this!)
I used a stamp from the Sweet Gingerbread stamp and die set for the sentiment. It is stamped in Baked Brown Sugar.
I adhered the panel to the card front at a slight angle using foam tape.
My final step was to glue the gingerbread girl down and add the bowl and pastry bag.  To give them some dimension I used foam dots underneath them.

http://www.scrappingcottage.com/cottagecutzgingerbreadbakingset.aspx

http://www.scrappingcottage.com/cottagecutzsweetgingerbreadstampanddie.aspx

http://www.scrappingcottage.com/cottagecutznestedstitchedeyeletrectangleset.aspx


Thanks for stopping by today and have a creative weekend!


Thursday, November 16, 2017

Nativity Blessings

Good Morning Scrapping Cottage Friends!

It is Pam on the blog today!  I just love the nativity scene that Cottage Cutz has created.  It is so beautifully detailed and everything looks so precious!


 Designer Steps:

 1.  Cut an A2 Kraft card base, cut a piece of wood grain DP 4 x 5 1/4. Cut a piece of navy dotted paper 4 x 5 1/4 and back it with foam. Use the Pierced Rectangle die to cut through the paper and foam to create the window
 2.  Glue down the wood grain paper then the frame on top of the wood grain
 3.  Cut out all of the pieces using the Cottage Cutz Nativity - Joseph & Animals and Mary, Angel and Baby.  I cut all the pieces out of white
 4.  Color all of the pieces with Copic Markers
5.  After the pieces are colored assemble them on the card as shown.  Cut the word blessings with the Cottage Cutz Expressions Blessings die out of kraft card stock and glue to the top of the card

Cottage Cutz Products


I hope you love this set as much as I do! It is the true meaning of Christmas!

Blessings
Pam


Wednesday, November 15, 2017

Mixed Media Tags

Hello everyone! It's Janet here for my Wednesday post. I'm so happy to show you what I've been up to lately. Christmas is going to be here soon and I am working on Christmas cards and tags at a feverish pace. Did you know there are only 5 Mondays left before Christmas! Yikes! There's a lot to do!


Lately I have been so inspired by card makers who are using mixed-media elements in their projects. Although an entire card was overwhelming, I felt I could tackle some tags using the new Christmas Tags die cut set. Somehow it's not as daunting when you are working on a smaller canvas.


I experimented with a number of different mediums on these tags and they turned out rather glamorous and diva-like. Some of the products I used were Distress Oxide inks, glimmer sprays, water, sequins, gold paste, perlen pens, gems, brads and Christmas mini-ornaments. I also used all kinds of ribbons from the traditional to furry and a few things in between! Most of these items were already in my stash, I just had to pull them out and put them to use!


This set also has a lot of little shapes you can use on these tags and they're sized just right for them. Instead of using the pieces, I used the negative space in the die cut as a template for the gold paste. Now I'm thinking about all the other applications for using negative space as templates for paste, spray or inks. It was a little tricky but it's the first time I've used a paste and ultimately I was pleased with the results. I definitely learned a few things by doing this project and I am warming up to the mixed-media style. I'm going to try something a little larger now that I have a little experience under my belt.


I invite you to watch my tutorial on these tags and learn along with me. I hope you'll be inspired to try something out of your comfort zone. It's satisfying to stretch your wings a little and try something new! These tags were the perfect size and scope for experimentation. Love it!


Enjoy the rest of your week!

Hugs,
Janet

Products used for this project:


Monday, November 13, 2017

Happy Holidays

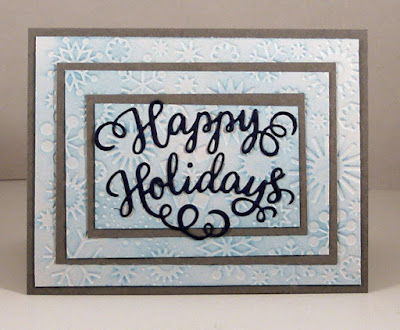
Hi, Scrapping Cottage fans!  Lois here with a new-to-me technique.   I saw  a tutorial for a variation on the Triple Stamping Technique last week and wanted to give it a try.  I'm not sure what it's called, but it was rather interesting.  For lack of another name, I'll call it Triple Embossing.  (My apologies to whomever developed this technique for using what might not be the correct nomenclature.)  Here's my card:


To start my card, I cut several layers of cardstock:

Gray - 5 1/2" x 8 1/2" (scored at 4 1/4"), 3 1/4" x 4 1/2", 2 1/4" x 3 1/2"
White - 4" x 5 1/4", 3" x 4 1/4", 2" x 3 1/4"

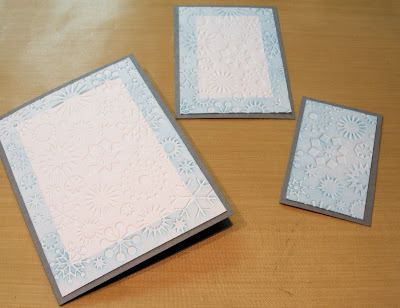
Using repositionable tape, layer the white pieces of cardstock, centering each piece on top of the next larger one.  This stack of cardstock will be placed in an embossing folder.


I ran the embossing folder though my Cuttlebug, being careful not to move the various pieces.


I removed the embossed pieces of cardstock from the embossing folder; and, while the pieces were still adhered to each other, I lightly sponged ink across the top of them.   This brought out the pattern of the embossing quite nicely.


I then separated the panels and adhered them to the coordinating pieces of gray cardstock.


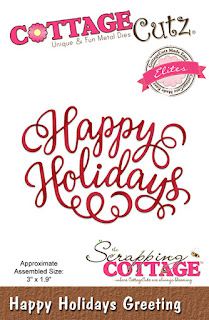
I didn't want to take away from the embossed/inked pattern on the panels, so I decided to add just a sentiment.  I cut the sentiment "Happy Holidays" from one of the new Christmas CottageCutz dies, Happy Holidays Greeting.


I layered the panels together (lining up the embossed areas), glued the die cuts to the center of my card, and I was finished.  You can see how the various snowflakes transverse the panels.  One of them (the large one on the far right) actually is on all three panels.


I really like the result achieved on my card and will definitely use this technique again.    The CottageCutz die used on this card is:

http://www.scrappingcottage.com/cottagecutzhappyholidaysgreetingelites.aspx


Sunday, November 12, 2017

Snowglobe tags


Hi!

It's Anja here with my latest project. This time I used Snowglobe die and made a bunch of small gift tags. Holidays will be here soon and I will have to get my gifts wrapped. A small handmade tag can give a nice touch.


For this project I used:
- Cottage Cutz dies and stamp (Snowglobe w/Fawn, Snowglobe Friends, Snow Friends),
- Distress Oxides (Broken China, Faded Jeans, Fired Brick),
- Distress Inks (Fired Brick, Pine Needles, Black Soot, Peeled Paint, Forest Moss, Faded Jeans, Chipped Sapphire, Pumice Stone, Seedless Preserves, Weathered Wood, Stormy Sky),
- white card stock for die cuts,
- gold pigment ink,
- black, yellow, brown pen,
- watercolor pencils,
- water brush,
- watercolor paper for stamping,
- Onyx Black Versafine ink,
- gold and red ribbon,
- hole punch,
- stamping platform,
- washi tape,
- paper glue.

First I stamped all the images on watercolor paper. I colored it with my watercolor pencils and water brush. Then I die cut every piece with coordinating dies.


When I had all the stamped images I die cut the snowglobes and colored them with Distress Oxides. I made holes on top for the ribbon.


It thought it would be fun to use snowglobe die for some round tags. I die cut all the pieces and colored them with Distress Inks. I also made holes on top.


Then I just glued all the pieces to my tags and put ribbon through it.


Have fun!

Anja Z.

Cottage Cutz dies I used: