Wednesday, November 18, 2015

CottageCutz Focus Week - Holiday Treat Holder

Hello and welcome to our Holiday Treat Holder Focus Week. 
Vladka here today!

I decided to create something for Thanksgiving and came up with picnic basket. I created template by myself and after the base was cut out, I cut out also a looooot of stripes and weaved them together to get the look of real weave basket. I did this separate, not directly on my basket. I glued weaves parts afterwards and cut away the excess. I did the same with basket cover, which can be open on each side or removed completely to easily get the treats. After basket was finished, I distressed all sides with brown distress inks. And of course I used a lot of different dies from On the Farm release and all of them are listed at the end of this post. So, if you are interested, just click on the picture and this will get you directly to the die in Scrapping Cottage store.

And this is not all my friends. Also this time we will be giving away a gift certificate for $15.00 to shop at the Scrapping Cottage Store. All you have to do is, to comment on each post for that week here in CottageCutz blog (between 18th and 25th of November) and one lucky winner will be announced on November 28th

So, good luck!

Card Supplies I used:
CottageCutz dies: they are listed below
Card stock: light brown
Distress Ink: Walnut Stain and Vintage Photo to distress the edges
Other: scissors, paper trimmer, scor-buddy, glue tape


Be sure to leave a comment now through the 25th for a chance to WIN a Gift Certificate to the Scrapping Cottage Store! We always enjoy reading your wonderful and sweet comments! Thank you all!!

Tuesday, November 17, 2015

CottageCutz Focus Week


Holiday Treat Holders!

Hello everyone and Happy Tuesday to all! Tomorrow we will start our 1st day of Focus Week. This month's is "Holiday Treat Holders" FOCUS WEEK!
 
We will be focusing on Treat holders made for the holidays from November 18th- November 25th, so be sure to join us and leave a comment, as we will be picking 1 commenter to win the Gift Certificate below for $15.00 to shop at the Scrapping Cottage Store!
The Design Team will have super SWEET Inspiration to share with you all, and you wont want to miss it! Starts tonight after midnight!
 
We will announce the winner on December 1st!
Hugs to all,
CottageCutz Design Team!


Sunday, November 15, 2015

CottageCutz Turkey Altered Candle

Hello crafters and welcome to another Thanksgiving project share from the "On the Farm" Collection from CottageCutz.  Today I am excited to show you this altered candle from the dollar store.  I have been wanting to do something with one of these fun candles for some time.  You can just about see the glow in this picture.  It's a color changing candle with a flicker light on the top.  Imagine how pretty this will be on your Thanksgiving table.  It was fast, fun, and easy to create.
The Turkey die from CottageCutz is mounted directly on the candle.  To color the Turkey, Brushed Corduroy and Barn Door distress inks were used.   The Sunflowers is another pretty CottageCutz die that were cut on yellow cardstock and lightly inked with Brushed Corduroy as well and glitter with Diamond stickles.  The bottom is a scalloped Spellbinders die with a circle of Thanksgiving designer paper mounted on top.  The same paper was cut 1/4 inch and glued to the top of the candle.
Here it's shown on top of a candlestick-which is also a great look to give it some height on the table.  Thanks so much for stopping by today.  I appreciate your visit.  Until next time,  Happy Crafting.  Here are the dies used:


Don't forget the Blog Hop going on.  You will have until Wednesday November 18th, 2015 at 12:00 midnight Eastern time to Join us :) 
We will announce the winners on Saturday November 21st, 2015.
Have fun and Good Luck to All!!!

Friday, November 13, 2015

CottageCutz Fall Hop!

Hello everyone and Welcome to the
Fall HOP  for November 2015
We are super excited to share some wonderful Inspiration using the super SWEET CottageCutz "On the Farm" Release. We also have some AWESOME PRIZES to give away!

Be sure to grab your favorite drink, and enjoy the Hop!!! 
**To be ENTERED to Win you will want to be sure to visit all blogs and leave comments for each blog and Here letting us know you have completed the blog hop!! Enjoy, there is lots of Inspiration using the New CottageCutz On the Farm Release!!

Prize #1
Prize #2
Prize #3
***Here is the Complete Line-up for todays Hop***
CottageCutz Blog (You are here)
CottageCutz end!


**Thank you all for Joining us today, and we hope you enjoyed today's HOP!!! You will have until Wednesday November 18th, 2015 at 12:00 midnight Eastern time to Join us :) 
We will announce the winners on Thursday November 26st, 2015.
Have fun and Good Luck to All!!!

Thursday, November 12, 2015

Snowman Cupcake

Hello everyone, Todays Christmas Card was designed using CottageCutz Christmas dies for todays Splitcoaststampers Sketch Challenge.
 Absolutely LOVE this DARLING CottageCutz Snowman Cupcake from the Scrapping Cottage, isn't he too SWEET???!!!! He was super easy to put together too!!!

CottageCutz Snowman Cupcake I cut him in white card stock and colored him using copics R39, E55, and G09. his eyes, and mouth is done using Black Viva pearl pen.

Embellishments- Design paper is Merrymint collection. Love this collection, as its super cute! Ribbon is from my stash, and the sparkle brads are from the warehouse sale here in Utah. I did stamp the sentiment using an old stamp. for the edges on the center panel I used a Punch.
Thank you for looking and have a lovely day!
hugs to all,
Cheryl

Wednesday, November 11, 2015

Happy Thanksgiving card

Hi there and welcome to CottageCutz Blog with new CottageCutz project on.

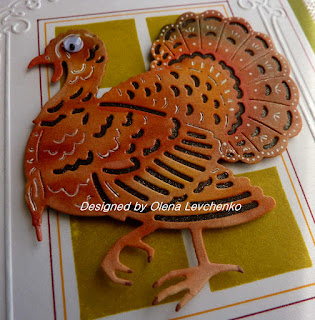
Today I am sharing with you my new Thanksgiving card I created with  beautiful NEW CottageCutz On the Farm Release


The finished card measures 4 1/2" x 5 1/2".
To make card, start by cutting green card stock 5 1/2" x 8 1/2", score and fold crease to make card base.
 
 
 First, start by cutting Turkey out using Light brown card stock. Next, coloring image using the Copic Airbrushing system and Copic markers (Y15, R24, E13, E15). To make image more real, put under image the brown card stock and glue.Decorate turkey with white gel pen, glitter pen and small wiggly eye.
The next step is background on card. First, emboss white panel using Cuttlebug embossing folder. Next, stamp square background stamp on embossed panel  and decorate with Stabilo red and yellow fine point pen. Stamp sentiment using orange craft glue. To finish card, add turkey to embossed panel and to base card.
 -----------------------------------------------------------
For this project I used:
 
___________________________________________
Card Supplies:
CottageCutz dies: Turkey
Card stock:white, green and brown
Inks: green and orange
Stamps: Happy Thanksgiving sentiment and HERO Arts "Six Large Solids" background
Other: Sizzix die cut machine, scissors, circle paper punch, craft glue, pierce tool, Copic markers, glitter pen, white gel pen, Stabilo pens
____________________________________________
 
Thanks for visiting, I hope your day is wonderful! Olena

Monday, November 09, 2015

CottageCutz Deer Tag Gift Set

Greetings everyone and welcome to another CottageCutz Creation......Warning-this is a very heavy photo post with lots of ideas for tags and possible gift giving creation.  It's Carol here today.  Hope you'll grab yourself a nice warm cozy drink while you browse these pretty tags.   What you see here is a box purchased from "Dollar General".  We have a lot of these stores in the South.  I thought this box was so pretty and super cute.  I did not cover the pretty design with another paper.  I just added die cuts to it to compliment the tags I created to go inside.
This is called the Frosty and Friends Scene die.  Isn't it darling.  If fit perfectly on the back of the box.  I just had to use it there.
As you have probably guessed by now, I created tags to go inside this pretty box.  It's a super cute give to give to a friend and would also make a great swap gift.  The tags are 4-3/4" x 3".  The heavy Michael's cardstock was used for the base and Authentique "Believe" paper is the background.  This tag uses Merry Christmas Reindeer.  The die was cut twice.  Once on dark brown card stock and red cardstock.  The Merry Christmas was layered in red on top of the die.  The flower is the Poinsettia & Holly die and was used on all the tags that have flowers.
Oh this is so cute.  I can't help myself.  This is called Santa with Reindeer Sleigh.  The sleigh was cut on matte gold cardstock, the Santa on red and his bags on green and the reindeer on dark brown cardstock.  I used two reindeers so it would like Santa was taking off.   The Noel die is from the "Expressions" line and also used several times throughout to keep with the theme.
For the layering on these tags, I cut dark brown cardstock a 1/4" less that the base and used the dark brown to highlight the deer in these tags.  The designer paper was also cut 1/4" less than the brown cardstock.  This die is called Filigree Deer.
The center of the tags use the Spellbinders Scalloped Circle and the Circle die.  They are layered on top of a small Wilton Doily.  This tag uses the Majestic Deer die and the Wintry Trees Die.
For the ribbon on the tags white seam binding was used for the tie and the bow.  All the little embellishments are Recollection from Michael's.  This die is the Deer with Pine Trees.  The Fir Tree die was also used to create a forest feel to the background.
For this tag the Fir Tree die was used again for the background.  The trees were painted with puff paint, dipped in glitter, and dried with a heat gun to make the paint puff up like snow.  This is from the Deer Standing and Sitting die.  Of course this is the deer sitting, but the deer standing was used on both of the sides of the box that house these tags for gift giving.
This tag features Deer W/ Birch Trees.   The Fir Tree Die was used again to intertwine in the background for a wintery forest look.
For this tag the Whimsical Deer with Bird was used.  For the flower the ivy was used on this tag to expand the floral arrangement.
This tag features the Stag with Poinsettia die.  You can see where this theme is going right!  I just love this tag set.  I had so much fun creating it.
Here are the tags nestled inside the box ready for gift giving.  Sure do hope you enjoyed viewing this creation and maybe got

Sunday, November 08, 2015

Holiday Reindeer

Hi all! Vladka is here!
Today I'm saying hello with this cute reindeer, which is so proud, because this is his first time to help Santa with presents. Did you see how cute collar he has? 
As always, I've colored the reindeer and the presents with distress inks. And as always, I started with lighter color and after that I distressed corners with darker color. The background was made as following: I took kraft cardstock and cut out the card base (approximately 4.25 x 5.5 inch tall) and one more piece slightly smaller as the card base. First I made some blue splodges with Distress Ink on this piece and after that, I distressed the corners with brown Distress Ink. At last I took white watercolor tube and daubed the color with little sponge around the surface. Sentiment was stamped on piece of white paper which also represent the snow hill. This card was quickly created and it is perfect for mass production.
Enjoy your Sunday!

Card Supplies I used:
CottageCutz dies: Holiday Reindeer
Card stock: kraft, white
Distress InkPeacock Feather, Walnut Stain, Vintage Photo
Other: white watercolor tube, scissors, paper trimmer, scor-buddy, glue tape, plastic acetate, craft sheet

Saturday, November 07, 2015

Winner Announce! :)

Hello everyone, and Happy Saturday to all! We want to thank you all for participating in our Contest ,your comments mean a lot to the DT and we appreciate you taking some time to leave some LOVE! 
Also we want to let you know our Fall Hop will be on November 13th, so be sure to stop by and join us for some fun!!!
 
NOW on to the WINNER of our Comment GIVEAWAY
.
.
.
.
.
.
.
.
Congratulations Lena & thank you for all your sweet & wonderful comments!!! Please email Joanne at scrappingcottage@cox.net to claim your Gift Certificate!

We want to THANK all of you for your sweet comments, they really do mean a lot to the designers, so thank you again!!! Be sure to stop by, and see what we have going on! Next will be our BLOG HOP on November 13th! and we cant wait!!! :) Hugs to all,
From the CottageCutz Design Team!

Thursday, November 05, 2015

Gobble Gobble Gobble

 
Says Mr. Turkey......hehehhehe
Hello everyone, today's card was designed using CottageCutz Beautiful Turkey Die from the "On The Farm" Release.. I also used CottageCutz "Happy Thanksgiving" die as well. I made this card for This weeks SCS Sketch Challenge, and really enjoyed using CottageCutz Die's along with this wonderful sketch!
 
Now for my card :)
Turkey is colored using the Copic Airbrushing system, and my compressor. LOVE this technique as its super fun, and the results are always beautiful! I used Copic colors - Y08, YR09,R59,G24,G07,E29,
for airbrushing.  The Happy Thanksgiving was cut using Bazzill's Sugar Daddy Bling card stock. And the Design Paper used is from American Crafts Pumpkin Patch.
 
I embellished using Sewing , Ribbon, and antique buttons. My Card measures 5 1/2" x 6"
 
 
 Thank you for looking and have a lovely Day!
Hugs to all,
Cheryl
 
Giveaway Winner will be announced Saturday the 7th! Be sure to stop by daily until then and see the wonderful Inspiration from the CottageCutz DT!