Wednesday, August 28, 2013

Album for newborn baby

Hi, Vladka here. Today I want to show you some pages from the scrapbook album for the newborn baby. Pages on the photos are not add to the book yet, because it is easier to photograph them so. :) These main pages separate the album into parts, which show some main events which happen in the baby´s first year. After every page is a space for photos and some sheets are added that some short stories or important dates can be written down.
Here is the front page with cute Furry Teddy Bear and white bird on the branch: 
I used another branch and second bird on the first inside page. I also put some grass there and between is a place for one photo, for example.
The next page which I want to present you is this one with Giraffe. I thought that this motive will be perfect symbol or metaphor for largeness.
Here is the last page which I will show you, but not the last one in the whole album. Little boy has 3 sisters and here is the place to add some sisters drawings. On this page I used following dies: Butterflies and Greenery.
It is always such fun to create something for babies or kids. I really enjoyed creating this!


Monday, August 26, 2013

Cute little duck


Hello from Simona, everyone!

To make today's card I used,
Isn't this little duck adorable?


I cut the duck and accessories out of white cardstock.
I colored the cut out pieces with distress inks.
The duck die comes with 4 Clear stamp faces.


I stamped the cherries from the CottageCutz
Home Baked Clear Stamps onto the white cardstock 9x.
I cut them out and colored them with distress markers.


For the base of the card and the layers
 I used Spellbinders Grand Scalloped Circles.


The sentiment is from Penny Black.
I also added some liquid pearls.


Thank you for looking!
Hope you all have a wonderful day!

Hugs,
Simona

The dies and the stamps used:

Sunday, August 25, 2013

Fancy Floral Lace Border

Hi, Everyone! Today I have created a new card
for The Scrapping Cottagewith the 
Here's my card:

For this card I cut the CottageCutz Fancy Floral Lace Border
in several hues of red and yellow, that was fun


Take another look:


These are the dies used to create this card:


Hope you have enjoyed your visit and 
come back again! 
Hugs,


Friday, August 23, 2013

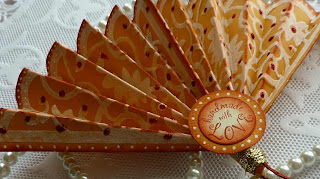
Handmade with Love

Hello Everyone from Olena.


Today I am sharing a Elegant Fan project I created with Beautiful  Summer Fancy Floral  Collections 2013. 


For this project I used only one NEW die cut from Summer Fancy Floral Collection 2013 - "Fancy Floral Corner #1"die (3.75" x 3.75").
First, I cut Fancy Floral Corner out two times using wax paper. Then, I glued Elegant corners to orange card stock. Using bone folder,  I marked lines for folding. 
 

Then, I sponge the edges, folded and glued together two fans. For finish touches with background on fans I put small red dots using red Stickles and white dots using White gel pen.


I, also, decorated fan with tassel. Next, I stamped sentiment on yellow card stock, cut out with circle punch and glued circle on fan. Oh, I forgot. I added silver ribbon on hand of fan.


For this project I used:


Have A Wonderful Day! Olena

Thursday, August 22, 2013

Morning Glory Doily


Kathy here with you and today I have card for you using CottageCutz' Morning Glory and Oval Doily & Frame Dies.


I love using lots of white with a pop of color to show how beautiful these dies are! The pieces were cut with white card stock and the flowers and leaves were colored with chalk inks to match this pretty lavender ribbon. I then shaped them and added some White Opal Liquid Pearls to the flower centers. I added the leaves and flower to the center doily with pop dots and added the outside piece of the doily to the card with pop dots. Here's a closeup of the flowers!


The card base is made with Orchid Opulence Cardstock with a white mat embossed with Perfect Polka Dots Embossing Folder. The ribbon is Lavender Seam Binding from Really Reasonable Ribbon. I didn't add a sentiment to this, but it could be used for all kinds of occasions!

Here are the dies I used:


Tuesday, August 20, 2013

Bella Ornate Birdcage Card


Hello everyone, Cheryl here with a card I designed for CottageCutz using the Beautiful Bella Spring Corners, and the CottageCutz fancy Ornate Birdcage die.

On my card I first picked a super darling dp, and then decided to layer the Bella Spring corners from each corner to give an added layer over my dp. I love the loo it gives, and you are still able to see the design on the paper.
For the Birdcage I cut it in black, and then embossed it with a Black Embossing powder from Creative Inspiration Paints. I LOVE the look of embossing the diecutz and love that they are EASY to cut out!


CottageCutz photo's below are LINKED for easy finding in the store.


I next Used the Beautiful Ribbons and flowers that Really Reasonable Ribbon carries for my card today. This card was a super simple card to make, as there is no sewing and pretty much one layer of dp, so makes for a easy layout!


Thank you for looking and have a lovely day!
Hugs to all,
Cheryl

Monday, August 19, 2013

 Yikes the weekend is over already and I was just getting started!!!  It's Carol here today and I have a CottageCutz card created with the wonderful dies from The Scrapping Cottage.  By the way, did you see the new releases-Halloween, Winter Wonderland, and Christmas Cheer.  Oh my goodness I am super excited about all of them.  They coordinate with last years releases perfectly!
 For this card I used 5 CottageCutz dies.  Fancy Floral Lace Border, Fancy Floral Background, Fancy Ornate Birdcage, Greenery, and Tea Time Doily.  Here's a tip.  My Tea Time Doily was used so much that it wasn't cutting properly.  I replaced the foam cover and now it is cutting like it was brand spanking new.  Replace those foam pads if you find your die doesn't cut like it used to!
 The Fancy Ornate Birdcage was mounted on the Tea Time Doily and a Team Time Doily was used as an embellishment behind these punched flowers.  The border around the outside of the card is a Martha Stewart Punch Around the Page set.
 The flowers were created with a regular 5 rounded petal punch.  They were stamped with an old Stampin Up text stamp I picked up at a yard sale some time back.  Then Victorian Velvet Rangers Ink was sponged on the petals. 
Thank you so much for dropping by today.  I hope you have a great week.   Take care and happy crafting.  Here are the dies I used: