Friday, November 24, 2023

Black Friday Release Inspiration

Happy Friday friends!

Kris here to share a card I made using our brand new BLACK FRIDAY RELEASE!!  There are 2 bundles of this release that are both on sale at 60% off!!  Or you can get the individual dies for 30% off.   See the whole release HERE.  

We also have our Mega Black Friday BLOWOUT SALE -- save up to 85% off! 


For my card today, I've used the Vintage Urn w/ Flowers die along with the Sentiment, Thinking of You die and mounted them on the new Trellis Background die.  

Design Steps:

I die cut the  Trellis Background die from white and mounted it onto a white A2 card base.  I kept it subtle so my flowers would pop and not get lost against a colored bg.  


Next I die cut my Vintage Urn w/ Flowers die from white cardstock and colored with Copic markers. 


I glued it to my card front. 


For my sentiment, I wanted it to match the colors of flowers, so I marked on some white c.s. with RV63 and RV66 first, then die cut my sentiment.  It's easier than to color the delicate die cutz after they are cut. 


So much to LOVE about this beautiful release!  

(Not to mention the fantastic prices right now)  ☺ 


Find more tutorials on our YouTube channel HERE.

Don't Forget our BLACK FRIDAY SALE - save up to 85% - ends Dec. 1st!


Sale prices do not apply to previous orders. Orders can not be changed, combined or 
canceled once placed via the website. Some items have limited stock on-hand, no backorders

will be accepted. Sorry e-mail or phone orders can not be processed during the sale.
Orders will be filled and shipped in the order they are received. $6.95 flat-rate shipping in
Continental USA, low international shipping rates available.
SALE ENDS Friday, Dec 1st at 9pm PDT

2 Release Bundles are 60% off!


Thanks so much for looking today ~ Happy Crafting!!

~Kristine

Thursday, November 23, 2023

Give Thanks

 Hello Friends 

Happy Thanksgiving!  I hope you are enjoying the day with friends and family!!  

Check out our big BLACK FRIDAY SALE today!  It includes a new release you won’t want to miss! Click HERE for the sale!

I am sharing a card that I thought you might enjoy on this day of thanks and blessings!  I used two dies from the fall collections Fall Centerpiece and Autumn Garland.


Design Steps:
1.  Cut a piece of kraft card stock 4 1/8 x 5 3/8.  Run the card stock through a wood grain embossing folder.  Then paint the front with a light coat of Gesso using a foam brush.  Let the panel dry
2.  Make yourself a ring of twine.  I wrapped mine around a cup bottom and then slide it off and taped the ends together
3.  To create the leaves I used a piece of Alcohol Ink Yupo and an applicator.  I put several of the colors of alcohol ink on the applicator and then dabbed it onto the Yupo paper.  I changed the applicator cotton rectangle and tried a few different colors.  I did this 3 times as you can see above
4.  I then used the Fall Centerpiece die and the Autumn Garland die and cut out the leaves
5.  I used the same dies and cut out the sunflowers on two shades of yellow and brown for the center.  I added a little Copic marker to the sunflowers for more depth.  Arrange the flowers and leaves on the circle of twine as shown above
6.  Add your sentiment with a little dovetail and your card is complete


We have more inspiration on our YouTube Channel check it out HERE

Thanks so much for stopping by!  And I will see you next Thursday.

Blessings and Take Care


Tuesday, November 21, 2023

Easy Deer Christmas Masculine Card

Happy Terrific Tuesday crafty friends! 
Melinda here with you today. I hope your Turkey day week is off to a great start. Can you believe it is going to be Thanksgiving this week?! Where is the time going?! Well, I need to get cracking on some Christmas/Holiday cards, so I decided to make this easy, masculine card. Take a look...


I started by applying the foliage to the patterned paper mat. I decided to use black for the leaves.

I then cut out a few of the trees and plain black cardstock. I glued them together to give them some great sturdiness.

I used my Spectrums Noir glitter marker to give my deer head some subtle, bling. Even though this is a 
"masculine" looking card, I think the glitter gave it a nice touch without making it "girly".


I colored the antlers with my gold marker. 


Here is my finished card. I layered the deer head onto the christmas tree. I then added the Merry Christmas tree's sentiment in kraft cardstock on the bottom of the tree. Overall a very eady and yet very effective card!


Merry Christmas Tree


Well that about covers it for today! Be sure to hit up CottageCutz.com for their fantastic 
Black Friday Sale! 
You won't want to miss it!

Until the next time, hae a wonderfully crafty day.

Melinda

Saturday, November 18, 2023

Autumn friends Celebrate Thanksgiving

Hello CottageCutz friends! Thanks for taking the time to stop and visit with us today. It's Mary Marsh here bringing you the Saturday edition of the Blog.

It's new release time!!! We have our Christmas 2023 release in the online store that has 40 designs. It's an old-fashioned Christmas theme. You can pick up the individual dies at 30% off for a limited time.

We also have a new Fall 2023 release in the online store with 15 designs. You can also pick up these individual dies at 30% off for a limited time.

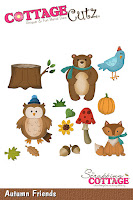
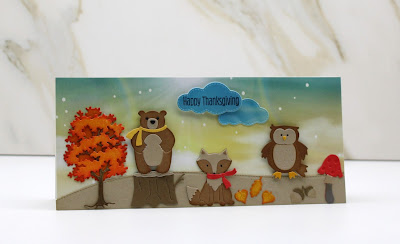
Today for your viewing pleasure, I am featuring the new Autumn Friends and the Fall Tree dies. I created a slimline Thanksgiving card for a family that has 2 young boys. I thought the whimsical style would be a perfect card for them. So, let's get started with some details of how I created my card. 

Design Steps:

I started my card this week with the colors. I used the colors from the Splitcoaststampers color challenge #974. We were to use poppy parade, crushed curry, pecan pie and crumb cake for the color combination. Optional was anything goes. I chose the addition of blue for this part. 
poppy parade, crushed curry, pecan pie, crumb cake 
I cut the Autumn Friends images in the challenge colors plus a few allowed neutrals. 

For the Fall Tree, I wanted the look of the trees we see in PA in the Fall season.  So, I cut in white cardstock and blended barn door and fossilized amber distress inks to get a beautiful Fall color. I colored the 3 leaves with the same inks. These inks are a match for the Stampin'Up colors. 
Next, I chose this pattern of designer paper for the card background. I liked the blue sky and the sun rays. It's from a pack called "heavenly skies" (Divinity Designs) and they are sized for a slimline card at 6" x 9".  
I cut a white card base 4" x 9" and the designer paper is also 4" x 9" to cover the white card front. 
 I attached the designer paper to the card base. And cut a slope in the crumb cake shade using the Hills Slimline die. They are both attached with double sided tape. 
I attached my images with clear drying glue except for the Bear & Owl. I used dimensional adhesive to have lifted slightly off the card base. 
To complete the card, I cut a couple of clouds using the Stitched Sun, Clouds & Umbrella die. I cut them from the leftover designer paper.  Stamped my Happy Thanksgiving sentiment and attached to the card base. 
That's it for me for this week. See you next Saturday. Happy Thanksgiving to all our American friends. 

Reminder: Marla has a new video and a giveaway on the CottageCutz YouTube channel. Click here.