Thursday, January 12, 2023

Hot Wheels!

Hello Scapping Cottage Friends,

It is Pam sharing with you today!

I am starting off the new year trying to get a head start on some birthday cards.  I have a number of male cards I need to make including hubby!  Masculine cards have always been a challenge for me.  But using the Classic 50's released has really helped with the challenge.  There is everything from cool cars to electric guitars!!  Today, I am using the awesome Motorcycle.


Design Steps:

1.  Using the Motorcycle die cut out the pieces in the following colors of card stock: red, yellow, silver, black, light and dark grey.  Shade the pieces with various inks and a small applicator 
2.  Assemble the pieces using a fast drying fine tip glue
3.  For the base use black card stock in an A2 size 
  • Cut a white panel 4 1/8 x 5 3/8 embossed in brick and inked with light grey
  • A silver panel 1 3/4 x 5 1/4 embossed and layered on black
  • A piece of turquoise cut with the third from the largest Wacky Stitched Rectangle and layered on black.  Wrap the turquoise rectangle with a piece of black ribbon
  • Using the Ring in the New Year die cut out 5 of the hats in the black checked DP for the banner
4.  Glue the white brick panel to the black card front.  Glue the silver strip to the white brick panel slightly to the left as shown above.  Place pop up strips to the back of the turquoise rectangle and then pop it to the front as shown below
5.  Glue the black string to the top of the card as shown above and then add the little checked banners. Add the little red stars and your sentiment and the card is complete

CottageCutz Products 


We have more inspiration on our YouTube Channel check it out HERE

Thanks so much for stopping by!  And I will see you next Thursday.

Blessings and Take Care


Wednesday, January 11, 2023

Empathy or Sympathy Card


Happy New Year!   I am happy to be back with you today after a busy Christmas season.  Today, I am sharing an empathy or sympathy card.  These are the type of cards we don't like to make but unfortunately are needed.  I love the classic elegance of this card.  If you don't need an empathy or sympathy card in your stash, you can use the card's basic design for a birthday, anniversary or wedding card.  The sky is the limit. 

All of the specific design details can be found on the CottageCutz YouTube Channel. I will also be giving away the beautiful "Holiday Dove w/Floral" die.  The die was created for the Christmas Part II release, but as you can see the addition of the dove is perfect for the theme of my card today.  

I have linked all the beautiful dies I used on my card below for easy shopping.  Thank you for stopping by to take a look at my card.  Until next time....Marla


Tuesday, January 10, 2023

Hey Sweet Heart Folded Flap Card

Happy Tuesday Cottage Cutz Friends!
Melinda here with you, and today I am sharing a fun and colorful Valentine's day card. Here's a look at my finished project. I used the sweet Mrs. Gingerbread Die as the focal image from this year's Christmas release.

Here is a look at my finished card. I started with a 5.5 x 5.5 white mat. I then used a pink cardstock mat and some yellow mini hearts patterned pattern.


Here's a closeup of the sweet little Mrs. Gingerbread die. I used some Doodlebug patterned paper for her hat and dress. I mounted her onto the 3rd pierced circle die from the set. I then used a smaller circle punch for the mat. I added a couple of hearts from my stash.

I used a scallop punch and some circles along with some hearts for the last part of my sentiment.

Here I used the Hey from the Berry Phrases Sentiment along with the Sweet as a Christmas Cookie die.


Here is the center slightly open. I used a small Velcro circle to help keep the flaps closed.

Here is a closeup of the inside. I used some of the heart stitched dies along with the I Love You 


How to do the center of the card
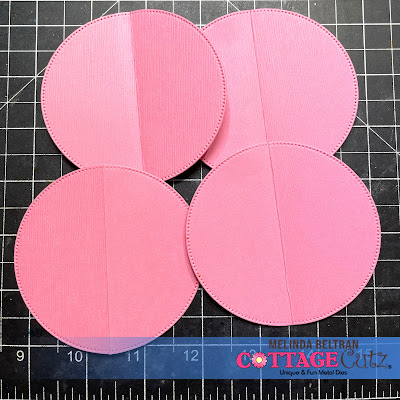
I used the largest Pierced Circle from the set and cut it out 4 times. I also cut a separate piece of white cardstock at 3.75 inches squared. I folded the circles in half.


Next I glued half of the circles to each side of the square. This is what it looks like in the photo above.

This is what the back of the card looks like once the 4 circles are attached. This photo is with the circles open.

This is what it looks like when the circle are closed.


I then used the next size circle down and used the pink cardstock for mats.

I then cut the circles in half and attached half on the front flaps and on the inside flaps. If you decide to put the mats on, make sure you leave a little room so they will close. I ultimately decided not to use the pink mats for the inside.

Dies I Used

Mrs. Gingerbread Gnome


I Love You


Berry Phrases


Sweet As A Christmas Cookie


Pierced Circle Set


Stitched Heart Set


Well that about covers it for today! Until the next time, have a wonderfully craft-die day!
Melinda Beltran

Saturday, January 07, 2023

Valentine Wishes From the Puppies

Hello CottageCutz friends! Thanks for taking the time to stop and visit with us today. It's Mary Marsh here bringing you the Sunday edition of the Blog.

Hope you all had a great Christmas and holiday week. Now it's time to settle in for the winter months. It's a perfect time for cardmaking, scrapbooking and other crafting pursuits. I am onto my Valentine cards. I send them out to family and friends. 

For your viewing pleasure today, I am featuring a slimline card using the Christmas Puppies and the Heart XO Windows Slimline dies. I like taking dies intended for one season and move them to a different holiday. It allows you to get more use out of your dies that way. 

card details: 

I started my card by using the Heart Xo die and cutting it in red cardstock. For the background for the hearts, I am using designer paper. I only had a small piece of the heart paper, so I decided to do something different with the middle heart window. I used another paper that I only had a small piece of, but it complements the other paper. 
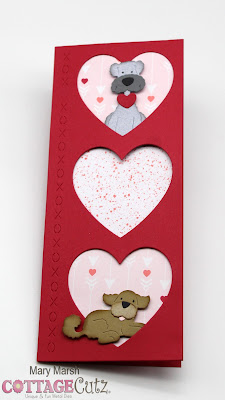
The slimline panel is 3 1/2" x 8 1/2". I cut red cardstock in the same size for the card base. 
Next, I cut the puppy images I used different colors of cardstock. You could also cut them in white cardstock and use the medium of your choice to color them. 
I started some card assembly at this point. Attached the designer paper inside the hearts with double sided tape. For the puppy images I used dimensional adhesive to lift them off the background slightly. 
I wanted a phrase for the middle heart window. I thought about stamping something but then I decided to use the "be my Valentine" phrase from the 2019 Valentine Puppies die. For the bottom heart window, I used the XOXO from the Valentine Phrase & More die also from the 2019 release. 
Now I am ready to finish off the card. I attached the phrases with clear art glue. In the middle heart, I added some hearts cut from the Valentine Puppies die. On the top heart, I added the puppy paws. And then scattered some white hearts on the card front. I had those saved from another project. I am not sure which die they came from. 
Well, that's it for me for this week. I hope I have given you a way to use this Christmas die for another holiday. See you next Saturday! 

dies I used to create card:


Thursday, January 05, 2023

You Rock Valentine

Hello Scrapping Cottage Friends

It is Pam creating with you today!

I hope you all had a fantastic time ushering in the New Year!  We decided to stay home and just have a quiet celebration.

Believe it or not I have started my Valentine's Day cards!  I used the Fifties release to create the card.  This release can be used in so many different ways!  The dies I used are Fifties Phrases #1 and Guitar, Music Notes & Records


Design Steps:

1.  Using the Guitar, Music Notes & Records die cut out the following card stock colors: black, turquoise, silver, pink, white, brown and yellow.  (I cut 2 guitars and two sets of notes) Also using the Fifties Phrases #1 cut out three of the stars and You Rock in black twice (glue the two together)
2.  Assemble the pieces with a fine tip glue
3.  For the card base use a white slimline measuring 8 1/2 x 3 1/2 closed.  Cut a piece of heart DP 8 1/4 x 3 1/4.  Start your design on the DP by adhering the you rock and stamped Valentine in the center
4.  To the right of the center add the two guitars plus the notes and to the left add your records and some notes.  Glue down the stars around the sentiment as shown below.  Glue the heart panel to the white card base and you card is complete

CottageCutz Products


We have more inspiration on our YouTube Channel check it out HERE

Thanks so much for stopping by!  And I will see you next Thursday.

Blessings and Take Care