Monday, November 07, 2022

Cookies 'n Cocoa Treat Tote

Welcome to a new week of crafty Christmas inspiration! ☺

 Kris here sharing a treat tote that I was inspired to make by one of the new Christmas Part 2 dies called Cookies & Cocoa!  This holder is perfect for gifting a big cookie and a packet of hot cocoa mix for those friends and family who drop by during the holidays!  They can easily be made up ahead of time so you have some on hand! 


After I made the first one using the Ginger Friends, I decided it would be best to show you how I did it in a video (at end of this post).  I used the Snowmen Friends on my 2nd one.  Both versions use the Cookies & Cocoa die on one side.  


back of holder #1...


Holder #2...


Back of Holder #2....


CUTTING & SCORING:

White Cardstock:
(1)  4-1/4" x 11" -- scored at 5-1/2" (base)
(2) 6-1/4" x 4" -- with longest side at top of score board, score at 1/2" & 1" on each end.  Turn so short side is at top of board and score at 1/2" & 1" on just one side. (pockets)
(1) 4-1/4" x 4"  -- with 4" side at top of score board, score 1/2", 2", 3-1/2" (connector pc)
(2)  Die cut middle sized from Pierced Wide Circle Frame set from thick white cardstock (handles)

Patterned Paper:
(2) 3-7/8" x 5" (for top portions)
(2)  Die cut 2nd largest of the Nested Wacky Stitched Rectangles set  (for pockets)

Video tutorial:
*If you can't view it here or need to see it larger, click HERE 

I hope you are inspired to get crafty with your favorite CotageCutz dies! Have a blessed week ☺

~Kristine

PRODUCTS USED:


We have more inspiration on our YouTube Channel check it out HERE

Saturday, November 05, 2022

Peace and Joy Rustic Wreath


Hello CottageCutz friends! Thanks for taking the time to stop and visit with us today. It's Mary Marsh here bringing you the Sunday edition of the Blog.

It's new Christmas release time!!! We have new dies in the online store. Our Christmas Part 2 release with 36 new designs is available and ready for shipment.

The individual dies are on sale for 30% off. It's only for a limited time so don't delay. You are going to love all the whimsical designs that are available in this release. There is something for everyone to make your Christmas cards extra special this year.

The Christmas Part 1 dies are also available with 21 new designs and on sale for 30% off individual dies.

Today, I am featuring the new Rustic Wreath and Peace and Joy Wreath dies. They are both part of the Christmas Part 2 release. 

I used the colors from the Splitcoaststampers color challenge #920 for the wreath colors. An option this week was to add a 4th color. I chose blue for my bird image. 
merry merlot, polished pink, garden green

The grapevine wreath image is cut in kraft cardstock, and I sponged tea dye distress ink for shading. I used brick wall designer paper for the background. You can use neutral shades in this color challenge. 

The Peace and Joy phrase is from the Peace and Joy Wreath die. I cut it in the merlot cardstock 2x for more definition. 
To finish off the card I scattered a few garden green glitter enamel dots. Well, that's it for me for this post. See you next Saturday. 

Reminder: Our YouTube Channel has a new video from Jen Hartsgrove. There is a giveaway for being a subscriber, liking the video and leaving a comment. Click here.


Thursday, November 03, 2022

Angel Nativity Ornament Christmas Card

Happy ThursDIE Cottage Cutz Friends!
Melinda here with you on this Thursday. Today I am sharing my second Christmas card of the season. It features dies from the FABULOUS Cottage Cutz Christmas releases!

Here's a look my finished card.  It is a bit larger than I normally do. It is 5x7. I used the new Angel Nativity Ornament die and the Christmas Greenery die.


I started with a white 5x7 White base. I then used some Kraft paper and ran it through my crimper. I then tore the edges and then swiped some white paint on it.


Next I die cut the pretty Angel Nativity Ornament die several times in white cardstock. I then colored the top layer with my Copper metallic sharpie. I layered them on top of each other to give it some dimension.

Next I cut out several of the Christmas greenery. I cut them all in Kraft cardstock. I then proceeded to color them in dark brown shades and also in white. Some I left as Kraft color.
Here's a closer look at the pretty ornament. I added a bow of brown glitter to the top.

Here's a closer look at the layers of foliage. I did also use my gold inkpad to brush some gold onto the background. I also added a layer of patterned paper to the base to finish the look.


Here is one final look at my completed card.


Don't forget to head over to the CottageCutz YouTube channel and check out all of the amazing projects on there. Our video team is doing a wonderful job of filling the channel with all sorts of creative content! You don't want to miss it!


Dies I Used

Christmas Greenery


Angel Nativity Ornament


Here's a look at the entire release. Be sure to head over and grab them while they last!

Christmas Part 1 Release

Well that about covers it for today! Until the next time, have a wonderfully craft-die day!
Melinda Beltran
 

Wednesday, November 02, 2022

Season's Greetings Mini Slimline Card


Hey Krafty Friends, Jen from Katahdin Krafts, back with another  CottageCutz YouTube  video on the CottageCutz Channel This week I am working with the "Holiday Fence" and "Season's Greetings" dies.  They are both part of the latest release, "Christmas Part 2".


I decided that a mini slimline card would pair perfectly with this adorable holiday fence.  My card panel is 5.75" x 3.25", my card frame and base are 6" x 3.5".  I created a night time winter snowy sky for my background using oxide inks and lots of splatter! 


You can find all my card instructions over on the YouTube Channel!

While over on the channel, make sure you like and comment for a chance to win the "Holiday Fence" die!

The winner of the "Cozy Winter Fireplace" die from my last video is Richard Elliott, the details for collecting your giveaway prize are over on YouTube!  Thanks for stopping in, and happy krafting!


Tuesday, November 01, 2022

Santa in His Cadillac!

Hello Scrapping Cottage Friends

It is Pam sharing with you today!

We have Part 2 of the Christmas release available today! This amazing release has 36 designs!  This time we have Gingerbread Cookies, Gnomes, Santa in a Cadillac and much much more!!  Check it out HERE.  The best part about this new release is that it is on sale now!!

The die I used to create my card today is Cadillac Santa!  I decided to make it a small tent fold card so I could stand it up!


Design Steps:

1.  Use your Cadillac Santa die and cut the following colors of card stock: red, green, silver, white, brown, black, tan and vellum (for the window, headlight and taillight in case you can't see it!).  Using the HO HO Friends die cut out Ho Ho twice once in white glitter card stock and the other in plain white card stock.  Glue the two together with the glitter letters on top
2.  Assemble all the pieces using a fine tip glue
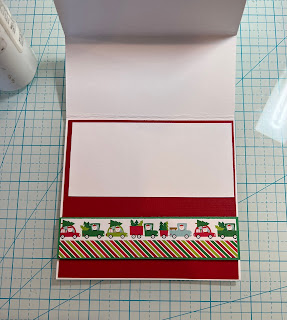
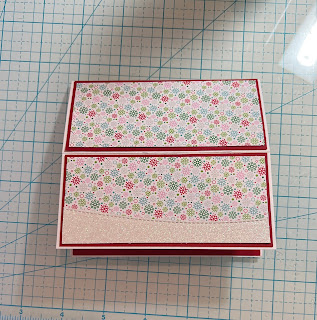
3.  For the base of the card cut a white piece of card stock 8 1/2 x 4 1/2.  Fold the white base in half and then fold the front flap in half toward the inside of the card.  For the inside cut a piece of red card stock 4 1/8 x 4 3/8, a piece of white 4 1/4 x 2, a strip of green 1 1/8 x 4 1/2, and a strip of DP 1 x 4 3/8.  For the front of the card 2 pieces of red 4 3/8 x 2, 2 pieces of DP 4 1/4 x 1 7/8 and a piece of glitter white card stock 1 x 4 1/4 cut with the Hills Slimline die for the snow 
4.  Working on the inside of the card glue the large piece of red card stock down first add the white strip of card stock to the top of the red piece. Layer the green with the DP and pop it up to the bottom portion of the card
5.  Close the card to work on the front of the card.  Glue the one of the red strips to the top of the fold.  Glue the other red strip to the bottom of the fold BUT do not glue to close to the top because you will have to slip in the HO HO. Then glue the DP to the red card stock.  Glue the glitter snow bank to the bottom of the front panel as shown

6.  Glue your HO HO together and then place a little line of glue on the bottom of the letters and tuck them under the lower red panel right at the fold.  Glue down your santa and your card is complete


CottageCutz Products


Please take a peek at this Cheery Christmas collection!  I promise you will want every single one of this incrediable release!!! Click HERE to see all the cuteness!!

We have more inspiration on our YouTube Channel check it out HERE

Thanks so much for stopping by!  And I will see you next Thursday.

Blessings and Take Care