Saturday, October 30, 2021

Christmas Deer at Mailbox

Hello CottageCutz friends! Thanks for taking the time to stop and visit with us today. It's Mary Marsh here bringing you the Saturday edition of the Blog.

IT'S NEW RELEASE TIME! The new Christmas dies are in the online store with 40 new designs from Christmas Part 1 and 19 new designs from Christmas Part 2 and they are on a limited time sale at 30% off.

Today for your viewing pleasure, I am featuring the whimsical Christmas Deer w/Mailbox and The Merry Christmas w/Shadow dies. This one will go to my sister-in-law who loves woodland animals and feeds the deer regularly. So let's get started on some details of how I created my card. 

Design Steps:

This week I started my card with my layout. As I have said so many times before having the sketch in mind helps start as well as simplify the card making process for me. I liked the sketch #877 at Splitcoaststampers. I thought it would work well for this cute little Christmas deer. 
Next, I cut the images and stuck with the traditional Christmas colors of red and green. 
Then I looked through my selection of Christmas paper to see what would work for the sketch I chose. I found one that I liked. I thought I would use some vellum over the designer paper to tone down the somewhat busy pattern. 

red card base: 4 1/4" x 5 1/2"
designer paper layer: 4 1/8" x 5 3/8"
white layer (element 3 of sketch: - 1 3/4" x 4 1/8"
Next, I cut my Merry Christmas w/Shadow sentiment in red and green. Love this new shadow die
Now that my card elements are prepared I am ready to start assembly. I attached the vellum to the designer paper with glue dots. I put them in places that I new would be covered with the white panel and then the images.  
The white panel with the sentiment is attached with double sided tape. I trimmed the design paper layer a bit because I was going to attach a snow bank.
The images are attached next with dimensional adhesive. I cut two snow banks from the North Pole die and attached them with double sided tape. I added two snowflakes for elements 4 & 5 of the sketch to complete my card.
Well, that's it for me for this week. I hope I have given you an idea for a way to use these new Christmas dies. See you next Saturday. 

The CottageCutz YouTube channel is up and running. We are featuring videos every Wednesday. Drop by and subscribe so you don't miss one and give us a thumbs up on our videos

dies I used to create card:


Friday, October 29, 2021

From our home to yours


Happy Friday it’s Wendy bringing you the blog today. I hope you’ve had a wonderful week and are looking forward to a weekend of crafting with the new release. OMG I was so excited to see such beautiful designs and I have had fun with a few of the dies today

Today I have used the Slimline Hills as my background. I cut this a couple of times so that I could offset them to give a point of interest. The top layer was attached with 1mm foam pads. 

I then cut a small border from the ‘Clouds Slimline’ dies for the top of the card

Next I cut out the houses from the ‘Winter Houses 2’ set. I chose just one design so that the houses looked liked they belonged on the same street. I’ve used contrasting card and these are some of my favourite colours. I found it easy to attach a piece of yellow card to the whole of the back of the house otherwise it would have been fiddly. I used a pretty white glitter card for all the snowy elements on the card as it gives the card a lovely sparkle

I just love the ‘Winter House Accessories’ die set as you can add so many elements to your card without them overpowering the design. I picked the dog, the snowman, the largest tree and the little fence posts.

The bottom left of the card looked a little sparse so I added the ‘Christmas Car W/Trailer’ to finish it off. 

I really hope that you enjoyed this card today and has inspired you for some Christmas crafting. I think these little houses would look great on tags too so I’m going to pull that together for a project next week

The CottageCutz YouTube channel is up and running. We are featuring videos every Wednesday. Drop by and subscribe so you don't miss one and give us a thumbs up on our videos. I

Happy crafting
Wendy

Dies I have used


Thursday, October 28, 2021

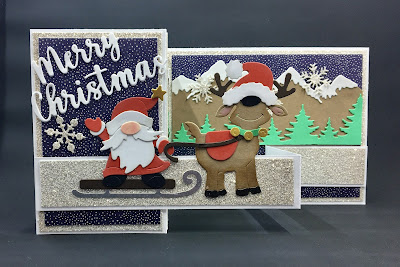
Ride On Gnomie Santa

 Hello Friends

Guess What!! It is New Release Time!  The collection is Christmas Part 2!  There are are 19 new designs just as adorable as the Christmas Part 1 release.  For a limited time you can save 55% off the entire bundle or 30% off individual dies.  You can check all of these fantastic dies out right HERE!

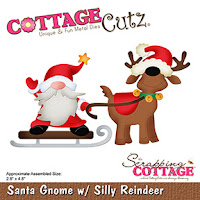
Today my Z-Fold card is using Santa Gnome w/ Silly Reindeer. There are several gnomes in this release and who doesn't love gnomes!!


Design Steps

1.  Cut the pieces out using the Santa Gnome w/Silly Reindeer and red, brown, dark brown, gold, silver, white green, tan and black

2.  Shade the pieces and assemble with a fine tip glue

3.  For the card base cut white card stock 4 1/4 x 11. Fold in half and then fold the front fold in half again.  Cut 2 pieces of silver glitter paper 2 7/8 x 4 1/8 and 2 pieces of navy dotted DP 2 1/2 x 4.  Next cut a silver glitter piece 5 1/4 x 4 1/8 and a piece of navy dotted DP 5 x 3 3/4
4.  Glue the silver layer down first and then the navy dotted DP down next
5.  For the Z- Fold arm cut a piece of white card stock 11 x 1 fold in half.  Then fold in half one of the flaps again.  Before attaching it to the card front cut silver glitter paper 3/4 x 5 1/4 and two pieces of glitter paper 3/4 x 2 1/2 and glue to the arm.  Glue the strip to the card front as shown above and below

6.  Using the Merry Christmas w/Shadow die cut out two in white card stock and glue them together
7.  Glue the Merry Christmas to the card front.  I decided I needed a little interest in the background. So I used the Slimline Mountain and Trees die and cut out the snowcapped mountains and the tree line.  I then cut them to fit the large background panel and the small side panel.  Then glued them down.  I glued down the gnome and reindeer on the front arm of the z-fold.  I also used the Snowflake Background Slimline to cut out a few snowflakes glued them down and the card is complete

CottageCutz Products


Thanks so much for stopping by and make sure to check out this latest Christmas release.  I will see you next Thursday!

Take Care and Blessings
Pam


Wednesday, October 27, 2021

Elegance In Simplicity


Hello my crafty friends!  It's Marla back with another YouTube Video  on the CottageCutz Channel, featuring this monochromatic slimline Christmas card.  I created this card using two of the new dies from the CottageCutz September Christmas release. 


I couldn't resist using the GORGEOUS Woodland Country Church die as the center piece on this Christmas card.  My family's holiday tradition includes Christmas Eve service, so this image really is near and dear to my ever loving Christmas heart.  I thought the delicate Merry Christmas With Snowflakes die was the perfect sentiment choice and sticking with an all white, monochromatic color palette would add that extra touch of elegance to the card.  

I hope to see you over on the CottageCutz YouTube Channel to see how this beautiful card came together.  I will also be announcing the winner of the Santa's Delivery Die from the giveaway in my last video.  Maybe it's you.  Please don't forget to subscribe and ring the bell, so you don't miss any of the process videos we are sharing on our channel. 

In case you missed it, the new CottageCutz Christmas Part II release is available now and they are on sale. You can purchase the entire release bundle and save 55% or receive 30% off individual dies for a limited time.  Head over to the Scrapping Cottage to see these and all of the other beautiful dies available to help you create some amazing cards for your friends and family this holiday season.

Until next time... Marla


Tuesday, October 26, 2021

3 Simple Tags


Happy Tuesday Cottagecutz fans. I hope your week is going well. I have been busily crafting all weekend. I just love this time of year for paper crafts 

It’s Wendy bringing you the Today blog. Today I have 3 simple tags. Simple can be very classy and this Christmas release has no end of super fun dies to choose from

To begin with I cut 3 of the nested scalloped rectangles in 3 different colours (4” x 3/4”). I then cut in kraft card 3 nested stitched rectangles and I did the same with some patterned acetate (3” x 2 1/8”). You could get a similar affect if you used the splatter technique on your card


Next I cut out 3 half stitched rectangles and used the Slimline Hills to give them a lovely snowy affect. I am doing this to give the tags some point of interest but it also hides the glue on the acetate.


So I assembled the base of the tags, first the Nested Scalloped Rectangles, then the kraft card and acetate. I then glued the snow to hide the acetate. The hole at the top of the tag will also keep the acetate in place


I then cut the ‘Joyful Snowman’ and Santa and the trees from the ‘Special Delivery’ die set


I attached the elements to the tags with 1mm foam pads and then threaded through the ribbon


I really hope you like the tags. Have a wonderful week and I will see you on Friday with a project from the new release 
Wendy

Dies I used