Monday, July 19, 2021

Little Farm Envelopes

It's Anja here for my Monday's post. I made little envelopes decorated with cute farm animals for today's project.

For this card I used:

- Cottage Cutz dies (Farm Cow Peeker, Farm Pig Peeker, Filigree Daisy Envelope),

- Distress Inks,

- white card stock for die cuts,

- yellow card stock for die cuts,

- black pen, 

- white ink,

- black pigment ink,

- sentiment stamp,

- acrylic block,

- scissors,

- paper glue. 


First I cut and colored the pig and the cow. Next I cut both envelopes. I cut the envelopes two times. I used one piece of each color to cut out the middle part. I did that with the scissors. I used this part to insert in each envelope. Then I assembled the envelopes, added the sentiment and adhered the animals. And my cute little envelopes were done. 


And that's all from me for today. Have a nice week and see you again on Sunday.

Anja Z.


Cottage Cutz dies I used:


Sunday, July 18, 2021

Happy Birthday

It's Anja here. I have a birthday card for you today. This time I used patterned paper for the background to emphasize this cute piggie.

For this card I used:

- Cottage Cutz dies (Playful Piggies, Pierced Rectangle Set),

- Distress Inks,

- craft card base (12,6x12,6 cm),

- white card stock for die cuts and background (3,5x12 cm),

- patterned card stock for background (12x12 cm),

- brown card stock for background (12,4x12,4 cm; 4x12 cm),

- black pen, 

- white ink,

- black pigment ink,

- sentiment stamp,

- acrylic block,

- adhesive foam pads,

- paper glue. 


First I cut and colored the pig. 

Next I cut the background parts. I used patterned and brown card stock.

I stamped the sentiment on a white strip of card stock. I also cut another strip of brown card stock to go underneath.

I placed all the parts to my card base and adhered it. Last I added the rectangle with the pig. I used adhesive foam pads to adhere that one. And my card was done.


And that's all from me for today. Have a nice Sunday and see you again tomorrow for my Monday's post. 

Anja Z.


Cottage Cutz dies I used:


Saturday, July 17, 2021

Toucan Celebrate Your Birthday!

Hello Scrapping Cottage friends! Thanks for taking the time to stop and visit with us today. It's Mary Marsh here bringing you the Saturday edition of the Blog.

IT'S NEW RELEASE TIME! We have a new collection of Slimline Designs. Your slimline cardmaking is going to get a lot easier. We have 20 new designs and they are on sale. You can get each individual die for a limited time 25% off. The dies have appeal for all styles of cardmaking. So check them out and make your selections.

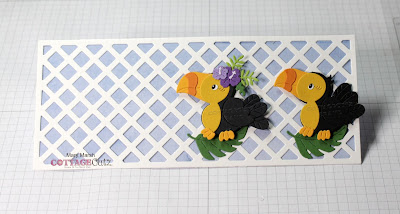
Today for your viewing pleasure, I am featuring the new Lattice Slimline die and paired that with the Toucan from our 2020 Beach & Tropical release. I created a birthday card for my daughter-in-law who celebrates in August.  I have plenty of time to make sure it arrives on time (LOL)! I am notorious for getting cards in the mail at the last minute! So let's get started with some details on how I created my card.

Design Steps:

I started my card by cutting the lattice in white cardstock. For the background I used sky blue designer paper. I am also using a white card base.

Card Base: 3 3/4" x 8 3/4""
Lattice: 3 1/2" x 8 1/2"
Blue Designer Paper: 3 3/8" x 8 3/8"

Next, I started building my outdoor scene. I cut the toucan with cardstock following the packaging colors. I also cut some extra greenery using the Tropical Bouquet die.
For my sentiment I used 3 different stamps and by masking and the help of my MISTI, I stamped on 3 lines in a grape ink. The banner is one of the extra dies that was included in the Windows Slimline die set. 
Now that all my elements are cut I am ready to start the card assembly. I attached the blue designer paper to the lattice with double sided tape. Then the toucans were attached with dimensional adhesive. I have them standing on a green tropical leaf.  
Next, I attached the banner sentiment and the two tropical leaves. 
The Birthday phrase is from the Fairytale Birthday die. I cut two for more dimension in a grape cardstock.
To finish off my card I attached the image panel to the white card base. I added some additional tropical greenery in the corner. I hope I have given you an idea for a way to use this new slimline lattice die with dies you already have in your collection. See you next Saturday. 

Dies I used to create card:


Friday, July 16, 2021

Sea of Love

Happy Friday! It's Jeanne today with a card using one of the fun new slimline dies combined with a few dies from summer of 2020 Pirates and Sea Creatures.  The Waves Slimline coordinates perfectly with that release.

I first cut the fish and mermaid tail from various colors of cardstock.

Next I worked on the ocean.  I cut a 5 1/2 x 9 inch piece of mixed media paper so I could do a watercolor technique I call "splat". 

I swatch Distress Oxide on a craft mat and spray with water.  Then I dip the paper in the ink.

I keep going until I'm satisfied with the results.  I use a heat gun every once in awhile to set the ink.

I used the largest of the Slimline Rectangles to cut a base from white cardstock and stamped the sentiment in the upper left.  I cut the water piece into three strips - two 2 inches and one 1 1/2 inches.

I opted to use only two of the strips and cut them with two of the Waves dies.  I placed them on the bottom and added my mermaid tail.  The over hang on the right, I cut with scissors.

Then I added my fish.  I had made more than I ended up using but that's perfect - I have some fish and a water strip for another card.

To finish the card added a pearl to the shell.  I hope you've enjoyed my card today.  Be sure to visit the online store where the new release is on sale for a limited time.

Products used:


Thanks for visiting today.  I hope you have a fun and creative weekend.


Thursday, July 15, 2021

Rose Anniversary Card

Hello Scrapping Cottage Friends

It is Pam sharing with you today!

We have a HUGE SLIMLINE DIE RELEASE with 20 fantastic dies.  The dies are at a savings of 25% off right now in the store.  The new designs are just so amazing.  They are sure to put your imagination into overdrive!!  Check them out right HERE.

I wanted to make a beautiful, classy Anniversary card for a friend so I decided to use our new Rose Background Slimline.  It is hard to see in the photo but I used a red foil paper for the background behind the die and it is so shiny and pretty.  It also came together very quickly!


Designer Steps:

1.  Using the Expression Happy and the Expressions Anniversary cut out the dies one time on the red foil and 2 additional times in black.  Glue them all together placing the red one on top
3.  Use a black slimline for the card base.  Cut a piece of red foil 3 1/2 x 8 1/2.  Use the Rose Background Slimline die and cut it out of black card stock.  Also using the second from the smallest Scalloped Stitched Retangle die cut out a small black rectangle
4.  Glue Happy Anniversary to the scalloped rectangle
5.  Glue the red foil panel to the front of the black slimline card base.  Then glue the rose die cut piece to the red foil as shown above.  Pop up the Happy Anniversary rectangle and add the bow.  Your card is complete

CottageCutz Products


Thanks so much for stopping by.  Please take sometime and check out the new dies so many of them make wonderful fast background for your slimline cards.

Blessings and Take Care
Pam