Thursday, June 03, 2021

Best of Cluck!

Hello Scrapping Cottage Friends 

It is Pam creating with you today!

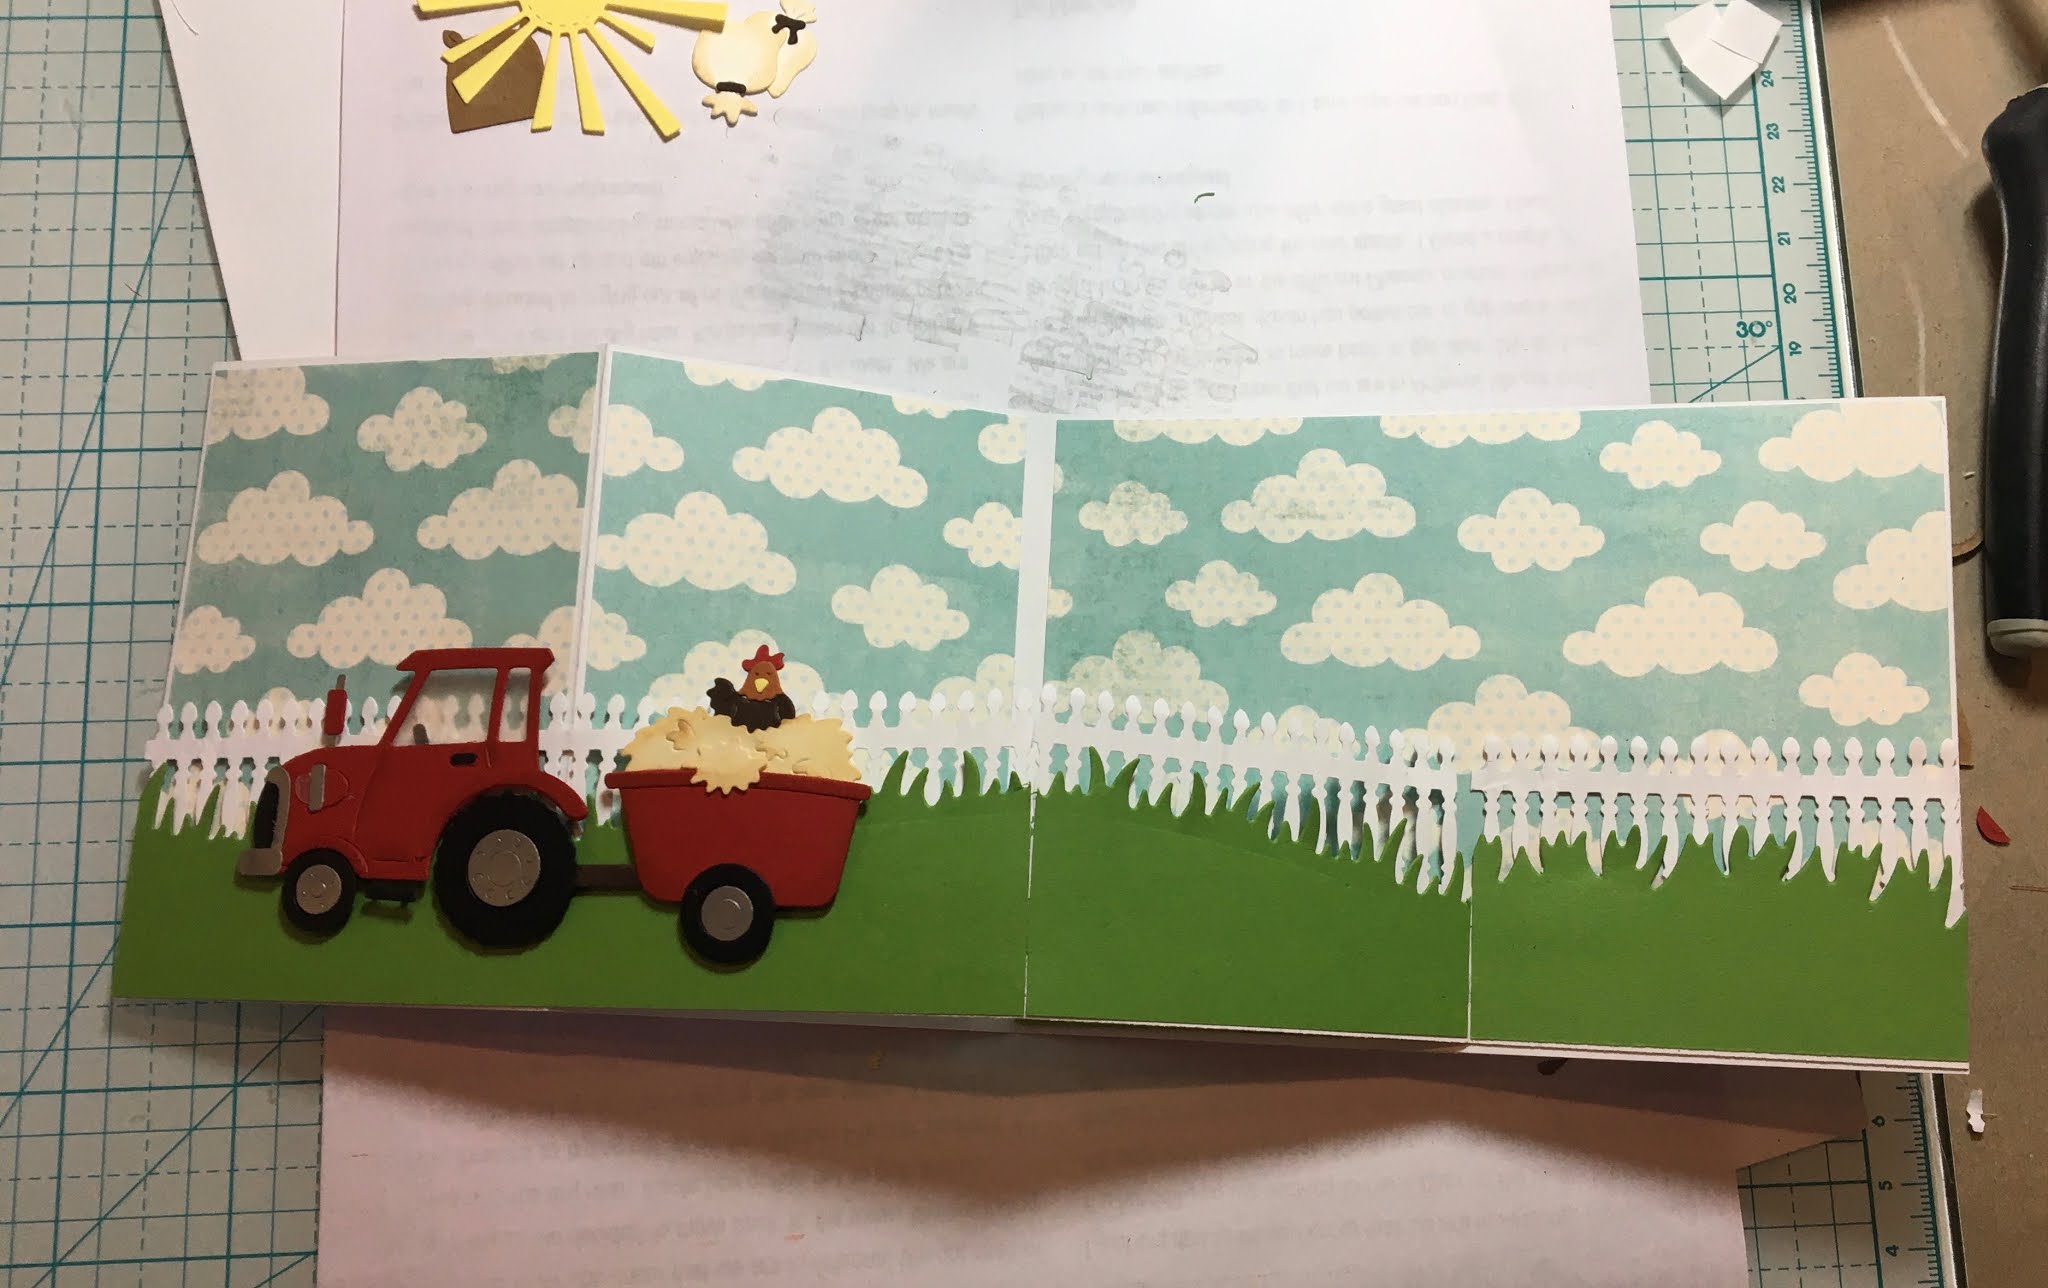
IT IS NEW RELEASE TIME! The collection is called COUNTRY FARM! It has the most delightful dies.  Everything from Tractors to Cowboy Chicks!  Each die is just full of awesome details and can be used for so many different occasions.  Today, I am using the Farm Tractor w/Trailer as a best of luck z-fold card.


Design Steps:

1.  Using the Tractor w/Trailer die cut all the pieces.  I used red, black, silver, brown and acetate for the window and head light.  I also used the Stacked Farm Animals for the additional chickens.  And the Grass, Tree and Vine die for the background tree.  Shade and assemble all pieces
2.  For the base of the z-fold card I used a white piece of card stock 4 x 11.  Fold it in half and then fold the front fold in half again.  For the little z-fold white strip I cut a 1 x 11 inch strip.  This strip is scored at 2 3/4 x 5 1/2.  

3.  Before attaching the strip glue down your cloud DP 2 panels at 2 5/8 x 3 7/8 and 1 panel at 5 3/8 x 3 7/8.  Next use your Grass Slimline die and cut 2 pieces of green grass about 1 inch high.  Also cut 4 pieces of white fence using the Victorian Fence die.  Glue the fence to the back of the grass and then glue to the z-fold strip.  Using the Stitched Sun, Cloud and Umbrella die cut out a sun in yellow
4.  Pop up the Tractor and Trailer to the card as shown.  Add the sun to the upper left corner
5.  Glue the tree flat to the back panel as shown.  Glue the 2 additional chickens and bags of grain to the card as shown.  Add the sentiment and your card is finished

CottageCutz Products


Thank you all for stopping by and be sure to check out this adorable new release!

Take Care and Blessings
Pam


Wednesday, June 02, 2021

Have a Roaring Birthday

Hello!  This is Sukie and today I'm sharing an interactive card for my design team day!  The new Slimline dies certainly made it easy to create this fun card.

I used the Lift Flaps Stitched Rectangle Slimline die set to cut out the double stitched rectangle and the lift flaps.  I cut out an extra lift flap in white card stock and cut it off on the attached end.  I also cut out the Safari Lion, Safari Rhino, Safari Giraffe, Safari Zebra and Safari Camel.  The grass border is from the Grass Slimline die set.

The safari animals were cut out in both white and colored card stock and shaded with some inks.  The first step in my design process was to layer the lift flap die cut on top of the the grassy background.  This piece was then adhered onto my card base.
Next, the sweet animals were nestled inside of the lift flap frames.  I trimmed the giraffe slightly so that he would fit.
The lion and rhino were adhered on top of the right and left side flaps. 
I stamped a couple of sentiments along with a lion image on the white card stock flap and adhered it to the other flap adding a fun element to my card.
Here are the die sets used on my card, available in the store:

Tuesday, June 01, 2021

Ho Ho Ho

Hello Scrapping Cottage Friends

It is Pam on the blog creating with you today!

Today is Throw Back Tuesday so I am taking advantage of this fun day by getting a head start on my Christmas cards!!  I am using a super cute die from the 2019 Christmas Release Part 2.  It is called Ho Ho Friends.  I decided to make two versions one horizontally and one vertically.  Not sure which I like better maybe you can help me decide!!


For the vertical card I used a green slimline base and for the horizontal card I used a white slimline base.  For both versions I used the Hills Slimline die for the snow which is cut out of glitter paper.  For the top card after I glued the hills to a piece of white card stock (only glue down the very bottom of the hills so I could tuck in the Ho Ho Ho). I ran it through my die cutting machine using the Scallop Stitched Rectangle Slimline. For the bottom I just glued the layers directly to the card base and added some DP for sky.

After I got the base done I cut out 2 of each of the reindeer, penguin and Santa shaded them with inks and glued them together.  I also cut out 6 of the holly and lettering using the Ho Ho Friends die
I added the holly to the letter H and tucked them into the snow.  Next I added the characters to the letter O and tucked them into the snow.  The last step is to add glossy accents to the holly berries, penguin beck and reindeer nose stamp the sentiment and glue to card and it is complete

CottageCutz Products


Thanks so much for stopping by for our Throw Back Tuesday.  I hope I was able to jump start your Christmas card ideas!
Blessings
Pam


Sunday, May 30, 2021

Celebrate

Hi!

It's Anja here. I have celebration themed card for you today. I combined dies from different releases and this is the final result. 

For this card I used:

- Cottage Cutz dies (Fox in Airplane, Celebrate Phrase, Clouds Slimline),

- Distress Inks,

- light blue card stock for card base (10x21 cm),

- white card stock for die cuts, 

- black pen,

- white pen,

- cotton string,

- tape,

- adhesive foam pads,

- paper glue. 


First I cut and colored the fox and the plane.

Next I cut the sentiment three times, glued the cuts together and then colored it.  

I used clouds slimline die for clouds cuts in different sizes. First I trimmed the paper (21 cm long) and the cut the clouds. I colored the edges and then glued the cuts on top of each other. I started with the widest one. 

I taped the string on the back of the plane and added adhesive foam pads to adhere the plane on the card base. I tied up the other end of the string to the sentiment and glued the sentiment on the card base. And my card was done.


Before I go I want to invite you to The Scrapping Cottage online store to check the new farm release and Memorial Day Sale. 

Have a nice Sunday and see you again on next week. 

Anja Z.


Cottage Cutz dies I used:


Saturday, May 29, 2021

Patriotic Gnomes

Hello Scrapping Cottage friends! Thanks for taking the time to stop and visit with us today. It's Mary Marsh here bringing you the Saturday edition of the Blog.

We have a brand new release of Country Farm dies. They are on a great limited time sale. You can get the entire release of 16 new designs for under $120. That's a savings of 60%. The individual dies are on sale at 25% off. The DT will begin showing samples with these dies next week. 
 
We are also having a Memorial Day sale. You can get some great savings of up to 70% until June 2. So now is the time to get your wish list out and pick up some new dies. The release of Slimline dies are still on sale at the online store. They just make your slimline cardmaking so much easier. There are  9 Slimline designs and they are on a 25% off sale. 

Since this is a holiday weekend,  I am featuring a patriotic card in the slimline design. I focused on a July 4th theme since that's a big celebration for the US. I used the Flower Power Tomte dies from our 2020 Gardening release collection and dressed them in patriotic colors. I also used the Windows Slimline die.  

I decorate my home in a patriotic theme that I leave in place until mid-August. So this card will be part of my decorations. So let's get started with some details on how I created my card. 

Design Steps: 
I started the card off by selecting my designer paper. I wanted a patriotic theme but nothing that would overpower the gnome images. My patriotic paper is limited and I didn't want to make a run to my local Michael's store so I looked online for something that I could download for free. Yay- I found some on Pinterest. And it printed out nicely as well.
 
So I cut the windows slimline once from the designer paper and then again in a red and blue cardstock. My card base is white and measures 6" x 8" and scored at 3". It's the same size as the window frame. 
Next, I cut the gnome images in red, white and blue cardstock. I didn't want them both to be exactly alike so I cut their hats in different designer papers and cut the hat bands in two shades of blue cardstock.
For the center panel, I decided to make that a solid color. I used the banner that comes with this slimline die and stamped my sentiment in blue ink. The July phrase is part of the Calendar Months die from our Valentine 2017 release, but is currently out of stock. The stars are from the Circus Ringmaster die. 
Now that all my elements are cut I am ready to start card assembly. I attached the red window frame to the white card base with glue dots. Then I attached the inlaid panels with double sided tape.
To finish off my card, I added my patriotic gnomes and secured them with dimensional adhesive. I decided to use the garden flags that come with the die. In the red, white and blue I think they look like flags that you would wave at a parade. 
Well, that's it for me for this post. See you next Saturday. Have a great holiday weekend.

dies I used to create card: