Thursday, July 27, 2017

Love You Forever!

Hi Scrapping Cottage Fans! It is Pam sharing with you today.

There is another great release of new dies over in the online store. The Nested Shapes with 17 designs as well as a Wedding Release with 20 designs. Janet (our video artist) has put together a video showcasing all the new nested shapes dies. Just click on the photo below to be taken to the CottageCutz YouTube channel.
https://youtu.be/2LOQcFflcIE

Now onto my card. I am featuring two different new release dies that make beautiful wedding, anniversary or Valentine cards.  I love the vintage feel to this wonderful bird die.  All the swirls and gorgeous detail is so pretty.


Designer Steps:
 1.  Start with a A2 Vanilla card base cut a slightly smaller piece of deep red card stock and glue to front.  Cut a piece of 4 x 5 1/4 piece of designer paper and glue to the red
 2.  Using the Nested Stitched Scallop Circle set place the largest circle onto the cutting platform and then the second to the largest inside the largest and cut a open scalloped circle
 3.  Cut the vine on dark green card stock using the Fancy Doves with Vine and then cut the flowers in the deep red
 4.  Glue the red flowers to the tips of the vine
 5.  Glue the open scallop circle to the card as shown just slightly of center.  The glue the vine down as shown
 6. Using the Fancy Doves with Vine cut out the two doves on designer paper then ink the edges with a distress ink

7.  Use a sharping tool to give the doves some dimension then pop them onto the vine add pearls and your card is complete
Cottage Cutz Products


I hope you give these new dies a try.  They both are so versatile! 

Blessings and thanks for stopping by!


Pam

Tuesday, July 25, 2017

New! Nested Shapes Release


Hello Scrapping Cottage Fans! It's Janet from SugarShine Designs. Today I'm sharing a video with you that takes a look at all 17 new nested shapes dies. These are exciting new additions to your crafting toolbox. I invite you to take a few minutes to see the new sets up close and you might see a few new designs from this month's wedding release too!

Click on the link below to go to the YouTube video showing this fantastic new release.


Dies used in this video:


Monday, July 24, 2017

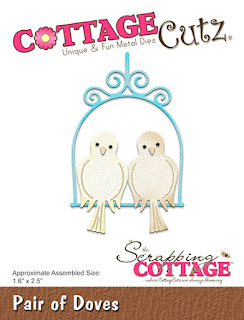
Two Doves

Hi, Lois here with my Monday post.  As you are probably aware,  CottageCutz has two new die collections -- a wedding collection and a nesting shapes collection.  And they are currently 25% off through 9:00 pm tonight PST.  I'm using a die from each set this week for my monochromatic card.


To start my card, I cut two pieces of white cardstock -- 5 1/2" x 8 1/2" (scored at 4 1/4") and 3 7/8" x 4 1/8", and one piece of black cardstock 4" x 5 1/4"; as well as a piece of patterned paper 2 7/8" x 3 7/8".


Next I cut the Stitched Eyelet Rectangle panel, using the largest die in the set, and the Two Doves die-cuts from white and black cardstock.


Using some ivory Copic markers and a black pen, I added some accents to the doves.


I wanted the doves  to be raised from the card, so I placed some foam dots on the backs of them . . .


. . . and adhered the bird stand and doves onto the patterned paper, which had been glued to the black panel.  Sometime ago I bought a package of wedding paper, which also included some tags.  I adhered one of the small tags to the top corner.


I ran the 3 7/8" x 4 1/8" piece of white cardstock through my Cuttlebug using an embossing folder with a similar pattern as that on the patterned paper; then I constructed the card base.


I glued down the finished eyelet panel at an angle, and my card was finished.


CottageCutz dies used on this card are:

http://www.scrappingcottage.com/cottagecutzpairofdoves.aspx

http://www.scrappingcottage.com/cottagecutznestedstitchedeyeletrectangleset.aspx

Sunday, July 23, 2017

Cabin in the Woods

Hi!

It's Anja here. Today I have a nature themed card for you. I made a scenery using the cabin and mushrooms die. A card is a bit different than usually because it has a window.


To make this card you will need:
- Cottage Cutz dies (Woodland Cabin, Mushrooms & Greenery, Snowcapped Mountains, Stitched Rounded Square Set),
- Distress Inks (Peeled Paint, Black Soot, Forest Moss, Fired Brick, Barn Door, Pumice Stone, Stormy Sky, Pine Needles, Shabby Shutters, Antique Linen),
- Distress Oxides (Pumice Stone, Vintage Photo, Fossilized Amber, Walnut Stain),
- white pigment ink,
- craft card base (15x10,5 cm),
- white paper (14,5x10 cm),
- white card stock for die cuts,
- white pen,
- paper glue.

First I die cut a rounded square shape window in to the card base. I also made a white frame using two of the largest stitched rounded squares.


I colored all the pieces with combination of Distress Inks and Distress Oxides. I used small make up pads to color the little pieces of the cabin.


For the background I used blue and grey and spritzed with a bit of water.


And then I just glued all the pieces together.


Don't forget to check out the new wedding and nested shapes dies in the store. I will start showing my projects using the new dies very soon.

Have a beautiful Sunday.
Anja Z.


Saturday, July 22, 2017

~ Bride & Groom ~ (new die)

Hello Scrapping Cottage friends! Thanks for taking the time to stop and visit today. It's Mary Marsh here bringing you the Saturday edition of the Blog.

Have you had an opportunity to visit the online store to see the new dies that have been released? There are 20 new wedding dies and 17 fun new nesting shapes.  They are currently on a limited time 25% off sale.

Today, I am featuring the new Garden Bride & Groom die as well as the new nested Stitched Scallop Rectangle die.
I have a wedding to attend soon and this die is perfect. I like the elegant appeal of this silhouette image. So I created a card a bit more on the clean and simple side to keep the bride & groom die cut as the central focus.

So let's get started with some details on how I created my card.
Step 1: When I make wedding cards, I usually choose the colors the bride has chosen for her wedding. In this case, it's a rich denim blue and a soft pink. I cut the scallop frame in the denim and then the bride & groom in white. I used the largest of the scalloped rectangle dies for my frame.
Step 2: I decided to stamp my sentiment on the card base before I placed any of the card elements. Used my stamp-a-ma-jig to help with the placement and to keep it straight. I stamped in the denim ink. I thought this sentiment worked so well with this bride & groom image.
Step 3: As I thought of ways to incorporate the pink into my card, I decided to use some ribbon. It dresses up a card nicely and adds interest. My card base is a little larger than what I usually do.
Card Base: 5 7/8" x 4 3/4"
Step 4: Attached the bride and groom to the scalloped frame with double sided tape. Once that was placed I die cut the corner flourish. I cut them first in white but it just didn't have enough pop. Once I tried the denim blue I liked the look. I used the corner flourish die. Attached the flourishes with mini glue dots.

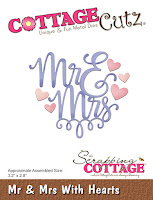
Step 5: Finished off my card by adding a couple of pink hearts cut from the new Mr. & Mrs. die
Well that's it for me for this post. I hope I have given you an idea on a way to use these new dies. Remember, for a limited time you can save 25% on the new dies.
 
dies I used to create card:
http://www.scrappingcottage.com/cottagecutzgardenbrideandgroomelites.aspx

http://www.scrappingcottage.com/cottagecutznestedscalloprectangleset.aspx

http://www.scrappingcottage.com/cottagecutzcornerflourishelites.aspx
http://www.scrappingcottage.com/cottagecutzmrandmrswithhearts.aspx