Friday, February 03, 2017

FLOWER OF THE MONTH-FEBRUARY


Hello !!!!
This is Anita here!!! First let me apologize for not posting last week as I was on vacation and was out of all internet connections. Now I am back, refereshed and recharged and rearing to go with new projects.
CottageCutz has come up with amazing line of stamps and die combos that are too adorable. I have loved each one of them and you too I am sure will like them. You can check these HERE and HERE and HERE

Today I am going to feature one of my favourite floral stamp-Violets-February


This is a beautiful floral stamp with matching die and colouring this is so much fun. I have made two cards here which inspite of being simple are yet very pretty.
So have a look.


To make this, I gathered my stamp and die set, some water colour paper and Zig real brush pens. I stamped the image on a white card stockcut with Memento Black ink and cut it with coordinating die.


Colour the image as shown.


Adhere the image on Cross stitched Oval die with 3d Foam tape.


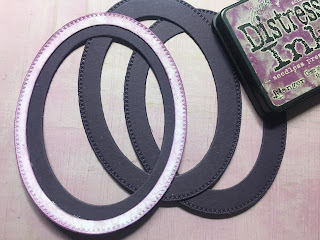
Cut oval frames using the Cross stitch Oval set. You will need three broad frames and one narrow frame.


Adhere all together and distress the narrow frame as shown.

For the backing , place the oval die cut on a pattern paper and cut out the oval shape. Adhere to the back.

Score a card front on the score board. Add some quick water colour. Adhere the oval panel.


  The finished card


 CottageCutz Products used
CottageCutz Violets - February (Stamp & Die)

I have another card that I wanted to share with you. It is showing the same Violet flower set. I liked the finished result with both the soft water colour and the bold colour. I have stamped and coloured the image on water colour paper using zig brush pens to colour. The colouring has a washed effect which adds to the beauty of these flowers.


Here I have used CottageCutz Double stitched Rectangle die to create the frames of my card.

I hope you liked my cards. There are many more floral stamp and die sets for each month and all of them are so beautiful. Do try them . 
Hope you had a good time here. 

Thursday, February 02, 2017

Flip Calendar - Part 3


Hi, Lois here again with the third and final post explaining how my flip calendar was constructed.   In addition, I will show how I made the base.


Supplies used in this post:

Copic markers
Foam pop dots
Heavyweight cardboard
Scor-Tape
Scor-Pal
Zutter Bind-It-All machine and wires

As I did with the previous months, I stamped, colored and cut the pieces of the scenery for my last four calendar pages.


I then constructed my scenes, as before, adding whatever icons I wished for each month.


Now I was ready to build my base.  It needed to be rather sturdy, so I used heavyweight cardboard.  I cut two panels slightly narrower (5 ¼”) than my calendar pages and 3 ½” longer (10 ¾”).  I scored one of the panels at 7 ¼” and 9”.  The other one I scored at 7 ¼”, but then I cut off 1 ¾” from the end.  This would allow me to be able to fold the base more easily – with less bulk.  In addition I cut a small “hinge” for the top 5 ¼” x 2”, scored at the 1” midpoint.


Using a Zutter Bind-It-All, I punched six holes, centered, at the top of the two base panels and at the mid-point of the “hinge” and then applied two-sided adhesive tape on the “hinge” and the lower panel of the shorter base piece.


Carefully, I attached the pieces together to form the base.

Again, using the Bind-It-All, I punched holes at the top of each calendar page, making sure that they were centered in the machine before I punched.

Using a 1” Zutter wire, I attached the calendar pages to the base.  And my calendar was finished.


At the end of each month, just flip the page and reveal the following month.  After the June page is flipped, all that is necessary is to turn the calendar around for July. 


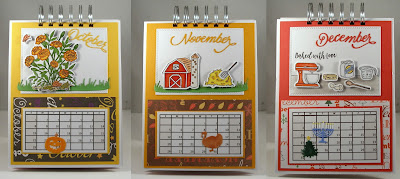
And, if you wanted to be able to use the calendar again the following year, all you would have to do is make new monthly calendars and carefully replace the old ones.  Here are all the completed pages of my calendar.


I hope you enjoyed the process of making this calendar.  Maybe you'd like to try making one yourself.

CottageCutz stamps and dies used on today's post are:


Wednesday, February 01, 2017

Flip Calendar - Part 2

Hi, Lois here again with the second part of my flip calendar.  Today’s post covers the months from January through August.

Supplies used for today’s post:


Copic markers
Ink – Distress Bundled Sage
Sponge dauber
Foam pop dots

 I loved the Birthday Month flower stamp/die sets, but I didn’t necessarily want to have just flowers on my calendar pages.  There are several other stamp/die sets available as well – In the Kitchen, Garden Gnomes, Bee Sweet, Woodlands. as well as others.  I interspersed some of them throughout my calendar.

The January, February, May and August pages were made with the non-flower sets, while the March, April, June and July pages used the appropriate flower for the month.  I stamped, colored and die-cut the images for each month.


After I put the die-cut images onto the white panels, I realized that they needed to be “anchored” by something.  So I die-cut a strip of grass, using the Spring Grass die.  I cut 12 of these strips of grass, one for each page.  This also added continuity throughout the calendar.  This photo was taken before I sponged a bit of darker green around the edges.

I glued the grass strips along the bottom of the white panels and then built my scenes.  I chose which of the icons I wanted for each month and applied them on the appropriate dates.


My next post will show the remaining four calendar pages as well as directions for the calendar base.

CottageCutz dies and stamps used on today's post are: