Sunday, August 21, 2016

Christmas card with 3D Flowers

Hello friends!
Thanks for taking the time to stop and visit today. This is Yuliya here). It's here share some of the new Christmas release with you!
And I will be sharing how to make this Christmas card using the CottageCutz dies.

Here is list of all supplies I usedCottageCutz Dies:
- CottageCutz Spruce Stems- CottageCutz 3D Flower 1
- CottageCutz Spruce Stems
Other: Sizzix machine, glue, patterned paper, cardstock, flower soft, glossy accents


Follow the pictures below for making this card step-by step
1. Size my cardstock - 30 cm* 10 cm. Fold it. And size my card - 15 cm*10 cm. Prepare patterned paper for base. 
 2.
3.
 4.
 5. 
 6.
 7.

8.


I hope you like this card. Have fun creating. And don't forget, fifth CottageCutz challenge is waiting for you. This time theme is BIRTHDAY CARD. You can linked your project here. And please, use only Scrapping Cottage dies.


Saturday, August 20, 2016

TRI FOLD CHRISTMAS CARD

Hello everyone !!!

How are you all doing ?? Are you having fun with all the gorgeous Christmas inspiration?? It's indeed so exciting that the Great day is just 3 and 1/2 months away but the air is filled with spirit of joy. Card making is in full swing everywhere and new designs are making a show everyday. On this ocassion, CottageCutz has come up with amazing Christmas theme dies and many more are still on the way. The new one released just a few days ago are the cutest and most beautiful ones.

Today I'm sharing a Tri fold long Christmas card with you and the twist is that , it is made of envelopes. Yes!!! We can effectively use envelopes to create card bases. This saves a lot of time especially when we have to make a lot of cards.
I am sharing here the pictures as to how I have prepared my card base. The close ups of the various parts of the card will explain you , how I have built up my card.

Here is my card.


  The finished card measures 8.75inches x 4.5 inches.
 You need  three long envelopes 8.75 inches x 4.5 inches that open side ways on the elongated side.
Place the envelopes side by side like this with two envelopes on either side flap side up.


Join the envelopes together. Adhere the flap of the envelope on the left side with envelope in the middle and repeat with the other side.

Cut out pattern papers a little smaller than the envelope to cover the card front, inside and back. Here I have used pattern papers and  stamp from Heartfelt Creations .


Add ribbon and now adhere the pattern paper.


Decorate the card with CottageCutz dies. Add an embossed pattern paper and cover with CottageCutz Wide rectangle stitched frame. Cut die cuts from Holiday bell and layer upon a scrap of paper. Add glitter. Adhere to the card. Add die cut  from the Merry Christmas ribbon.


On the first panel add die cuts from CottageCutz Garden stamp and Winter Cabin Border.


Add die cut from CottageCutz leafy swirls and Best Wishes die cut.


 The finished inside panel


Dies used are listed below.


A fabulous challenge# 5 is going on at the blog and we would be really happy to see your entries. 


Friday, August 19, 2016

Winter Scene in the Ornament Bulb


Hi, Vladka here!

It is such fun to play with Christmas dies and today I have this card for you:


Let's go to basics first:

White card base: 4 1/4 x 6 inches (cut 4 1/4 x 12 inches, fold in half)
Additional piece of white cardstock and some white and light blue cardstock for die cuts and back side of the ornament.

Other Supplies:

CottageCutz Dies: Listed Below
Other: Paper trimmer, Sizzix machine, Scor-buddy, White watercolor in tube, paint brush, fun foam, green and brown copic markers

1. First prepare card base and use the biggest Bulb Ornament die and cut it out of additional piece of white cardstock. You will need the negative piece, but save the ornament bulb for the next project. Do the same with piece of fun foam, which should be slightly smaller as additional piece of white cardstock. This is our base.


2. Cut the snow hillDeer and Forest scene out of white cardstock and prepare also piece of blue cardstock for next step.


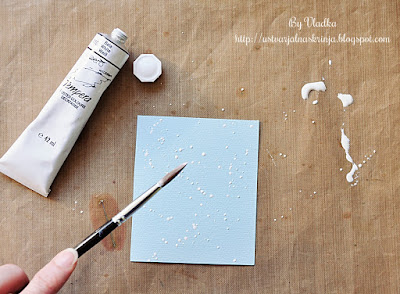
3. Let's go on with background. Take piece of light blue cardstock and some white watercolor and paint brush. Mix white color with a small amount of water. With paint brush, flick some droplets on the blue cardstock and let it dry.


4. Color the trees and the deer with green and brown copic markers:


5. Put some white watercolor on the piece of dish sponge and drag gentle over the Winter scene:


6. Use double sided tape and glue snow hill on the backside of the additional piece of cardstock so that it will be visible true the bulb hole. Glue also Deer and Forest scene on the backside of the fun foam so that it will also be visible true the bulb hole.


6. Now glue fun foam on the back side of the additional piece of white cardstock and blue piece of paper on the back of fun foam. Glue everything on the cardbase, which is already prepared beside.


7. With Build a Bow die, make bigger bow and glue it on the top of the bulb. Flick some white droplets also on the finished card:


8. Finished the card and glue everything on the cardbase and add also the Merry Christmas die cut. If you want, you can add also piece of acetate between additional piece of paper and fun foam and make shaker card out of it.


I hope you like this card. Have fun creating. And don't forget, fifth CottageCutz challenge is waiting for you. This time theme is BIRTHDAY CARD. You can linked your project here. And please, use only Scrapping Cottage dies.

Thursday, August 18, 2016

Christmas Ornaments

Hello everyone,

It's Donna here with a couple of cards made with some of the new release Christmas dies!!!!  I am so excited about this release because I love to make Christmas cards.  I love the reason for the season, I love the colors, and  the snow (but I love summer the most), I'm not trying to rush Summer away. How about you, what is your favorite season?

My cards are clean and simple, but I love how they came out and I love the nontraditional colors I used.


Here is how I put them together:

1.  A2 card (4 1/4 x 5 1/2),
2.  Top layer measures 4 x 5 1/4,
3.  I die cut all three dies from the nested ornaments, Teardrops set,
4.  I die cut the snowflake from the Peppermint Latte set,
5.  glued the snowflake on the smallest ornament and added a rhinestone,
6.  I cut the tops of the ornament with silver glitter paper,
7.  I attached all the ornaments and snowflake using alternating colors,
8.  Embossed my sentiment with silver embossing powder,
9.  Attached the ornaments with silver lace and added them to the card.

I hope you are inspired!  Please stop by and join the challenge, this months theme is birthday

Dies used: