Monday, January 02, 2012

Happy New Year 2012

Hello everyone and HAPPY NEW YEAR TO ALL!! Today im sharing my card made with the Beautiful Cottage Cutz die's and My Little Shoebox design paper
I also used MLS stickers and they make it super easy to spell out what you want to say :) LOVE these too!!! I used the ornate frame from the summer release and then the Plumeria Flower. I added pearls to the center of my flowers.

I added some RRRibbon and some pears to my card. Also love adding sewing :) I love the Plumeria flower because the cottage cutz has 3 different sizes and leaves too, its a perfect flower to work with :) and with my 3 flowers here i used the MLS design paper, so no ink on these :) heheheheh


Ok I just have to let you all know that the DARLING VALENTINE RELEASE is now up on the store site for PRE-ORDERS, and OMGOSH I LOVE Them all!! This release is way too SWEET and PERFECT for Valentines Day!!!

Hope you all have a wonderful and awesome New Year!!!
Hugs to all,
Cheryl

Sunday, January 01, 2012

Hello 2012 !!!


Hey everyone, from Sunny Singapore ! 
HAPPY NEW YEAR to all our blogging friends !
& Wishing you ALL a NEW YEAR filled with more inspiration than ever !  


I am so looking forward to enjoying the ride in 2012 , 
so it is only fitting that I chose to use the 
Carnival Silhouette die from our Carnival release in July 2011 
to go with my card sentiment today . 
I have used American Crafts' glitter paper for the diecut -
one of my faves to use when using a silhouette die- glitter paper ie. 

As I look to the year ahead , I like to be reminded - 

"The Best is Yet to Come ! " 

Enjoy 2012 , blogging friends !!! 

Hugs,


Saturday, December 31, 2011

Let it Snow!

Here in Utah we usually have snow on the ground at this time of the year, but not this year.
We've had a couple of skiffs and that's it. I'm not complaining but many are saying "Let it Snow!"
It's a funny thing because when it starts to snow and everyone starts slipping around when they drive and they get wet and cold, they start complaining about the snow.


We'll see if my Eskimo w/Igloo card brings some snow for the new year.
Here is wishing you all a Happy and Prosperous New Year!
Kay

Thursday, December 29, 2011

Celebrate the BIG 2

 Yes. . Celebrate the BIG 2. . .  201"2". . . . This week I decided to work on a New Years cards. I used a few dies from the Cottage Cutz Birthday release from the middle of 2011. Cottage Cutz Celebrate which has the word Celebrate and several confetti type shapes and the two small Cottage Cutz dies, two styles of balloons. The entire Birthday release really allowed you to use most of the dies for any type event.I used Lime Green glitter, Black & White Bling and Metallic Gold card stock. The colors seem to pop against each other. I foam dotted some of the balloons to create dimension. I used a 1/8 hole punch to cut a few Lime Green Glitter card stock dots and glued them to the black sheer ribbon so the polka dots would match the card.  You can't always find ribbon to match a card perfectly.  The tag with the 2012 is tied with a gold cord bow to the BIG 2, just like a tag on a gift. I also let the balloons and strings overlap the card a bit. Fill the finished card with confetti before mailing. . .
Thanks and Happy New Years to All!  Barry

Happy New Year!

Since Christmas is over I was looking for something fun to make for New Year's and spotted my wreath die sitting on my craft counter. So I made a New Year's wreath. This was so simple. I cut out a silver and blue foil (American Crafts foil cardstock) wreath and then placed the silver one over the blue one and stuck a few of the blue leaves up over the silver ones to intertwine them.

I cut out the banner from the same die. I cut out a white one and a silver one. I stamped the white one and the cut of the sides, inked the edges and adhered it to the silver one. I used pop dots to raise it above the wreath. Super simple.

I hope you all had a Merry Christmas and I wish you a Happy New Year!
Kay

Wednesday, December 28, 2011

Plumeria & Leaves

Hello everyone, and Happy Wednesday to all! Today im sharing the Beautiful Plumeria & Leaves Cottage Cutz.
this cottage cutz is perfect for adding handmade flowers to your projects. I used pink card stock, pink ink, stickles, and a pearl to create my flower I also inked up the leaves. For the design paper I used My Little Shoebox design paper and stickers for my wording.

I added some sewing, Ribbon(RRR), and a fabric brad to the center of my bows. 

Supplies Used:
Plumeria & Leaves Cottage Cutz/The Scrapping Cottage
Design Paper/My Little Shoebox
Ribbon/Really Reasonable Ribbon
Stickles & Pearl
fabric Brad
Sewing in Pink
Card Stock AC
Inks to distress flower and leaves on Plumeria flower


Hope you enjoyed today's post!!! And I hope everyone had a Very Merry Christmas!!! Happy New Year to all :)

Hugs to all,
Cheryl

Tuesday, December 27, 2011

Puppy Love

Good morning friends!  I hope you all had a Merry and Blessed Christmas  or special time spent with loved ones during this holiday season.  Our Christmas was very pleasant.  My 15 yr. old had his wisdom teeth removed on Thursday.  Other than having chipmunk cheeks, he has been such a trooper and hasn't complained a bit.  Though he has been eating puddings, and jello, and ice cream and yogurt, he was able to eat a couple of helpings of turkey stuffing with gravy for his Christmas dinner.  The rest of us enjoyed turkey, stuffing, mashed potatoes and gravy and some other sides.  My oldest son said the turkey this year was one of the best he has ever had.  It was very moist.  I soaked it in a salt brine the last couple of times and I believe that has made all the difference.  I always baste my turkeys but the salt brine was the only thing that was significantly different than other times I have prepared turkey.  I always wash and soak my poultry, like my mother taught me, but I added much more salt to the soaking water than usual.  I hope I haven't bored you with my little cooking lesson.  I don't usual ramble so much.  After dinner some of us started putting together a 1000 piece puzzle, another past-time my mother also shared.  It is nice that my son's girlfriends also enjoy doing them as well.  Enough of my rambling lets move on to my card.


     I used the very popular Peeker Pocket die along with the Shih Tzu Peeker die to create my card.  The little pooch was one of the first dies I ever received, and I still love it!  I cut the pocket and puppy from white cardstock and colored the images with copics.  To create the texture on the pocket, I first colored the pocket with a blue copic, I think it was Manganese Blue.  Then I took a piece of scrap fabric that seems like a denim of some sort, and my colorless blender refill solution.  Wet the fabric scrap with the colorless blender and press it to the colored pocket to remove color and create the texture.  I learned this technique from a very talented artist, Joanne Basile, who taught some My Favorite Things classes at my local Scrapbook Store.  (I hope I spelled her name correctly.)  Isn't it a great technique?  The paw print and sentiment are from Market Street Stamps Pawprints on our Hearts set and the clipboard stamp is by Unity.  I hope you have a wonderful day and a safe and Happy New Year!  I will be back with another post on January 7th.  Thanks for stopping by!

Hugs and smiles,
Janice

Monday, December 26, 2011

Happy Winter!

Good morning, and welcome to The Scrapping Cottage Blog!  It's Lorie here today, and I sincerely hope that you ALL have enjoyed a wonderful Christmas celebration.  We've had gorgeous weather here in mid MO, for this time of year, with highs near 50 degrees, and lots of sunshine.  Not so Christmas like, but nice just the same.  My card today kind of reflects the kind of mood I'm in, because I'm one that likes the change of seasons, and yes, I even like winter.  I enjoy snow, and all the wonderful and fun things the first snowfall brings, like sledding, and bonfires, and snowmen.  So, with that being said, here's my Happy Winter card for you!  ;-)
 This Winter Snowman Cottage Cutz die is so perfect for ALL your winter cards and projects.  I just left out a few of the accessories included with this cutie to make him more of a general winter character than a Christmas one.  He's ready for some snowy fun, just like we are!!  

Wishing you a bright and beautiful day and happy crafting!


Sunday, December 25, 2011

Thank You Card


Merry Christmas! I hope you are getting to spend time with your family and loved ones! I have a thank you card to share with you today. I know I will have lots of thankyous to send out, so this will get me started!


I used the adorable Mr. Gnome die, Mushroom and Flowers die, and Flowervine Edger dies from CottageCutz. This little gnome is just so cute, he makes me smile!


Saturday, December 24, 2011

Snow Bird Sign


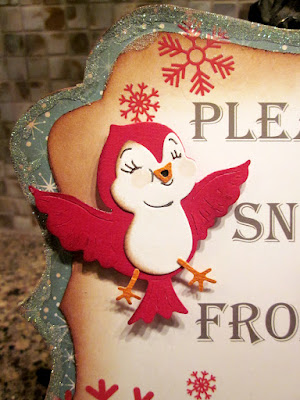
Merry Christmas Everyone!!!!  Today I created a sign...now let me explain it just a bit.  My Mother's big party each year is Christmas Eve and she always tries to have a little keepsake for everyone to take home.  This year she has a beautiful little twig tree she spray painted silver and covered in glittery snowflake ornaments for everyone.  However with it being the center piece people would never know to take one home with them...so I thought I would make a little sign to put in front tree.


 I used the adorable HAPPY BIRD die for this project.  I've always looked at this die and have seen a sweet little bird singing in spring, but I love how he looks like a snowbird for my project today.....really a die you can use all year long. 

I hope everyone has a safe and Happy Christmas and is able to spend it with family and friends.  See ya next year!!!

Hugs,


Thursday, December 22, 2011

'Tis the Season

Hello everyone and Happy Thursday to all! Today I wanted to share the sweet "Hot Cocoa Cafe" LOVE this cottage cutz too! There are different ways you can put this together, and i kept mine kinda simple.
I also used the banner from Boxwood Vine Wreath, and the matching stamp 'Tis the Season, now for the background i used the Holiday Doily in Red. Hot Cocoa Cafe was cut out all in white, and then i colored each piece with copics. Next I added some stickles for the snow :) LOVE the look it gave to my Cottage Cutz. 

Supplies:
Hot Cocoa Cafe/Cottage Cutz
Boxwood Vine Wreath/Cottage Cutz
Holiday Doily/Cottage Cutz
Design Paper /DCWV
Ribbon/Really Reasonable Ribbon
Pearls/Stickles/Sewing
Copics to color/Tim holtz for dusting the banner
2 gingerbread boys from a button pack

Well I hope everyone is ready for Christmas, I have wrapping to do, and all my shopping was done online this year. this is our first year with no presents wrapped yet under our tree, they are all up here with me, waiting to be wrapped.....hehehehehehe Im waiting for my hubby to help me, as i wont be able to do it alone. 

I do want to wish you all a VERY MERRY CHRISTMAS!!!! 

Thank you for looking and have a very nice day!

Hugs to all,
Cheryl

Wednesday, December 21, 2011

Just Chillin'

Hi , everyone ! 
Trust  this is the time to kick back the heels , sit back 
and catch our breathes a little in the days just before Christmas. LOL! 
And a card today that I can share that expresses that sentiment exactly - 
I have used the Snowglobe , Winter Accessories die for the 
Fishing Penguin . 
I have cut out most of the parts using white cardstock 
and used my current fave Pebbles Inc chalk 
and American Crafts Glitter Gel pens to color in . 


Warmest Wishes for a blessed Christmas time with you & yours ! 


Tuesday, December 20, 2011

A Touch of Sparkle

 A Touch of Sparkle. . . .Here I used glitter paper three different ways with the Cottage Cutz Dies. The first was the Cottage Cutz Celebrate the Season die. I cut the scroll verse from glitter paper than mounted on white card stock, than mounted on black card stock.. Added a dimensional 3/4" black card stock circle with a mini snowflake from the Cottage Cutz Snowman in Mug die. I also added some eyelash yarn in the same red sparkle as the verse around the snowflake.
 The second mini card I used the Cottage Cutz Filigree Snowflake die. I made a 4" x 4' Card with a 3" x 3" window, slipped the white glitter paper behind the window than mounted the tips of the snowflake to the frame. I than added a few clear and silver jewels to the snowflake.
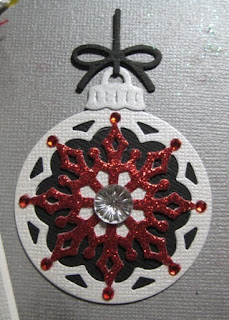
 The third mini tag you can see only take a few cutz. I used the Cottage Cutz 3'x3' Snowflake Ornament die. The ornament was cut in white card stock first, than red glitter paper. I trimmed the edge of the ornament away on the red glitter ornament. . to use the snowflake only. I used a hole punch to cut the 2" black circle and a 3/4" for the small white circle.
Start your sandwich with the white mini circle glued behind the red glitter snowflake. Glue the red glitter snowflake on top of the white ornament, matching the pattern. Than glue the entire ornament to the black 2" circle. Added jewels to the tip of the red glitter snowflake and a large jewel in the center. Mounted on Silver card stock.

Added note: I used Black, Red and White with a bit of Silver on all the cards. The Black against the vivid Red and stark White makes a really good contrast. Black has become designer favorite at Christmas in the last two years.

Thanks and this will be my last post before Christmas .
. so Merry Christmas to all and to all a good 2012. 
. . . .  Barry


Monday, December 19, 2011

The Reason for the Season

Here we are, only a few days before the big day. I have a Nativity card for you today to help us all remember the reason for Christmas.

The Nativity die is a 4x6 die that comes with Mary, Joseph, the baby Jesus and a star. I made the stable and hay myself.

I hope you all have a Merry Christmas!
Kay