Sunday, October 31, 2010

Inching by just to say hi

Hello and HAPPY HALLOWEEN!!! I can almost hear you looking at this and saying DUH NIKKI, this is NOT a Halloween card!!! And you are CORRECT, however, it is made with a Halloween die! I used the Fuzzy Spider die to make my little inchworm. I {GASP} cut the legs stamp apart to just use two legs.

Well, here's my card for this week! I hope you have a SUPER HAPPY HALLOWEN!!! Oh, alright, since it IS Halloween...Here's a Halloween card I made last week using the Pumpkin Trio die. ☺

and just for kicks, a side view...

Ok, I'm REALLY done now. Hehehe. Again, have a SUPER HAPPY HALLOWEEN!!!! I hope your bucket floweth over with CANDY!!!!

Nikki


Saturday, October 30, 2010

Happy Halloween

Since tomorrow is Halloween, I thought a Happy Halloween card would be so appropriate for my post today :)

I just love this Pumpkin Trio Shape!! The stamped faces are soooooo cute.
I hope you liked my card today! I have to run because we have a weekend full of Halloweening ahead!!

Happy Halloween!!


Friday, October 29, 2010

Happy Haunting!

Hello and welcome to The Scrapping Cottage Blog!!  Well, my favorite holiday is soon going to be here and gone, and for my card today, I tried to use as many of these wonderful Cottage Cutz dies as I could ,because they're just to darned wonderful NOT to use!  For this 6x6 card, I used the Spooky Fence, Harvest Time (tiny pumpkins), Midnight Owl, and Skeleton Dies.  Here's what they all look like after I worked them together into the card. 
 I added some shading by sponging the edges of the skeleton and pumpkins, and the owl was shaded with my Copic markers.  Anyone who knows me at all, knows I have a hard time ever creating anything without some sparkle and ribbon, and as usual, I managed to find a spot for both on this card. 

Thanks so much for stopping by today.  I wish you a safe and happy Halloween, and some happy crafting this weekend, as well!!


Thursday, October 28, 2010

Happy Halloween!

I hope you're staying warm where you are. With fall officially here, the temps have dropped considerably here in the high desert of Eastern Washington and I'm even wearing slippers in the house! GASP! It may not sound like a big deal, but I'm a year-round barefoot kinda gal and my feet have been freezing the past few days on these hardwood floors! But I digress... the reason for my fall lead-in is this card :)

I've used the pumpkin trio, minus their face stamps, for this glittery fall card. For the pretty corner flourishes, I used the vine stamp that comes with the trio die.


I added vines and leaves from the pumpkin patch die and the grass from the spooky fence. Cute, huh!


For my final project this week, another treat container! If I had a whole house for a storage unit, I could fill it with containers. I'm a container-holic {Nikki - no comment from you, hoarder-watcher! LOL) K, so anyway, this container, as you can see, is Queen and Co.

I took it apart to make a template...
...and traced it onto my double-sided paper
On the inside, I made my score lines and marked where my tabs and slots would be.
Fold, adhere and punch holes in the sides for my ribbon handle, and now I'm ready to embellish.
The adorable little witch on her broom makes a super cute little treat sweetie, doesn't she!
Add stickles - cuz everyone loves bling, even witches, don't you know....

...and a tag for giving. Here I used one of the pumpkins from the pumpkin trio and slipped the ribbon handle through one of the slots.

You still have a few days yet till Halloween if you want to make treat bags. You can use most any container as a template to make your own, or just grab a lunch bag and start embellishing! Pretty much anything will work....as long as it's got candy in it, right!? :) Happy Halloween!

Wednesday, October 27, 2010

Spooked!

I hope your Wednesday morning was more pleasant to wake up to then mine was....
It looks like winter outside here in Utah with 2-3 inches of the white stuff.
It should wait until after Halloween to snow in my opinion...
Today I want to share with you this card I made with the Kitties & Tombstone die.

I love that this has so many elements on one die: grass, Jack 0'lantern, kitty, bat and tombstone. I also used the mini fence die as well.
I hope you have a beautiful fall day where you live!
Kay

Monday, October 25, 2010

It's Monday Again! Good morning!


Good morning friends! Hope this finds you well and ready to begin a new week. I don't know about you, but the older I get, the faster time goes. Halloween is just 6 days away so I have slipped in one more Halloween card to show you. The dies I have used are Pumpkin Trio, Ghosts and bat, Crow mini, Scaredy cat mini, and the picket fence. I used Copics to color the background and moon, and a white gel pen for the highlights. Wishing you all a safe and fun Halloween on Sunday. Be back in a week! Hugs, Janice

Sunday, October 24, 2010

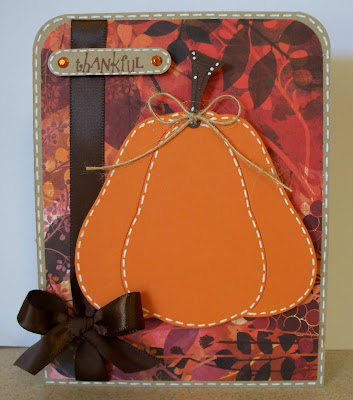
Thankful

Hello! I hope this Sunday finds you well. For my card today, I wanted to show that the Pumpkin House die doesn't have to just be "Halloweenie". I used it to make a more Harvesty/Fall card.

Can you see inside here? ☺ I always finish off the inside of my cards with a small strip of whatever patterned paper I used on the front of the card. Well folks, that's my card for today...I'm off to watch an American Pickers marathon on t.v. and do some craftin'! I feel the need to glitter something! ☺

Have a GREAT day!
Nikki


Saturday, October 23, 2010

B is for Batty

Happy Saturday Scrappers!

Today I am posting my "B" page in my Halloween ABC Book. There are several great Cottage Cutz bats to choose from but I have used the Mini Bat for this page. Each of my bats has a tiny pop dot under the body to lift them off the page so they look they are really flying around. I also cut the bats out of glitter black paper for extra fun. I used yellow stickles for the eyes which are so easy to use and fun, too - just dot, dot and you have eyes!

I also added stickles to the orange stars of my patterned paper for some extra blingy fun. Plus I thought it would tie in nicely to the glitter bats.

Thanks for stopping in today and have a great rest of the weekend!!
Ruth Ellen

Friday, October 22, 2010

Boo Bag Gift Set

Good morning, and greetings from Chicago!!  Yes, I'm in Chicago!!!  I really didn't think that after CHA visiting Chicago again would be in my future for a long time, but I was wrong.  I'm here to take the first Intermediate Copic Certification class that's ever been offered.  I was so thrilled to get the opportunity to learn more about my favorite coloring medium, and I'm looking very forward to the class today.  

So, since I was really strapped for time this week with preparing to leave, I'm sharing a project with you that I made for the Peachy Keen Stamps Challenge, which is a Wrap It Up challenge.  Participants are challenged to make somthing that has to do with or is used for wrapping.  I chose to make this fun little gift bag set., which includes the bag with lid, bow, and tag.  I started with a plain white lunch sack, and decorated the back ground with my PKS face stamps.  I cut a lid to fit the bag from card stock, and I used my Cottage Cutz Ghost and Bats die from The Scrapping Cottage.  This set comes with 7 stamps to give the die cuts an assortment of adorable faces.
 Here's a close up of the bow and tag.  The die cuts were cut with white card stock and colored with Copic markers.

 I'm hosting a blog candy give away on my blog, so please be sure to visit The ThINKin' Spot and enter for your chance to win three fabulous Cottage Cutz Halloween dies.  You have until Monday, October 25th to enter.

Thanks so much for stopping by today!  I wish you a blessed day and happy crafting!!

Hugs,
Lorie 

Thursday, October 21, 2010

Halloween treat boxes and cards, oh my!

This pillow box door hanger was so easy to do. Click here to download the template. I simply printed the template onto my cardstock and cut it out then embellished with the tear kitty die/stamp set. This is such a fun way to leave a surprise treat for someone on any occasion!


For this project, I used a french fry box template and double sided Halloween paper (Basic Grey Eerie) embellished with the sweet little candy monsters (minus arms and legs - they aren't going anywhere! LOL) You can use the pattern in the link provided or do like I did and ask for an empty french fry box and take it apart.


I love making Halloween projects and cards in case you couldn't tell! For this one, I used the loopy edger with the image of the Mad Hatter from the Graphic 45 Halloween in Wonderland collection. Love these papers. I've embellished using stickles.

On the inside message I've used the witches brew cauldron and frog for my "go mad on Halloween" sentiment, adding stickles for the brew bubbles.

For this card, I wanted to do something a little different. I heat embossed my cardstock with clear embossing powder before cutting the chandelier.....

...and added silver stickles to the spider webs and bat eyes.
To make the chain, I used jump rings "hanging" the chandelier from the brad.

For the inside message I've used the cutest little bat and ghost on foam tape (gotta have foam tape on everything!), and ornate border rubon from my stash. The font is a freebie. You can snag it here.


Wednesday, October 20, 2010

Let me be Frank....


I can't see a Frankenstein without thinking two things. One is my neighbor who's name is Frank Brightenstein....and the other is the saying "Let me be Frank" from a tole painted Frankenstein
I did years ago. He makes such a fun Halloween card with his bright green face.
You can always count on CottageCutz dies to think outside the box when it comes to all the variety of diecut shapes. I also used the Scaredy cat mini on my card.
The inside of the card says "Have a Haunted Halloween".
Now that my daughters wedding is over I can start enjoying fall and the fun of Halloween.

Tuesday, October 19, 2010

Spooky Fence

Spooky Fence from Cottage Cutz, What a great die, you first look at it a a nice fence panel to add to a card or page layout. Sometime forgetting all of the possibilities. Today I did a card using the fence as a border. OCT 31st . . .I also used the small 2"x2" die from Cottage Cutz called Scaredy Cat Mini. He is kind of one of those Hair Razin kind old cats. The spider hanging from the T also comes on the fence die.

This panel shows how the fence hooks together, the top fence shows how the die design has HOOKS on each end to hook your fence together to create a long fence. The second shows how to cut the fence panel after three posts to create a gate.

This layout shows how you can put the fence together to create a complete fence. The fence you snip the hook off, than on the second fence panel you snip one post off. That is what I used on the card. To straighten the fence up a little on the third fence panel you snip a "v" out . . one full post and part of the second post. . . . .you can continue until you have the need fence. Don't forget the die also come with a great patch of grass for under the fence.