Saturday, May 13, 2017

Toys for boys

Hi, Janja here!

For today's post, I prepared another children's card. This time for the boys.
Let's see how it is made.


Supplies:
- CottageCutz dies: Choo Choo Train, Toy Helicopter mini, Snowcapped Mountains
- white card base: 6 x 4.5" (15 x 11,5 cm), folded
- gray cardstock: 5.5 x 4.2" (14 x 10,7 cm)
- white cardstock: 5.2 x 4" (13,3 x 10,1 cm)
- white and colored cardstock
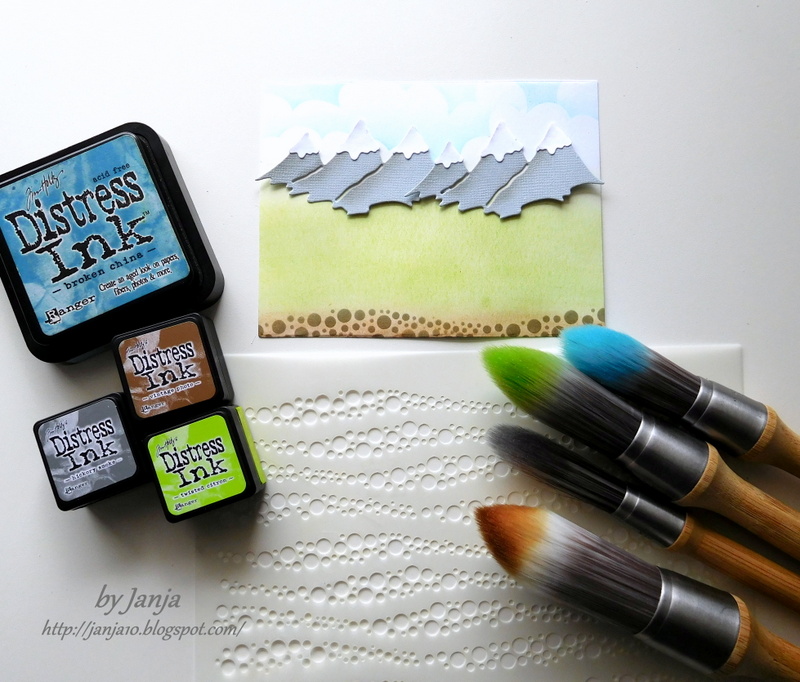
- Distress inks: Broken China, Twisted Citron, Vintage Photo, Hickory Smoke
- stencil and stencil brushes

Cut out all the elements for train and helicopter. Distress them on the edges with Distress inks, and glue together.


Trim white cardstock for background. At the bottom, create mounds with stencil, Vintage Photo Distress ink and brush. Color the rest of cardstock with Distress inks Twisted Citron and Broken China.
Cut out also mountains, and cover peaks with snow.


Assemble the card.


Thank you for coming over and have a nice day.


Friday, May 12, 2017

Faux spinner card with Sequins

Hello to all ,
This is Anita here with a card that has a twist . It looks like a spinner card but the boat in the picture does not spin and I have added sone Sequins in the spinner path to add some dazzle.


To make this card , cut out a circle using the stitched circle die on a card panel or patterned paper measuring 7inches by 5 inches .

Cut a circle from white card stock that is at least 1/2 inch smaller than the outline of the bigger circle.

Add a sentiment on this .

Double fold foam tape and cut out thin strips . Add this at the back of pattern paper all around the circle shape and add another pattern paper at the back .

Adhere the circle die cut with sentiment at the centre with double foam tape.

Cut the boat die on white card stock and colour with zig markers following the image on the package .

Add this on the card with double foam tape as shown.

Add Sequins to finish the card.


This card gives the look of a spinner card but the boat is fixed . You can create a variation by creating a spinner card with the boat actually spinning . 
Do stop by the CottageCutz blog for a whole range of dies .


Thursday, May 11, 2017

Baby Monkey!

Good Morning Scrapping Cottage Friends!

It is Pam creating with you on this beautiful Thursday!  I just thought I would share another use for this cute little new release Baby Monkey die!  I always need cards for enclosing gift cards. So I found this really easy design on Youtube.  I altered some of the measurements so that it would fit into a A2 envelope.   It seems now a days that a gift card is all anyone wants especially my older nieces and nephews.  I must admit it is much easier then trying to please them but it does take some of the fun out of gift searching!


Designer steps:

1. Use a light brown card stock base 4 1/4 x 11 and score at 4 1/2, 5 1/2 and 6 1/2.  Use your bone folder and crease the card as shown.


2. Flip the card over and put a strip of strong tape as shown then press together.  This will form the card holder.

3. Use the second to the largest Pierced Rectangle die which is the same wideth as a gift card and make the cut through the mountain fold.


4. And now it is time to decorate the  card!  Cut a white 4 1/4 x 4 1/4 piece of white card stock and emboss it with cupcakes.  Glue to the front of the card


5. Using the Baby Monkey with Balloons die cut all the pieces of the monkey and balloons.  Use brown, tan, and black for the monkey.  Before you assemble the monkey sponge the edges for more depth
6. Glue all the pieces together adding small black pearls for the eyes

7. Cut the balloons using designer paper and the strings out of black card stock
8. Cut a strip of light brown card stock 11 x 1 inches this will make a band around your card to keep the gift card inside it good and safe.   Just take your band and fit it around your card and make a tiny pencil mark as to where you will place the tape

9. Cut a Cross Stitched Circle out of designer paper and glue the monkey and balloons to the circle.  Then attach the circle to the front of the band set aside

10. On the inside of the card cut a Double Stitched Rectangle and glue to the center of the inside of the card
11. Using designer paper cut another set of balloons, string and the word Celebrate glue all to the inside of the card


Here are the Cottage Cutz Products used:


I hope you enjoyed this project and that it will inspire you to make a card with an enclosed gift card!

Blessings and thanks for stopping by!
Pam


Wednesday, May 10, 2017

CottageCutz Baby Lamb on Moom

Hello and welcome to the Scrapping Cottage Blog!  I am Beverly Polen from Guneaux Designs, and today I am a guest designer.  I have for you a darling card that features the CottageCutz Baby Lamb on Moon Die.  I think the baby lamb is so adorable!


The card design is a Z-Fold with ovals cut out from the first and second sections.  You can see through the ovals to the main element on the back section of the card, which is the CottageCutz Baby Lamb on the Moon.  I have not seen before a Z-Fold card with the first two sections cut out for windows to see through to the main image on the back section.  If there is no such design in the crafting world, I guess I just created a new Z-Fold card design.   LOL!

To create my Z-Fold card, I cut from white card stock the pieces from the lovely CottageCutz Baby Lamb on Moon Die.  


I colored the pieces with Copic Sketch Markers, adding a touch of gray to the moon.  Afterwards, I glued the pieces together.


Using the second and third to the largest CottageCutz Double-Stitched Oval Dies, I cut out an oval and frame from white card stock.  I later colored the frame with a yellow copic marker.  I also cut a second frame with the largest and second to the largest dies and colored it yellow. 


I colored the oval with two of the new Tim Holtz Oxide Ink Pads (i.e., faded jeans and broken china). I used the lighter blue for the center of the oval for the moon's glow.


Then, I cut a 10-13/16" x 5-1/2" piece of white card stock and, on the 10-13/16" side, scored at the 3-5/8" and 7-1/4" measurements.  The 3-5/8" score line is a mountain fold and the 7-1/4" score line is a valley fold.  At this point, I did not fold the card stock on the score lines until I finished additional steps.  


I wanted to create the appearance of a galaxy; therefore, I sponged onto the card stock three of the Tim Holtz Oxide Inks (i.e., fossilized amber, faded jeans, and broken china) and spritzed it lightly with water.  After drying, I used a toothbrush and diluted white acrylic paint to splatter paint onto the colored card stock.


After that dried, I turned the card stock over and colored the center section with the same inks, spritzed with water, and splattered with acrylic paint.  When the card is finished, this section will be the inside center fold.


Before folding on the score lines, I placed the second largest Double-Stitched Oval Die on the first section of the card, and the third largest die on the center section, centering them as much as possible. I ran the card stock and dies through my die cutting machine.


I then folded the card on the score lines, and the following photo shows the result.


Next, I assembled the card by attaching the baby lamb and moon onto the oval previously colored and adhered it to the last section of the card.  I used an old star stamp to stamp, emboss, fussy cut, and add to this piece.


Then I added the largest yellow frame to the first section of the card and the smaller frame to the inside center section. 


When the card is closed, the back middle section that was inked will show as the second section on the card.


I did not add other embellishments to the card as I did not want to distract from the "galaxy" effect on the card.  A sentiment will be added when I know who is the recipient.

I hope you enjoy this card and take time to browse the recently released baby and script design dies! The script dies are 25% off for a limited time!  Have a blessed day!

I used these two CottageCutz dies for the card: