Showing posts with label Woodland Christmas Set. Show all posts

Monday, January 10, 2022

Woodsy

Hi everyone today I am back sharing a fun woodsy card perfect for the men in your live or just a friend just because...  I used one of the latest new releases Winter Ski Lodge along with a variety of other sets from The Scrappin Cottagge listed below.
I took the trees from the Rustic Sign & Trees set to set behind my Winter Ski Lodge but to add some fun details I took various pieces from the Christmas Farmhouse Floral set and colored them with my copics to give it a different look to the greenery.
Then I used some balsa wood paper to create the ski lodge and colored various pieces with copics but also used colored cardstock for different pieces to bring everything all together.  Then I put a stitched reindeer from the Woodland Christmas set because what is a lodge without a deer around right?!!
I hope everyone enjoyed my post and welcome 2022 looking forward to an amazing year!


In case you didn't hear, The CottageCutz YouTube channel is up and running. We are featuring videos every Wednesday. Drop by and subscribe so you don't miss one and give us a thumbs up on our videos.
Products Used: 


Thursday, November 18, 2021

Christmas Poinsettia

Hello Scrapping Cottage Friends

The design team is continuing to use our two new Christmas release dies.  The two releases are at 30% off but this great sale won't last long.  So make sure to take a peek before the prices go up.  I am using one of the very versatile dies the Woodland Christmas Set.  There are a number of great designs on this one die.  I am using the beautiful Poinsettia for this card.


Design Steps:


1.  Use a white slimline base measuring 3 1/2 x 8 1/2.  Cut a piece of white card stock using the Lattice Slimline die for the cards background.  Glue the Lattice to the front of the white slimline base card

2.  Next using the Woodland Christmas Set die cut out the red flowers, green leaves and the gold centers.  For the gold berries I used the Christmas Floral #2

3.  Use a stylus to give the flowers and leaves a little bend.  Rub the back of the petals and then flip over and make a circular motion in the cener of the flower.  For the leaves just rub the back of the leaves

4.  Make your arrangement just slightly below the center of the card.  I used glue dots for the flowers and tucked the leaves and gold berries in with glue
5.  Stamp your sentiment and layer with red card stock.  Glue the sentiment to the front of your card and your card is complete

CottageCutz Products


I want to remind everyone that the CottageCutz You Tube channel is up and running once again. We have new videos every Wednesday.  Check it out right HERE!

Take Care and Blessings

Pam


Friday, November 12, 2021

Santa hitching a ride


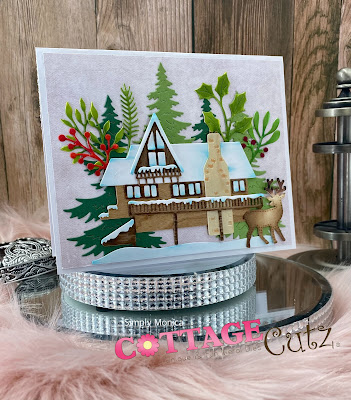
Happy Friday Scrapping Cottage fans. I really hope you’ve had a good week and are looking forward to the weekend ahead.  Today I’m sharing a simple and fun card with you, I just love the last 2 releases (well I love all Scrapping Cottages dies).

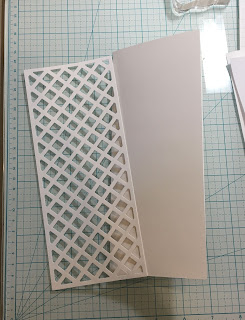
Firstly I took a piece of pale blue card measuring 6” x 4” when folded. I thought it gave the card a winter look. I then took the ‘Hills Slimline’. And cut them twice, one higher than the other so they could be overlayed. I glued the bottom panel but used 1mm foam pads for the next layer. 
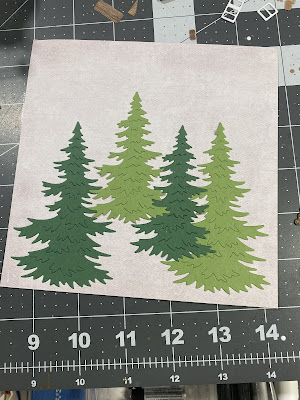
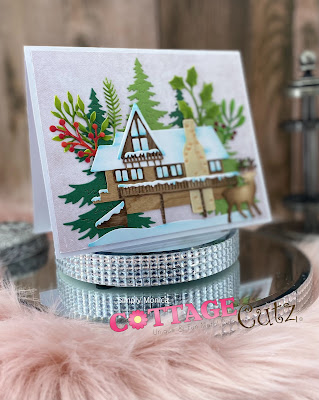
I thought it would be nice to add some trees to the background and I used the trees from the ‘Winter House Accessories’ die. I cut them out of white glitter card and it is hard to see but they really glisten


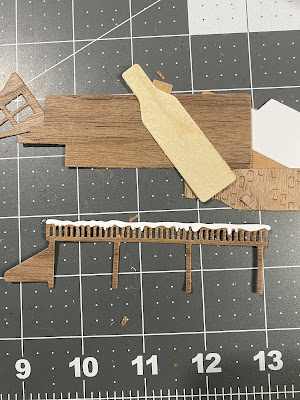
Next I cut out Santa from ‘Santa’s Delivery’ die and all of the elements from the ‘Snowman Reindeer Die’. I cut the car out twice and layered it on top of each other to give it some depth. when you cut the car out,  it cuts the holes for the lights. I stuck a piece of card behind this and them and used some of my large crystal diamantés so they looked like headlights

I then assembled all remaining elements.I left the snowman’s arm until last so that it fit the steering wheel when put together


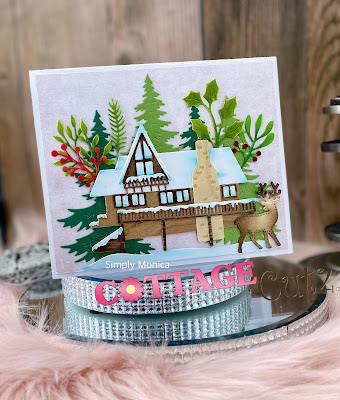
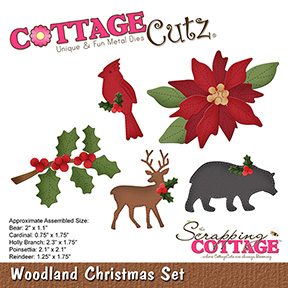
I attached the car and Santa using 1mm foam pads. Santa looks like he’s hitching a ride but I’m not sure that he’ll fit in the car. He may have to wait for his sleigh. I cut some holly from the ‘Woodland Christmas Set’ to put in the right hand corner out of the same glitter card as the trees and added some diamantés for berries

So here’s the final card. I really hope you like it. I had so much fun putting this together. I wish you a safe and happy weekend with lots if time to craft
Wendy


Dies I used


Sunday, November 07, 2021

December Calendar Mini Page With Gingerbread Die Cut Family

Happy Sunday Scrapping Cottage friends! Melinda here with you today. First things first.... Did you remember to "fall back" today? I hope that extra hour means you get an extra hour of crafty time!!!!

Today I am sharing a cute December calendar I made featuring the gingerbread family die set along with a few elements from a couple other dies! They are all part of the fantastic Christmas Release #2.  Now is the perfect time to pick them up! They are 30% off

Here is a look at my project.

It is a fun December calendar page. The finished size is 7 x 7.

I will be creating a December Daily type project this year. I started off with this page.
For the base of the project, I started with a piece of 7x7 green cardstock. I then cut a white cardstock mat at 6.75 x 6.75. I then used an "ancient" MS border punch in my stash for the border.
To that I added a mat of some patterned paper I created. I cut that at 5.5 x 5.5. I added some flat back pearl strands to that border. 

Here's a closer look at some of the elements at the bottom of the layout.

Here you can see the cute girly gingerbread. You can also see the cute candy canes and the darling bow. The candy canes are from the Marshmallow Guys die cut. I colored them with my red marker and then added a little red stickles to give it a little extra. The double bow comes from the beautiful Ice Skates die. I love that you can easily mix and match pieces from the various dies!

To the top right corner, I added this pretty little stitched Cardinal with some holly leaves and berries. I added a touch of stickles to the berries for an extra touch. The photo doesn't show the sparkle to well though. 

Here's a closer look at the cute little gingerbread child and father. They are so cute and pretty easy to put together.


Here is one last look at my spread. I created the monthly calendar and then sized it down and printed it.
I haven't decided if I am going to add this to a little mini album or which way I am going to combine them. So STAY TUNED as next week I will be sharing more of my pages!


The Dies I used to create these projects:


Well that about covers it for today! 

The CottageCutz YouTube channel is up and running. We are featuring videos every Wednesday. Drop by and subscribe so you don't miss one and give us a thumbs up on our videos.

Make sure to come back by each day for some more great crafty inspiration from the super talented team. Don't forget to head over and take advantage of the great savings on these and more of the fabulous Sale!

Be sure to head over and check out the fantastic
CHRISTMAS PART 2 RELEASE!!!!
SOME AMAZINGLY CUTE DIES! 
This release has the Merry Christmas with Shadow die.

CHRISTMAS PART 1 RELEASE!!!!
SOME MORE AMAZINGLY CUTE DIES! 


Until the next time, have a wonderfully crafty day!

Thursday, November 04, 2021

Peace on Earth

 Hello Friends,

It is Pam sharing with you on the blog today!

Guess What!! It is New Release Time!  The collection is Christmas Part 2!  There are are 19 new designs just as adorable as the Christmas Part 1 release.  For a limited time there is 30% off individual dies.  You can check all of these fantastic dies out right HERE!

I am showcasing two of the new release dies today.  The Peace on Earth with it's beautiful font and the Woodland Christmas Set specifically the gorgeous poinsettia.  I added a lot of gold for some extra Christmas bling!


Design Steps:

1.  Using the Woodland Christmas Set I cut the poinsettia out of striped DP, the leaves out of dark green and the centers out of gold.  Next I gave them some shape by using my stylus first on the back of the petals and then flipping them over and pressing down in the center of the flower.  For the leaves just run the stylus over the back of the leaves
2.  I used black ink on the edges of the flowers and leaves for a little depth.  Then used a glue dot or a strong glue to assemble the flowers

3.  Using the same gold card stock that you used for the center of the flowers cut out the Peace on Earth phrase

4.  For the card base use a cream colored card stock in an A2 size.  Cut a piece of Striped DP 4 x 5 1/4, a piece of ornament DP 3 1/2 x 4 1/2 and using the second to the largest Pierced Rectangle Frame die cut out a red frame.  Cut out a piece of dark green card stock 2 1/2 x 3 1/2 to place behind the frame
5.  Glue the striped paper to the card base, next glue the ornament DP to the center of the striped paper.  Glue the dark green card stock behind the red frame and then glue the frame to the card center.  Add the lacy foil trim to the top and bottom of the card as shown
6.  Next add the Peace on Earth phrase glued flat, the poinsettia and the leaves and your card is complete


Thanks you so much for stopping by today and as always I look forward to seeing you next Thursday to share more crafty ideas!

Our CottageCutz You Tube channel is up and running once again. We have new videos every Wednesday. There is also a giveaway on the channel for subscribing, commenting and liking the video. Check it our here.  

Take Care and Blessings
Pam
CottageCutz Products