Showing posts with label Under the Sea. Show all posts

Monday, June 05, 2017

Under the Sea

Hi, Lois here with a fun card today.  As you may or may not know, CottageCutz recently released a whole series of word dies -- 35 in all.  Check them out in the CottageCutz store.  I had such fun making my card for today, and I used one of the word dies -- discover -- on it.  I'm a big fan of underwater scenery, and that's what I created today.


To start my card,  I cut a piece of heavyweight teal-colored cardstock 5 1/2" x 11", scored in half.  Then I cut a piece of navy cardstock 5 1/4" square and a piece of swirly bluegreen patterned paper 5 1/8" square.


Most of the die-cuts on my card come from one single die, Under the Sea -- plus the Clown Fish (which may be currently out-of-stock) die and the Seahorse die -- as well as the word die.


After cutting the pieces, I added some color shading using Copic markers.


Then I went about constructing my scene.  That was really a lot of fun.  The inset pieces on the seahorse and clown fish were cut from cardstock on which I had already applied some adhesive backing, so inlaying them into the outlines was pretty easy once I had glued down the fish and seahorse onto the card.


Here again is my completed underwater scene.


CottageCutz dies used on my card are:


http://www.scrappingcottage.com/cottagecutzunderthesea-2.aspx


http://www.scrappingcottage.com/cottagecutzseahorseelites.aspx

http://www.scrappingcottage.com/cottagecutzclownfishelites.aspx


http://www.scrappingcottage.com/cottagecutzexpressionsplusdiscoverphrase.aspx

Just a reminder that we are now on Instagram. Click here to see our Posts and also to follow us on Instagram.

Wednesday, July 20, 2016

Under The Sea Hinged Card Technique


Hello Scrapping Cottage friends! Thanks for taking the time to stop and visit today. It's Mary Marsh here bringing you the Wednesday edition of the Blog.

Today for your viewing pleasure, I am featuring some dies from the June 2015 release. It seemed appropriate to show a beach themed card today since that's where I am as you are reading this. I am with my hubby and sons and their families near Charleston, SC-on the Isle of Palms.

I created an underwater scene and then I realized my card was going to be a bit larger than the usual A2 size that I make. I have some 12 x 12 paper, but I didn't have any in the navy blue shade I wanted to use. So I did a hinge technique for this card. It worked out well and I show you how in the instructions below.

navy card base: 5 3/4" x 4 3/4"
mint green layer: 5 5/8" x 4 5/8"
mint green patterned paper layer: 5 1/2" x 4 1/2"
CottageCutz dies used: under the sea, happy fish 2 and clown fish

I found this mint green pattern paper in my stash and I thought it had the look of sea water so I decided to use that. You could also sponge or brayer water in to create an underwater scene.

Next I cut all the die elements I wanted to use. For the sea greenery, I sponged some of the cardstock to get a variation in shades. I did the same with the coral. I used a rose shade of cardstock and sponged one to get the shade variant.

For my fish I die cut them from a multi media paper and colored them with an aqua brush and navy reinker and the rose ink pad. So the fish and the coral are the same color but I like how I was able to get a darker shade by water coloring.


For the water bubbles I used the happy fish 2 die and cut from acetate and used the round circles from that. I cut it 2x to get all the bubbles I needed.

Now for the hinge technique. I cut 2 pieces of navy cardstock 5 3/4" x 4 3/4". I also cut another 2" x 5 5/8" piece of navy and folded that in half. Using Scor-Tape for added strength, I taped this smaller piece on the first navy panel. Then I repeated the process with the 2nd navy panel. Voila! Now I have a custom made base size and didn't have to go and buy any 12 x 12 paper to make it.

Here are some photos of how I did this technique. I used beige cardstock and dark brown for the hinge part so you could see in the photos what I am doing. You can add patterned paper to the inside to cover the hinge or use an embellishment.


Well, my friends that's my sample for this week. Don't forget that we are having our 3rd challenge and the theme this month is greenery. This sample works as does this card I showed you last week. Just in case you need a little inspiration.

Hope you are enjoying your summer! So until next time........inky hugs.


Tuesday, April 19, 2016

A beautiful underwater world

Hi, Janja here!

The new CottageCutz flourish & flowers dies are already on my desk. But before I start with them, I want to lead you in a beautiful underwater world. Let's see what is hiding in the coral reef.


For the card we need:
  • white card base: 10.6 x 5.3", folded
  • blue or patterned paper: 5 x 5"
  • patterned paper in the sand color: 5 x 1"
  • white and color cardstock
  • distress inks: peeled paint, mowed lawn, worn lipstick, dusty concord, festive berries, aged mahogany, mustard seed, rusty hinge, pumice stone and black soot

First, we prepare cutouts shaded with distress inks. We prepare a larger number of cutouts, because the card is made inside and outside.
 

For corals, underwater plants and coral reef, I used the die - under the sea. The die offers a lot of elements that you can optionally attach to the background. Some of cutouts are fixed directly to the background and for the remaining we use adhesive pads. 
In this beautiful environment, I added a crab, a starfish and a fish.
 

In the interior of the card, the background is prepared the same way as the front side of the card. 
From the white cardstock we cut out a circle (the largest die of a set) for text. The edges are covered with the stitched circle frame (the largest die of a set). With the remaining cutouts we create a beautiful underwater world.


And don't forget on our April challenge - anything goes. You still have time to share your projects with us till the end of the month. Two lucky winners will get the nice award.
Dies, which I used at work:


Have a nice day. 

Janja

Saturday, July 18, 2015

Fishbowl

Hi all!  Vladka here!
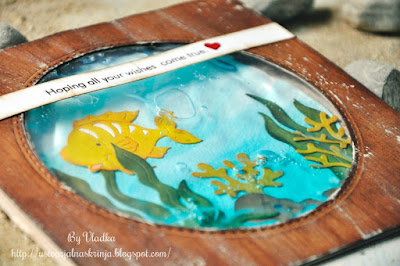
Today I have special card for you because I made this window which looks like water. I found instruction on internet, but I used thicker shower gel instead of hair gel and put it into small plastic bag. I sealed it with scotch tape and put it between card base and front cardstock which looks like wood. 
Inside of the card I put with distress inks colored circle and following die cuts: Happy Fish 1 and Under the Sea. It really looks like fishbowl and it was really fun project. 
But After I finished it and I was pushing gel around to get smaller bubbles, bag burst a little bit and my gel started to coming out. I've tried to save the card with scotch tape but it was to late. I had to cut off the front part of the card. So, my advice is to use thicker plastic bag and don't send such card with regular mail. But it can work and it looks fantastic, so I think I will give it another try. I was a little sad for a moment but because project itself was so fun, my sadness got away quickly. 
Have fun and have great weekend!