Showing posts with label The Scrapping Cottage. Show all posts

Thursday, August 18, 2016

Christmas Ornaments

Hello everyone,

It's Donna here with a couple of cards made with some of the new release Christmas dies!!!!  I am so excited about this release because I love to make Christmas cards.  I love the reason for the season, I love the colors, and  the snow (but I love summer the most), I'm not trying to rush Summer away. How about you, what is your favorite season?

My cards are clean and simple, but I love how they came out and I love the nontraditional colors I used.


Here is how I put them together:

1.  A2 card (4 1/4 x 5 1/2),
2.  Top layer measures 4 x 5 1/4,
3.  I die cut all three dies from the nested ornaments, Teardrops set,
4.  I die cut the snowflake from the Peppermint Latte set,
5.  glued the snowflake on the smallest ornament and added a rhinestone,
6.  I cut the tops of the ornament with silver glitter paper,
7.  I attached all the ornaments and snowflake using alternating colors,
8.  Embossed my sentiment with silver embossing powder,
9.  Attached the ornaments with silver lace and added them to the card.

I hope you are inspired!  Please stop by and join the challenge, this months theme is birthday

Dies used:


Friday, June 17, 2011

Recipe For Happiness

Good afternoon, and happy Friday!  I'm a bit late getting my post up today, because we've had some big thunder boomers go through this morning, when that happens, I disconnect all my computers from the power, just to be on the safe side.  They're all plugged in to surge protectors, but I don't completely trust those things.  Anywho, between the storms, I've been cooking up a storm.  I've got 140 hot rolls made, the last of which are in the oven as I type, and this house smells sooooo GOOD!!  We've got a little 25th  anniversary celebration to attend, and I volunteered to make the rolls and punch for the event.  Such a wonderful thing to be celebrating, and I'm sure looking forward to it!  So, that brings me to my project for today.  When thinking about spending 25 years of wedded bliss together, one might think about what it takes to accomplish that, and I ran across this cute little poem one day that was entitled A Recipe For Happiness.  You can click on the picture to get a closer look, and read the poem more clearly.  
  I thought these special, but simple words would make a great addition to kitchen decor, so I decided to scrap this page and frame it.  I used the Recipe Box with Cards 4x6, and the Mixing Bowls Cottage Cutz dies, which are both from the In The Kitchen release at The Scrapping Cottage.  I cut the bowls with scraps of paper to match the accent piece on the page.  I decided I needed a table to set the bowls on, so I cut that from white card stock, and added an eyelet border with a punch.  A little added bonus was the stitched ribbon, which really makes it look real.  The paper is from the Nana's Kitchen collection from DCWV.  For the finishing touch, I added a little spatula brad.  I hope you like this as much as I do.  I think it's going to look really cute in the kitchen!!

Thanks so much for stopping by!  Have a wonderful day, a blessed weekend, and happy stamping!


Friday, March 11, 2011

Believe In Miracles

Hello and happy Friday!  I'm sorry I'm running so behind today.  I hope what I have to share with you will make up for my being a little late.  I thought I'd share this tutorial with you for the butterfly I used on this card.  This is the very first technique I ever learned at the first workshop I ever attended to make a card.  THIS is what hooked me on stamping forever!!  When I saw this Ornate Butterfly die from The Scrapping Cottage, I was instantly reminded of the first card I ever made, and I knew exactly what I was going to use this die for first!  So, off we go!!!!  Here is my finished card, and below, are instructions for how I did it.


This is a chalking technique using Versamark clear watermark ink.  You will need:  Chalks, an ornate, or filigree stamp (I used the Eyelet Circles Background stamps from TSC),  Versamark ink, and the Ornate Butterfly die from TSC.
 The first thing you will do is stamp the surface of your prepared die cut (I cut this out with Georgia Pacific white card stock) randomly with Versamark.  Sorry!  Pictures of that step don't show up, obviously, because it's clear.  ;-)
 After you have the surface covered to your liking, you will start applying the chalk colors of your choice randomly over the stamped ink.  There is no right or wrong.  It's just whatever you like, and don't be afraid to rub the chalk in for a deeper tone.  You can do one or as many colors as you like.

 I used a variety of rainbow colors for my butterfly.  Once I had the colors of the butterfly finished, I used acetate to cut the backing for the wings, then filled in with Crystal Effects and sprinkled with glitter for some sparkle.  Here's a close up, where you can see that you can see through the acetate backing on the wings, even with the glitter.  It's soooo pretty IRL!!!
I hope you've enjoyed this quick and easy tutorial today, and I wish you a blessed day, a wonderful weekend, and of course some happy stamping!


Monday, December 27, 2010

New Release Coming Soon!!


Hello friends! I hope you all had a wonderful holiday! Today I have a new stamp and die to show you. They will be available soon! The postage stamp die has several stamps that fit the shape. I love these cute little birds. A perfect stamp to make Valentine cards. Have a great day!
Hugs and smiles,
Janice

Monday, November 01, 2010

Fall is in the air!


Good morning friends!

It is hard to believe that it is November 1st. Where does the time go? I hope you all had a safe, fun, and Happy Halloween. We didn't even have a single trick or treater. :( That is what you get when you live on a private road. The house we lived at prior to this one, was on a busy street, so we didn't get trick or treaters there, either. I love Halloween and wish I could see the little ghosts and goblins coming to my door. Some people get so many they run out of candy. I wasn't going to buy any candy this year, but my optimistic husband said we needed something for the neighbors when they drop by. Well, guess what? Even they didn't come by. So guess who has been eating the candy? :( Well enough of my rambling.

Todays card is clean and simple and made with The Simple Tree die. The colors have been beautiful this year and there are still many trees left to lose their leaves. The last few days have been a bit windy, so most of the leaves have fallen. I used different papers to show the many colors of the fall season. This is a card that is easy to make! I hope it inspires beginners and experienced card makers to give it a try. I think the result is kind of cute, if I do say so, myself. I hope you like it too! As always, thanks for stopping by and have a wonderful week! See you next Monday!

Hugs and smiles,
Janice


Monday, October 18, 2010

Happy Monday Morning Friends!


Good morning everyone! I am so excited about the new dies at The Scrapping Cottage! I can't wait to try them all. Today I have a card featuring Lisa Jean Witch. This die set comes with 3 Peachy Keen Stamps, a toothless grin face, a cranky witch face, and an angry broom face. I chose to use the crabby witch face today as I used the other face just a short time ago on my blog.

I cut the pieces using white cardstock and colored them up with my copics. I am so happy Lorie taught us that wonderful trick. I find myself cutting most of my images in white. I love to color and I feel that you can get a much more detailed image doing it this way. Please be sure and check out the new dies at The Scrapping Cottage or at Peachy Keen Stamps. They have been selling quickly. They are definitely dies you will want for your Halloween collection. I would love to see what you create with your Cottage Cutz dies. Just leave a comment with a link so I can come take a look. Enjoy your day and I will be back next Monday with some more Halloween cuteness.

Monday, October 11, 2010

Happy Monday to all of you!


Hello Friends!

Sorry I am a little late posting today. We have been having some really nice Fall weather and I know my sisters in WI have been enjoying beautiful sunshine and changing colors. For todays card, I wanted to try and achieve a shabby chic kind of feel. I think I was successful. I have been wanting to go apple picking, but haven't made it yet. I hope to before apple picking season is over. Here in New England, there are lots of places to chose from, and you don't have to drive too far. We went apple picking when we lived in Arizona, surprisingly. The groves were smaller but the apples were good. I still prefer the cooler fall weather of the Midwest and the changing colors. Massachusetts has a very similar climate as my home state of Wisconsin. I do miss the wide streets and sidewalks of Wisconsin, but New England is beautiful too!

I used two mini dies today. Apples and CottageCutz Basket Mini (currently sold out). I will be back next Monday. Have a great week!! :) Janice

Monday, September 27, 2010

Happy Fall!


Good morning! Today I have another Fall card to show you. I hope you aren't getting tired of them already. I love Fall. This year there has been an unusually high number of acorns falling from the trees. Thankfully I haven't been beaned in the head by one. This little squirrel is gathering acorns for the winter. You can find him here. I also used the Indian Corn die. I love this die! I used raffia to make the cornstalk. Happy Fall was cut from a coloring book. The leaves on the bottom were given to me in a Fall toss. The smaller leaves were cut from patterned paper. I used a Martha Stewart border punch to cut the grass. Have a fantastic week everyone! See you next Monday!
:) Janice

Monday, August 09, 2010

It's Monday! "Let's Do Lunch"


I can't believe it is Monday already! Hope you all had a great weekend. For today's card I used dies from the new summer release. I love the Picnic Basket die! I grew up in WI and my Mom would pack a picnic lunch at least once each summer, and we would head off to Bay Beach for a day of FUN! We had one of those metal coolers from the 50's. I love everything from the 50's, especially kitchen decor.

The finished card size is 6x6. I cut the picnic basket using white cardstock and colored with copics. I used a small piece of gingham paper for the cloth inside the basket. I usually use scraps and place the paper over the part of the die I want to cut. Of course if you prefer to color your die cuts, you will have very little waste. I am so glad Lorie gave me that wonderful tip! It opened up a wide range of possibilities. I never really thought about it. I would choose colored cardstock to cut my images, but now the possibilities are endless! Thanks Lorie!

The Picnic Ant and the Picnic Ladybug are so cute! The drumstick and the slice of watermelon are cute too! You could have them carry different items to switch it up a bit. I could have put the drumstick in the picnic basket and have the ant carry the apple.

I used a small alphabet stamp set to stamp the words, "Let's Do Lunch".

Picnic anyone? Enjoy the day!

Hugs and smiles!
Janice

Monday, July 26, 2010

Good Morning Friends!


For today's post I have used The Cottage Cutz Hummingbird die. I love birds and this hummingbird die is a beauty!

I have been enjoying Lorie's technique of using white cardstock and then coloring the images. I colored my die cuts with copics and used a white gel pen for highlights. I hope you like it. Have a great week! I will be back next Monday with a new project.

Friday, July 16, 2010

Happy Days and Blue Jays

Good morning!!  I certainly hope it's a happy day for you.  Happy days and Blue Jays are what I'm celebrating today.  This is a card I made with the Blue Jay die from The Scrapping Cottage.  During the winter months here in Missouri, we thoroughly enjoy feeding the birds, and it gives us a lot of enjoyment to watch them.  Beautiful Blue Jay's frequent our feeders on a regular basis, and when I received this particular die, it immediately reminded me of our lovely winter visitors.   I'm so impressed with the amazing  detail of each die cut piece.  As usual, I started with plain white Georgia Pacific card stock, for my die cut.  I assembled the pieces by gluing them together, then I started coloring with my Copic markers.   I always start with the lightest color, and build layers of color from there. 
The second picture below shows you a little closer look at the  coloring, and a tip I'd like to share with you is that after all of my coloring is finished, I like to go over the piece and add tiny details with a pure black Micron pen size 01.  You can see below some of the lines that I added with my pen, and it really helps give the finished project an authentic look.  I played along with the 2 Sketches 4 You Challenge (Kazan's sketch) with this card layout.  I just love sketch challenges, because by having the sketch already prepared, I can focus my time and energy on coloring the image and choosing great paper and embellishments.  It just seems to make my card making life so much simpler.
I hope you've enjoyed my offering for today.  Feel free to stop by my blog, The ThINKin' Spot  for more of my adventures in card making.   Have a wonderful weekend, filled with happy stamping and scrapping!

Friday, July 09, 2010

Bloom Page

Good morning!  Welcome to The Scrapping Cottage Blog on this blooming beautiful morning!  I have a scrapbook page to share with you today.  I'll be honest with you and say that working on this page reminded me why I don't scrapbook nearly often enough.  You see, I have a hard time knowing when it's time to stop, and my pages kind of take on a life of their own.  I seriously need to learn that I don't have to use every die or stamp made to do one page.  Oh well, I had fun, and that's all that REALLY matters.  Here's my Bloom page ready and waiting for some wonderful pictures to finish it off.

 For this page, I used the following Cottage Cutz dies:  Flower 1 Layer, Flowervine Edger, Daisy with Swirl, Watering Can, and Scalloped 3 Edger.  Yes, I did get a lot of them in there, but I was having so much fun!  The Bloom sentiment was cut with my Cricut using the Storybook cartridge. 
All of the die cuts, except the sentiment were cut with white card stock, then colored with my Copic markers except the sentiment.  The sentiment was cut with pink card stock, then outlined with Copics and highlighted with a white gel pen.  
I added some rain drops as an accent for the page.  I've actually got some pictures in mind that will work beautifully for this page, and if I can only find them I'll be one happy scrapper  Thanks for stopping by today.  I wish you a blessed day filled with happy scrapping!!


Monday, July 05, 2010

Good Morning Friends!

Good morning everyone! I hope you all had a wonderful and safe 4th of July weekend!

For today's post, I am going to show you how I re-purposed the Shih Tzu die cut that I used on Thursday. I like to think outside the box and see other ways I can use a die.
I hope you like what I have made.


While looking at the die cuts I saw a hairstyle and a sweater. I cut the hair of the dog off to create the neckline of the sweater. I used several colors of die cuts to make the little girl. The snout of the die cut had the perfect shape for the little girls hair.


I will let the pictures speak for themselves. If you have any questions, please don't hesitate to ask.


I cut the green snowpants, added some black boots, and added a cute little Panda Bear to the winter sweater to cover the eyes of the dog die cut. I finished with a scarf, a bow in her hair and some white stitching, using a white gel pen. And of course, her cute little face was stamped with a Peachy Keen Simple Sallies face, PK-531.


Thanks so much for stopping by! If you re-purpose your die cuts and would like to share them, leave a link in the comments so I can come and see. Enjoy your day! It is in the 90's here. I will be staying inside today.

Friday, July 02, 2010

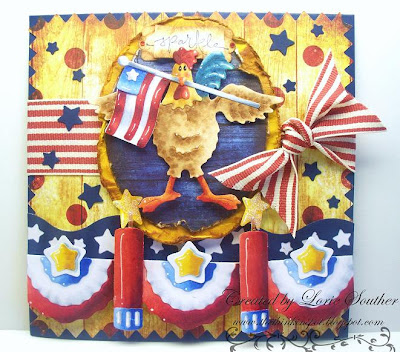
Something To Crow About (...see rooster below)

Hello, and happy Friday!! My name is Lorie Souther, and I am thrilled to be able to share a card with you today as one of the new design team members for The Stamping Cottage. This is indeed great news for me to crow about!! I am looking very forward to working with the rest of this talented design team, sharing creative inspiration, and making new friends.

For my card today, I used some wonderful 4th of July themed Cottage Cutz dies from The Scrapping Cottage. American Rooster, Firecracker, Patriot Bunting, and Stars Edger dies all went into this fun and festive creation. Since my stamping and scrapping experience started with my love for painting and coloring images, I decided the best way for me to work with what I know was to start with a blank canvas, if you will. I cut each of these (except the stars edger) with regular white card stock, assembled the pieces using Zip Dry paper glue, and then colored each die cut with my Copic sketch markers. For me, this was the easiest way to achieve the color, highlighting and shading that brings everything to life. The white highlights were added using a white gel pen. I did quite a bit of distressing on the edges of the oval background using Tim Holtz distressing ink in the Tea Dye color. My sentiment for this card is simply "Sparkle", and I added a little bit of sparkle to the stars on the firecrackers, although it doesn't show up so well in the photo.

Here's a little closer look at some of the details. Notice that I used the stars from the Stars Edger and randomly glued those around the image. I like to find ways to use as many of my scraps as I can, and in this case, it worked out just dandy.

The technique I used to color the rooster is one I call the "stippling technique". I guess that term comes from my tole painting days, and while I'm not sure that's the official term for it using markers, it works for me. I just pounce the color into the desired areas with my marker layering the color from lightest to darkest.

I'm so happy you could stop by today. Please feel free to visit me anytime at my blog The ThINKin' Spot . Have a wonderful day, and a safe and Happy 4th of July! See ya soon!

Wednesday, June 30, 2010

Hello Everyone! Happy Thursday! Let me introduce myself.

My name is Janice Wilson. I am thrilled to announce that I have been asked to join The Scrapping Cottage design team. I am looking forward to getting to know the other designers and to share my designs with you. I hope that we can be an inspiration to each other and learn things along the way. Most of all, let's have FUN!! I primarily make cards, but on occasion I like to step out of my comfort zone and try something new. For today's card, I used CottageCutz Shih Tzu Peeker and CottageCutz Daisy Seeds. I had a lot of fun making this card. I love the Shih Tzu die. It is so cute! I used a couple shades of brown cardstock to assemble the puppy. I didn't have a picket fence die or a grass die so I just cut them myself. The picket fence was very easy. I cut strips of white cardstock, 1/2 inch wide. 2 of the strips were 5 1/2 inches long. The pickets are about 2 inches tall. I cut one of the points on a picket to use as a template to cut the rest of them. I cut the strip of grass, free hand. I inked the edges and the centers of the daisies with Dandelion Memento ink. I free hand cut the bone sign as well, because I don't have a bone die, yet. I used a twist tie that I stripped the paper off of, coiled each end, and used it to hang the sign.


Thanks so much for stopping by. If you have any questions just leave a comment and I will do my best to answer. Have a great day!