Showing posts with label Stitched Rectangle Set. Show all posts

Tuesday, February 12, 2019

Thanks, teacher

Hi, Janja is here with you.
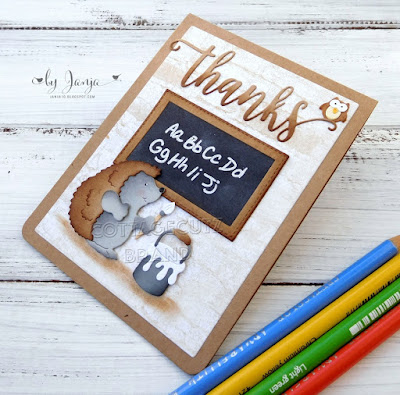
For today, I made a card on which I used the Valentine hedgehog. Let’s see the hedgehog as a teacher.


- card base: 4.25 x 5.35" (10,7 x 13,9 cm), folded
- patterned paper: 3,74 x 4,96" (9,5 x 12,6 cm)
- colored card stock
- ink pads
- white and black gel pen
- double-sided adhesive tape, foam tape, glue

First, stamp an alphabet on a black card stock. Then white embossed letters. Cut rectangles and a frame for the school board.


Cut out the hedgehog from a colored card stock. Color the edges with a brush and ink pads. Glue all pieces to each other.


Trim a piece of patterned paper and paste it onto the card front. 
Cut out a thanks phrase and a little owl.


Attach the hedgehog to the card front as shown using a dimensional tape. When everything is finished, darken the floor with a brush under the hedgehog and a bucket of paint.


I would like to invite you to the online store. The new Spring dies are on sale for 25% off.

Have a nice day.
Janja


Saturday, September 29, 2018

A Spooky Wish Hello

Hello Scrapping Cottage friends! Thanks for taking the time to stop and visit with us today. It's Mary Marsh here bringing you the Saturday edition of the Blog. 

My card today is from the 2018 Halloween release and a sneak peek of the Autumn 2018 release.  There are 10 new designs in the Halloween release. You will find these in the online store at a 25% off sale.
I used the Halloween Ice Cream Cone  and the Fall Phrases dies for my sample today. This die is a sneak peek of the new Autumn release coming soon. So let's get started with some details on how I created this card.

Step 1: I looked through my paper collection for a Halloween themed design. I found this paper that has the title of "spooky night" and I liked the laboratory beakers and flasks on the paper. I thought it would work well with my Halloween themed card. 
I cut both sheets of the patterned paper at 4" x 5 1/4" and then cut on an angle. The panels are joined together with some matching ribbon.
Cajun Card Base: 4 1/2" x 5 3/4"
Orange layer panel: 4 1/4" x 5 1/2"
Patterned Paper: 4" x 5 1/4"
***After I started card assembly, I decided to add another color for my card base. I chose a cinnamon shade for the card base***
Step 2: I cut my ice cream cone in similar colors to the die packaging. The hello word is cut in the Cajun (cinnamon) cardstock. 
I used the Rectangle Set & the Pierced Rectangle dies as a backdrop for my ice cream cone. Stamped my spooky wishes sentiment on the white panel in black ink. 
The ice cream cone is secured with dimensional adhesive and the hello phrase with Ranger multi matte medium.
Step 3: To finish off my card, I scattered 3 black rhinestones. It balanced the image panel nicely.  Attached the panel to the card base with double sided tape. 

Well, that's it for me for this week. I hope I have given you an idea for a way to use these new dies. And, remember they are 25% off in the online store. See you next Saturday!

Dies  I used to create card:

http://www.scrappingcottage.com/cottagecutzrectanglesetbasics.aspx

http://www.scrappingcottage.com/cottagecutzpiercedrectanglesetbasics.aspx


Saturday, March 03, 2018

Sewing theme card

Hi, Janja here!

My today's card was made with a set of cute sewing elements.
I have some friends who love sewing. That's why I was especially pleased with the Stitched Sewing Notions die. With this die we can make a few cards or thank you cards, for everyone who loves sewing. I also prepared a matching tag.

The Stitched dies and the new Spring dies are currently 25% off. Check them out in The Scrapping Cottage store.


Supplies:
- white card base: 4.25 x 5.5" (10,7 x 13,9 cm), folded
- kraft cardstock: 3.7 x 4.8" (9,5 x 12,3cm)
- patterned paper
- white and kraft cardstock
- Distress ink pads: Festive Berries, Aged Mahogany, Vintage Photo
- glue, double-sided adhesive tape, self-adhesive pads

Prepare a card base from a white cardstock. Cut a smaller layer from a kraft cardstock, and attach to a card base. Die cut two rectangles from patterned paper and white cardstock (the largest die from both sets).
Make a matching tag using the Mail Tag Set die.  


Now cut out all the sewing elements. For shading I use bright and dark tones to add a dimension.  
Look how cute these cutouts are. Especially the "handmade" label with heart. The perfect end touch to handmade items.  


 Complete the card and tag.


Thank you for coming over. Have a nice day.


Tuesday, April 11, 2017

Bee Happy

Hi, Janja here!

Today I would like to share with you another card with a bear.


Supplies:
- CottageCutz stamps and dies: Ben with Beehive, Sweet Valentines (beehive, honey pot, sentiment), Beehives (branch), Rectangle Set, Stitched Rectangle Set
- white card base: 5.3 x 5.3" (13,5 x 13,5 cm)
- patterned paper: 5 x 5" (12,7 x 12,7 cm)
- patterned paper: 4.25 x 4.25" (10,8 x 10,8 cm)
- colored cardstock
- Distress inks: Festive Berries, Mowed Lawn, Twisted Citron, Faded Jeans, Broken China, Antique Linen, Vintage Photo, Mustard Seed, Spiced Marmalade, Rusty Hinge, Black Soot
- watercolor paper

Trim selected patterned papers. Cut out watercolor paper with the largest rectangle die from the set, and stamp on it the bear with black Archival ink.


First, color the entire motif with Distress inks. Later stamp one more time only the bear, beehive and honey pot. After coloring cut them out with the matching dies.


We will attach one beehive to a branch with leaves. Cut them out from brown and green cardstock.
 

Stamp sentiment in black and assemble the card.


If you have not yet managed to see the new CottageCutz dies - Baby, I kindly invite you to the store. 

That's all for today. I hope you like it and thank you for stopping by.


Tuesday, April 04, 2017

Enjoy every moment

Hi, Janja here!

Nature is these days breathtaking with beautiful color spectrum of blooming flowers. It is therefore not unusual that I once again reused beautiful CottageCutz stamps and dies - Birthday Flowers.


Supplies:
- CottageCutz stamps and dies: Narcissus Flower - December, Larkspur Flower - July, Garden Gnomes 1 (Hello),  Wildflowers 2 (dragonfly), Fancy Floral Lace Border, Oval Set, Stitched Oval Set, Stitched Rectangle Set, Stitched Circle set
- kraft and white card base: 4.25 x 5.5" (10,8 x 14 cm), folded
- patterned paper: 4 x 5.2" (10,2 x 13,2 cm)
- green cardstock: 4 x 5.2" (10,2 x 13,2 cm)
- patterned paper: 3.74 x 5" (9,5 x 12,7 cm)
- Distress inks: Tattered Rose, Picket Raspberry, Blueprint Sketch, Mowed Lawn, Peeled Paint, Spiced Marmalade, Rusty Hinge
- watercolor paper

Stamp flowers on watercolor paper. After coloring, cut out flowers with matching die.


If we do not have appropriate colored cardstock, use Distress inks and color white cardstock.


Cut out paper strip with stitched rectangle die. Fix the die on the edge of cardstock, and cut out one line with stitches. Then move the die, and cut it out again.


From white cardstock cut out two lace border. Shadow them gently with Distress ink - Tattered Rose.


Stamp and emboss sentiment with white powder. Attach lace.


Cut out two ovals from kraft cardstock and patterned paper.


Trim patterned paper and card base.


Add the dragonfly and the card is completed.


With circle die cut out a hole in a patterned paper. Fasten patterned paper to a green cardstock, and put them together on a white card front.


Stamp and color flowers. Cut them out with the matching die. Attach flowers in a circle. Use self-adhesive foam pads. Stamp "Hello" on a strip, and attach it to the background with eyelet. 


Thanks for joining me today!