Showing posts with label Retro Alphabet. Show all posts

Friday, August 19, 2022

Batter up!


Hi everyone! Linh here and I have a fun baseball card for you sports fans! The latest Baseball & Golf collection is amazing! If you struggle with making cards for the men and sports lovers in your life, this is the perfect collection for you!


Card Sketch

For this particular card, I followed a fun card sketch. it's nice a simple and perfect for using some of your pattern paper scraps!  These papers are Lawn Fawn's Gotta Have Gingham and Plaid papers.  I thought they'd be perfect for this baseball themed card.

The Retro Alphabet set from CottageCutz seemed like a perfect fit for this masculine card! 


Wednesday, June 17, 2020

All Things Grow with Love

Hello!  This is Sukie and today I'm sharing this all occasion card for my design team post.  I used one of the fun dies from the Gardening die release.
My card features the Garden Ladder, the Pierced Circle Set and a little arrow from the Retro Alphabet die set.
I incorporated a couple of different patterns for my card base on a solid white card panel.  The sentiment was stamped on a strip of solid card stock.
The base of my card came together quickly with the different layers which were topped off with the circle.
The ladder was adhered to the left side of the circle.  The neutral background allows for the gardening elements to pop even in the softer colors.
The sentiment strip was adhered along the top edge of my card.  I added the arrow inside the circle as an embellishment.
Here are the die sets used on my card, available in the store:

Saturday, February 22, 2020

Easter Parade

Hello Scrapping Cottage friends! Thanks for taking the time to stop and visit with us today. It's Mary Marsh here bringing you the Saturday day edition of the Blog.
We have a new release of Spring dies, and they are in the online store and 25% off for a limited time. There are 27 new dies in the release and each one is cuter than the next. They will be perfect for your Easter and Spring card making. We will be having a group post starting tomorrow and will run the entire week.

Today, I am featuring the new Spring Parade die. This die set is just too cute and it's perfect for a whimsical Easter or Spring card. It will go to my next door neighbors. They have a 3 year old and she will just love it. So let's get started on some details of how I created my card.

Design Steps:

I started by cutting the images. I used a variety of colored cardstock for the images.  You could always cut everything in white cardstock and use the coloring medium of your choice. I just prefer using the colored cardstock.
Next, I selected my cardstocks. I chose this designer paper that is a lighter shade of blue and I thought it would make a great background. I sponged some lighter green ink at the bottom for a grassy area for my parade marchers.  I decided to go for a long and skinny card to fit all of my images. For mailing, this would fit in a #10 business size envelope.
Teal card Base: 4 1/2" x 7 1/2"
Designer Paper Layer: 4" x 7"
I cut the parade word from the Retro Alphabet die. The cardstock is a teal shade.
Now that all my card elements are cut, I am ready for card assembly. I started with the die cut images. I used double sided tape to secure to the designer paper.
Added my Parade sentiment using Ranger multi matte adhesive.
I stamped the Easter word in the same teal shade.
To finish off my card, I added the image panel to the card base. I decided to add a few purple sequins for a little added interest. I hope I have given you an idea for a way to use this new die. That's it for me for this post. See you next Saturday.

dies used to create card:


Thursday, January 09, 2020

Happy Brrr-thday!


Hello Scrapping Cottage friends! Thanks for taking the time to stop and visit with us today. It's Mary Marsh here bringing you the Thursday edition of the Blog. Happy New Year wishes to all our Blogger friends!

Today, I am featuring the Polar Bear Fishing die. It's from our latest Artic Animals release. There are 13 new designs in this release and each one is so versatile for a variety of card making and giving occasions.

I needed a masculine birthday card and I thought this die image would be perfect. So let's get started on some card details.

Design Steps:

I started off by cutting the polar bear image. I used a variety of white and colored cardstock. Sponged blue ink on the edge of the ice float for depth.
I used a snowfall stencil and embossing paste for the top half of my card. I stenciled an A2 size piece of white cardstock but I cut it at 2 1/8".  I stencil on a craft mat because the clean up is a breeze.
Stamped the sentiment in an espresso brown ink. I decided to stamp it before it was attached to the card base. This bottom half of the card front is blue designer paper. I thought it had a water like pattern to it. 
Now that all the card elements are prepared, I am ready to start assembly. I attached the stenciled panel and the designer paper to the white card base. The panels are joined together with blue cardstock cut at 1/4" x 5 1/2". I was trying to get the look of the horizon line.

White card base: 5 1/2" x 4 1/4"
Stenciled panel: 5 1/2" x 2 1/8"
Designer Paper Panel: 5 1/2" x 2 1/8"

The polar bear image was attached using dimensional adhesive. For the ice float, I used double sided tape.
To finish up my card I attached the "brrr" letters. These were cut in blue glitter paper and I used the Retro Alphabet die. I stamped the remaining letters of the birthday sentiment on light yellow cardstock and sponged it with dried marigold ink to make it a bit more vibrant. Sorry I forgot to take pictures of this step in the process. But here is the finished photo.
Well that's my card for this post. I hope I have given you a bit of inspiration for a masculine birthday card. See you on Saturday for my regular posting day.

dies I used to create card:


Tuesday, April 23, 2019

Knight and Dragon

Hi, Janja is here with you.
Above the dragons and knights, boys are always excited. I made two cards for all the little boys who dream that they are brave knights who overcome the dragon.
I used dies from the new release - Magical Fantasy.


- CottageCutz dies: Knight, Royal Horse, Magic Dragon, Fairytale Castle, Rainbow With CloudsRetro Alphabet
- white card base: 4.25 x 5.5" (10,8 x 14 cm), folded
- white cardstock: 4 x 5,2" (10,2 x 13,2 cm)
- scrapbooking glitter paper
- colored cardstock
- colored ink pads
- embossing folder
- glue, double side adhesive tape, self adhesive foam pads

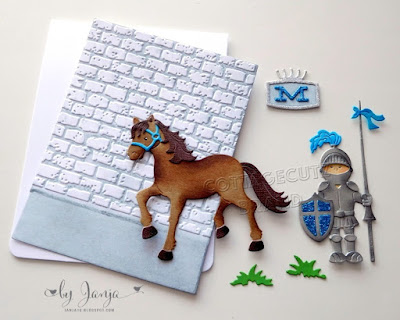
For the first card, cut out the knight and horse. Then darken all the pieces with colored ink pads along the edges and fasten them together.


For the brick wall use embossing folder and distress ink - Iced spruce.


The first letter of the boy's name is cut out of blue and silver scrapbooking glitter paper.


Completed card.


Repeat the process on the second card and cut out the central motive first. 
Cut the hill with scissors.


I used an oval brush and a plastic stencil for the cloudy background. Very simple and the result is flawless.


Now we have everything ready. We finish the card as shown.


Have a nice day.
Janja