Showing posts with label Paddles & Rope Ladder. Show all posts

Tuesday, April 05, 2016

Pelican

Hi, Janja here!

I'm glad that spring is here, and even more, I am looking forward to summer. This year so much that we already booked our holidays. Since the holidays are still far away, my dreams are being realized with cards.
So let's get started ...


For the card we need:
  • white card base: 8.5 x 5.5" (21,5 x 14 cm) folded
  • blue and white cardstock: 4 x 5.2" (10 x 13,2 cm) and 3.7 x 4.9" (9,5 x 12,6 cm)
  • scraps of colored cardstock
  • Distress inks: Broken China, Faded Jeans, Vintage Photo, Wild Honey and Pumice Stone
  • blue ribbon
  • glue and adhesive pads

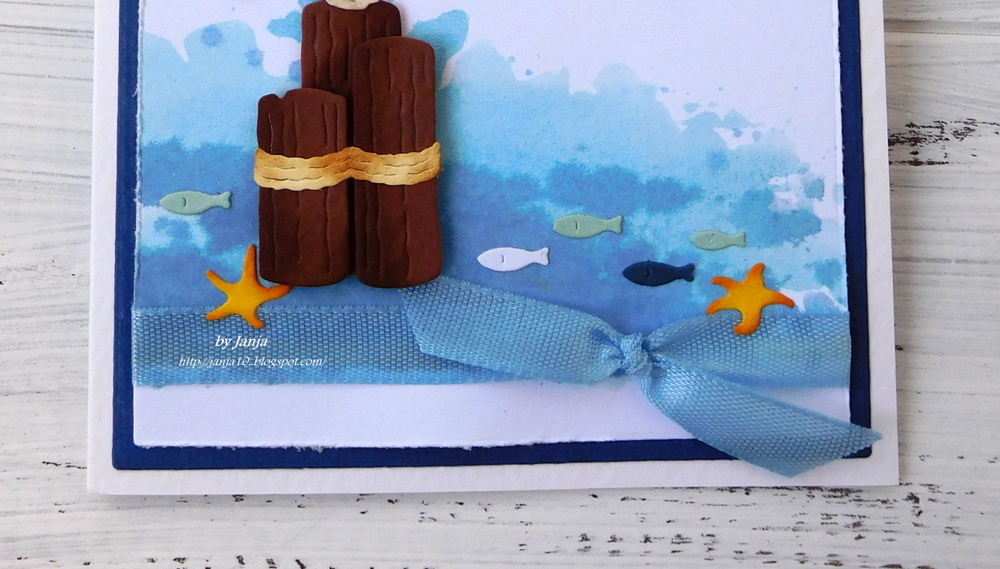
I printed the inscription in Word and painted the background with Distress inks, water and a brush. Before painting paper was wet with water for more beautiful flowing.


For the pelican I used a CottageCutz die. All cutouts are shaded with the Distress inks. With shading we achieved look of depth. 
I applied adhesive foam pads to the back of my pelican and attached it. 
With scissors, we draw around the edges of the cardstock. At the lower end of the cardstock I glued a ribbon, bound in a knot. 
When card was completed, I added some seagulls and fish.


List of dies used:


Have a nice day.

Janja

Wednesday, March 30, 2016

Nautical Father's Day


Hello Scrapping Cottage Friends! Thanks for taking the time to stop by and visit with us.
 
It's Mary Marsh here with the Wednesday edition of the Blog. Today, my card sample will show you another way to use some of the fabulous nautical dies from the CottageCutz March 2016 release. And, a way to use your circle dies for something other than just circles. It's also a Father's Day card which we will be celebrating here in the US on June 19.
 
So let's get started with how I created this card:
 
red card base:  4 5/8" x 5 1/2"
white layer:     4 3/8" x  5 3/8"
Both these layers are a little larger than the standard A2 size in order to accommodate the boat base and fishing net.
 
Sail Boat Base: Cut with navy blue card stock. I used the 3rd largest circle die from the CottageCutz circle (basics) set and cut it in half.  To give it a wood like effect, I used a woodgrain embossing folder and ran it through my Big Shot machine.  
 
The fishing net is cut from kraft card stock and I used the CottageCutz paddles and rope ladder die. The fish are part of this die and I cut those in yellow, orange and blue card stocks.


 Striped Sails: I used striped patterned paper and cut in a triangle shape. One is slightly larger than the other. The "sail pole" is 1/4" wide, cut in navy blue and I taped the sails to it. I made it long enough to tuck behind the boat base.  To make the red flag atop the sails I used a star punch and cut off one of the points.
 
Clouds: I cut these from the Lighthouse w/ clouds die. Looks like it's temporarily sold out. Used white card stock and sponged with medium blue ink. I used dimensional tape to secure them to white base.
 
 
Water: I used a curvy line stamp to create my water and stamped in a medium blue ink.  Scattered a few fish in the water.
 
To complete my card I stamped my "happy father's day" sentiment in navy blue ink. I stamped on an angle for added interest. And, that's it for me for today. So until next time.......inky hugs!!!


Tuesday, March 29, 2016

Fearless seafarer

Hi everyone, Janja here.
I hope you had a nice Easter. Today I'm sharing with you a card for boat and sea lovers.


For the card we need:
  • white cardstock for base of card: 10.6" (27 cm) x 5.3" (13,5 cm), folded in half
  • slightly smaller square patterned paper from the base
  • scraps of white and colored cardstock
  • Distress inks: Festive Berries, Aged Mahogany, Broken China, Faded Jeans, Antique Linen, Wild Honey and Storm Sky
  • glue and adhesive pads
  • scissors and paper cutter

Owls are cut with the CottageCutz die captain & sailor owls. I put them on the two paddles and filled the bottom of the card with fishing net full of fish.
As an experienced seafarer never sails on the open sea without a life preserver, I fixed one on the fishing net.


With cute owls, you will delight even the most demanding lover of the sea.


List of dies used:


I wish you calm sea.

Janja

Wednesday, March 16, 2016

Beach Life


Hello CottageCutz Fans! Thanks for taking the time to stop and visit with the Scrapping Cottage Blog. It's Mary Marsh here with the Wednesday edition of the Blog. Today for your viewing pleasure, I have made a pop-up card box with some great nautical dies from CottageCutz.

This type card is really easy to make and when it's decorated has a WOW factor! It also folds flat so it can be put in an envelope for mailing or hand delivery. Lets get started with some instructions.

Step 1:
Cut cardstock to 9” x 5 1/2”. Score on the long side at 2 1/8", 4 1/4”, 6 3/8", and  then at 8 1/2”. Turn the cardstock 90° and score at 2 3/4".
Step 2:
Use a paper cutter or scissors and cut the score lines to the center score. On the end ½” score line cut it off on a diagonal to create a tab.


Step 3:
For this step you need a bone folder, to fold all the score lines for a sharp crease. Once that’s done you tape the tab. Use red line tape and tape the outside of the tab. Bring the tab side over first to the middle and then bring the other half and press together. 
Step 4:
Now you have the look of the box. To add support to the outside back of the box, I used white cardstock measuring 2" x 4 7/8". You can use this panel to stamp a sentiment.  I added the lighthouse, birds (from lighthouse die) and star fish from the paddles and rope ladder die.


Step 5:
To create my layers on the box, I used red card stock cut at 2" x  2 1/4" and patterned paper cut at      1 7/8” x 2 1/8” for the 3 box flaps that are hanging down. I decorated it with the CottageCutz Crab die cut in red cardstock. On the inside back panel the red cardstock measures 2" x 4 7/8" and patterned paper measuring 1 7/8" x 4 5/8".

Step 6:
For the inside dividers, cut cardstock to 3 1/8” x 3 1/8” and score this at ½” and 2 5/8”. Cut this piece in half and fold on the score lines. Both tabs should be folded back.

You use red line on these tabs as well. Tape on the outside of each tab. Tuck the tabs on the inside of the box to create your dividers. You can slightly close the box in this step to make sure the tabs line up straight.


Step 7: Decorating the box
I decorated the inside of the box with several CottageCutz nautical dies. On the back panel I used the large sailboat die, cut in navy blue cardstock. I stamped my "beach life" sentiment and used the circle set basics to cut it out. I cut another circle in red cardstock and slightly offset it.

I also used the Pelican die cut in a white confetti cardstock. Sponged his beak with distress inks. The wood mooring he is standing on is cut in a medium brown shade and the ropes in kraft cardstock. The detail on the pelican and the wood mooring is amazing.

The lighthouse is another detailed die. I cut this one in red cardstock and used navy blue accents. There is even a small cut panel that I cut in yellow for the inside light. If I haven't said it before, I just love these dies.


Well friends, that's it for me today. I hope you enjoyed this card and will give the pop-up box technique a try. So until next time.......inky hugs!!!