Showing posts with label Oval Set. Show all posts

Sunday, January 03, 2021

Safari Hello

Hi!

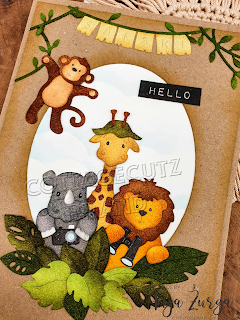
It's Anja here. Hope you had a blast last couple of days. I wish you all the best in this New Year. Lots of happiness, health and crafty ideas. My first card in 2021 is another safari themed project. I just love this dies and it so much fun to make cards with this cute animals.


For this card I used:

- Cottage Cutz dies (Safari Adventure Gang, Safari Monkey, Safari Cruiser w/Banner, Oval Set),

- Distress Inks,

- craft card base (13x18 cm),

- white card stock for die cuts and background (11x16 cm),

- craft card stock (12x17 cm),

- silver pigment ink,

- plastic stencil (clouds),

- black pen,

- white pen,

- sentiment stamp,

- black pigment ink,

- acrylic block,

- scissors,

- paper glue. 


First I cut and colored all the animals, greenery and the banner.

Next I cut the biggest oval from the set from the craft card stock rectangle. I colored around the edges with brown shade of Distress Ink.

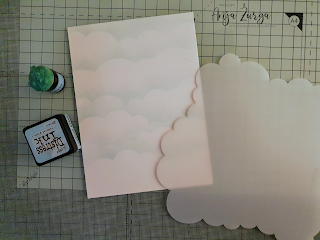
Next I trimmed another rectangle out of the white card stock and colored the cloudy sky on top. I used a plastic stencil.

Next I stamped and cut the sentiment.

Then I arranged all the pieces and glued it on the craft card base. First I glued the animals in the middle of the oval. Then I added the banner and greenery around it. I cut all the parts that were placed out of the paper. Then I glued this background and the colored sky on the card base. Last I added the monkey and the sentiment. And my card was done. 


That's all from me for today. Have a nice Sunday and see you again next week.

Anja Z.


Cottage Cutz dies I used for this card:


Wednesday, December 09, 2020

Dear Santa, Define good . . .

Hello!  This is Sukie and today I'm sharing a fun card for my design team post.  I used the Gnome w/Chimney to create this festive Christmas card.  This sweet die is from the Christmas Part 2 die release. There are so many adorable dies available in the store for those Christmas creations!

The word art card stock was the inspiration for my card.  I coordinated the die cuts to the paper colors.  I used card stock for my die cuts and also stamped a fun sentiment on a piece of red card stock.
The patterned card panel was layered on some red card stock for a pop of color.  I used the Oval die set to cut out the opening on my layered panels.  The die cut through the 2 layers, perfectly!
The first step in my design process was to affix the sentiment inside of the oval.  Next I adhered the snow mound directly on top of the sentiment tag.
The card panel was layered on a standard A2 sized card base.  I ink blended the background with some Black Soot Oxide Ink for a shaded appearance.
The adorable gnome with his chimney was tucked into the snow mound and centered perfectly inside the oval frame.
The sack of goodies was nestled into the snow next to the chimney finishing off the adorable scene on this card.
Here are die sets used on my card, available in the store:

Sunday, November 22, 2020

Winter Forest

Hi!


It's Anja here. Today I have a Winter scene for you. This time I used water color markers instead of inks and below is my final result.


For this card I used:

- Cottage Cutz dies (Winter Forest, Oval Set),

- Distress Oxides,

- water color markers,

- craft card base (15x15 cm),

- water color paper for die cuts and background (13x13 cm),

- dark blue card stock for background (13,4x13,4 cm),

- white paint,

- white pigment ink,

- black pigment ink,

- water spritzer,

- sentiment stamp,

- acrylic block,

- water color brush,

- brush,

- heat gun,

- paper glue.

First I colored the silhouette. I left it together with the negative so it was easier to color.


Next I added "snow" to the trees using white paint and a brush.
 
Then I started on the background. I trimmed 13x13 cm square out of the water color paper. I used the biggest oval die from the set and cut the oval out in the upper middle of the paper. I colored the paper with a mix of Distress Oxides. Then spritzed it with water, dried it and sprinkled it with white paint. Dried it again and added white ink to the borders of the oval.

 
Then I trimmed the blue cardstock and adhered it to the card base together with the white background. I put the colored oval back in the cut. I added the sentiment below the oval.

 
Last I added the silhouette and my card was done. 

This is all from me for today. Have a nice week and see you again next Sunday.

Anja Z.


Cottage Cutz dies I used:


Wednesday, September 30, 2020

Happy Meow-oween!

Hello! This is Sukie and with only a month away from Halloween I have a sweet little kitty card to share!  I'm showcasing one of the fun dies from the Cottage Cutz Halloween die release.  This is just one of the 3 new releases in the store.

I went with a purple ink blended card for a spooky but fun background.  I blended 4 different Oxide Ink colors, splattered the background with some water and then added some paint speckles.
I cut out the Black Cat w/Jack-O-Latern using card stock and did a bit of shading with some ink.  I also cut out a basic Oval from white card stock.
The oval was centered inside of my card panel.  I'm loving the glow from the lighter ink behind the oval die cut.
The black kitty with her jack-o-latern was affixed inside of the oval.  The kitty is absolutely adorable with that sweet look on her face.
I found the most perfect sentiment in my stash of stamps and heat embossed it on some black card stock.
Here is the die set used on my card, available in the store:

Saturday, September 26, 2020

Kittie & Jack-o-Lantern

Hello Scrapping Cottage friends! Thanks for taking the time to stop and visit with us today. It's Mary Marsh here bringing you the Saturday edition of the Blog. 

We have three brand new releases in the online store. It's Christmas Part 1 (22 new designs), Christmas Part 2 (21 new designs) and a Halloween release (14 new designs). They are all currently on sale and you can save anywhere from 25% to 60%. 

Today, I am here with a card from the Halloween release. Many of you create cards for Halloween and are looking for ideas to use these new dies. So, I am featuring the new Black Cat w/Jack-o-Lantern die. I think both the pumpkin and the cat have such cute faces. Nothing to scary at all so it would be one you could send to a child. So let's get started with some details on how I created my card.

Design Steps:

I started my card with the colors from the Splitcoaststampers color challenge #810. We were to use terracotta tile, flirty flamingo and soft suede. Plus neutrals are allowed so I was good with the dark green for the pumpkin vine and black and gray for the cat. 
terracotta tile, soft suede, flirty flamingo
I cut the pumpkin from terracotta tile cardstock and the cat's scarf in flirty flamingo. The cat is cut in black and gray cardstock. I used a dark green designer paper for the pumpkin vine. 

I had my card base and designer paper chosen so I just needed a layout. I picked the Splitcoaststampers sketch challenge #819. I thought it would work well with the pumpkin and cat image. 
For layer #1 I used a soft suede designer paper. I thought the circles worked well with this image. For layer #2 I used a woodgrain designer paper and cut it with the 2nd largest Rectangle die. For layer #3 I used soft suede cardstock and the 2nd largest Square die. 
Next, I stamped the sentiment with Versamark ink and then embossed it with black embossing powder. I wanted it to stand out on the card. I cut it out with the Stitched Oval die.
I am ready to start card assembly. I attached the image to the square panel with dimensional adhesive. 
Attached the designer paper to the card base and layer #2 and the image panel with double sided tape. 

The sentiment panel is also secured with double sided tape. I added another layer to the panel. It's cut from  terracotta tile cardstock with the Oval die.  
I finished off my card by scattering a few terracotta tile enamel dots and to the sentiment panel a couple of leaves. 
That's it for me for this week. I hope I have given you an idea for this new die. See you next Saturday!

Dies I used to create card: