Showing posts with label Nested Wacky Stitched Square Set. Show all posts

Tuesday, August 23, 2022

Baseball Bag and Card Set w Video

Happy TuesDIE Cottage Cutz Friends!
Melinda here with you on on another sweet TuesDIE. Today I am sharing a fun card and box set, featuring dies from the Baseball and Golf release.

Here’s a look at the set. It features an A2 top folding card and an easy to make, treat bag. I made the bag from one sheet of 8.5 x 11 cardstock. Below is a quick tutorial on how I made the little box.

You start with one piece of 8.5 x 11 cardstock. A little heavier weight cardstock is ideal. 
You want to score your cardstock at the 2.5" and 6" along the 8.5" side.
Score at 4.5 and 6.5 along the 11" side.
Then along the 11" side you want to score from the top of the paper to the first score line at 2.25" Then you want to score from the bottom of the paper up to the first score line at 2.25".  Flip your paper and do it on the other end of the 11" side as well. This is just for a cutting guide to be able to cut off all 4 corners.

Here is what the bag looks like when cut. You will then want to create a pleat on the sides as you gather them up so that the two large flaps (front and back) will touch. For my closure, I just punched a couple of holes through both and strung some ribbon through them.


I added a piece of patterned paper to the front and back of the bag. The size of the mats are 3.25 wide x 4.25 tall. I used the baseball die, the Baseball phrase die and the mit to decorate the bag. It hangs as a tag for the front of the bag.

Here's a photo of the card. I used the All Star emblem, the baseball player silhouette and the ball, mit and bat along with the MVP phrase. I mounted the mit, ball and bat as well as the silhouette batter onto some red cardstock and onto some square wacky stitched mats.

Here's a photo showing how I colored my Baseball phrase die with my markers. I cut all of my dies in white cardstock and then use my markers and inks to color them in. 

Here is one last look at my set. I think it turned out great and can't wait to gift it to one of my favorite all stars!


Head over to my YouTube Channel For a Quick Project Share and helpful tutorial for this cute set!

Be sure to check out my project share video on last week's set too!

The Dies I Used For This Project


Here's the entire release. Head over to the shop and check them all out!


Also, don't forget to head over to the CottageCutz YouTube channel and check out all of the amazing projects on there. Our video team is doing a wonderful job of filling the channel with all sorts of creative content! You don't want to miss it!


Well that about covers it for today! Until the next time, have a wonderfully craft-die day!
Melinda Beltran

Thursday, July 21, 2022

So Berry Sweet Gnome Card

Happy ThursDIE Cottage Cutz Friends!
Melinda here with you on on this Terrific Thursday! I hope you are enjoying your week thus far and if you are state side...hopefully you are beating the heat! Staying in and crafting is always a great refreshing way to relax in these dog days of summer! Today I am sharing a very simple but sweet card I created featuring dies from the new Strawberries and Bees release

The focal point of this simply sweet card is the adorable little Strawberry Gnome Girl Die. She is part of the new Strawberries and Bees release. I also used the Berry Phrases Die from the same release. My finished card size is a standard top folding A4 size. The base is white cardstock and then I added a piece of red cardstock. To that, I added a mat of some patterned strawberry paper. I designed the paper and printed it out. I purposely made the strawberries on the paper tiny so they wouldn't be disproportionate to the rest of the composition.

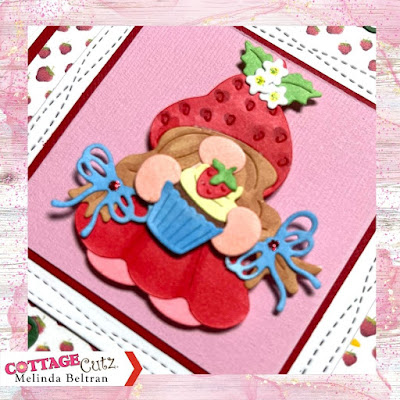
Here's a closeup of that sweet little Strawberry Gnome Girl.

She was very easy to assemble. I just cut all her pieces out in white and then colored them in. That really is my favorite thing to do. Coloring your die pieces is very relaxing. She comes together very easily and is so sweet.

Here's another view of her closeup. Once I assembled her, I added some foam tape to give her a little lift off the mats. I used a pink and red cardstock mat and put those on top of Wacky Stitched mat. I added just a tiny touch of stickles to the centers of her hairbows and the centers of the little flowers on her berry hat.

Here's a closeup of the sweet title and two berries. I did the same with the title pieces. I cut them all out in white and then colored them in. 


Dies I Used


Be sure to check it out and all the amazing creations from the design team!


Also, don't forget to head over to the CottageCutz YouTube channel and check out all of the amazing projects on there. Our video team is doing a wonderful job of filling the channel with all sorts of creative content! You don't want to miss it!


Well that about covers it for today! Until the next time, have a wonderfully craft-die day!
Melinda Beltran

Friday, June 17, 2022

Birthday Wishes Card

Hello Scrapping Cottage friends!  
Melinda here with you on this Fabulous Friday!  Today I am sharing another tastefully fun birthday card. It features some cool treats created with dies from the New Sweet Treats Release! Here is my card.
I started with a top folding white cardstock base. It is a standard A4 size. 4.25 x 5.5". To the base I added some cute patterned papers from Doodlebug. I also added a strip for the bottom border.


Here's closer look at the sweet and cool treats I used to adorn this card. They are from the Build An Ice Cream Cone die. I cut the pieces out of Pink, Kraft and White cardstock. I used my markers to give them some color. To the strawberry, cherry and topping on the center cone, I added some stickles to give them some extra sparkle and shine.

Here's a closer look at the sentiment. I typeset it and printed it off my computer. I added it to the smallest Nested Wacky Stitched Square  from the same set. I mounted that with some foam tape onto the colorful border at the bottom of the card.


Here is the new sweet treats release.

Sweet Treats Release


The Dies I used to create this project:


Make sure you head over to the CottageCutz YouTube channel and check out all of the amazing projects on there. Our video team is doing a wonderful job of filling the channel with all sorts of creative content! You don't want to miss it!

Well that about covers it for today! Until the next time, have a wonderfully craft-die day!
Melinda Beltran


Sunday, January 30, 2022

Bunny Peeker Treat Box w/ Bonus Card

Happy Sunday Scrapping Cottage friends!
Melinda here with you today. It's another Sunday Funday and I hope you are enjoying some crafting! I am sharing a little more spring inspiration featuring dies from the new SPRING RELEASE! Today's project is a super cute little box with the adorable new Peeker Bunny w/ Pocket Die for the front!

The new Peeker Bunny w/ Pocket Die is part of the fantastic new Spring Release! I started by cutting out my die pieces in white cardstock. I then colored my various pieces in with my markers. I did also cut out the pocket piece in blue cardstock as well as a patterned paper for the sides of the box mats from my Doodlebug paper pad.


I decided to make my Peeker Bunny w/ Pocket the front of a cute little treat box, instead of a card. The box size I ended up using comfortably holds 3 Ghirardelli Chocolate Squares with some tissue. That's the perfect amount for a little gift for your co-worker's, teachers, etc. this spring season.

Box Assembly
I settled on starting with a piece of paper 5.25 x 5.25 size.


I scored all four sides at 1 5/8th. That is the next 1/8" line past the 1/2" mark.

Here is what it looks like when scored. It is not a perfect square size. I settled on this size to match the width of the pocket piece as close as possible.

Next you will want to cut it as shown. The easiest way to remember how to do this is just cut the line of the outside score to the first cross line. Then do a quarter turn and repeat. Do this all the way around. You will also want to cut a little slice out so that it makes assembly easy.

This photo shows you where to apply your adhesive. You will put it on the "top" of each of the four corner tabs you created. Once you do this, simply fold up the box and adhere the sides.

Here is what it looks like assembled.

This is a slight segue. I wanted to share all the various size boxes I worked up before I settled on my size. I wanted to come up with one that was as close to the width of the pocket without making it too complicated. Can you tell I am not the greatest at math?....LOL!

Here is one more look at the finished box. After I assembled it and took my photos, I realized I left off the sweet little ladybug that sits on top of the flower!!!! UGH! SOOOO.... I had to get it on somewhere!!! 

So I whipped up this cute card. I had extra pieces, so this came together easily. 
My finished card size is a 5x5 top folding card. I used a piece of white cardstock for my base. I then used the same blue cardstock for the pockets as a base mat. On top of that I layered some Doodlebug patterned flowers paper, a strip of some of the bright green paper in the same pad. I then used the Wacky Stitched square for another base and then some more Doodlebug patterned paper for a mat. I set my sweet little bunny in her pocket on top of that. I did add a little foam tape to the back of the die cuts to give them just a bit of lift and dimension.

Here is a side view. You can see that sweet little ladybug on top of this flower. 


Here you can see I used the double stitched rectangle and the hello and spring words from the Hello Spring Bunny Cottage.


The Dies I used to create this project:


In case you didn't hear, The CottageCutz YouTube channel is up and running.  Head over and check out the latest video! There is a giveaway for subscribing too!


Well that about covers it for today! Until the next time, have a wonderfully crafty day!
Melinda Beltran