Showing posts with label Nested Wacky Stitched Rectangle set. Show all posts

Monday, February 27, 2023

Sweet as Lemonade

Happy Monday crafty friends!

Kris here with a cute Box Card!  I really love to make box cards like this because they are easier than they look and you can fit more dies/images on them to create cute scenes and really gives your recipient a fun surprise!  ☺ 

I've used several brand new sets from the Flowers & More Release -- which are all 30% off for a limited time!


*The girl is an image I drew as part of my own  digital stamp collection (2015) and is not currently available, however this boxcard would also be cute with only the CottageCutz dies listed or add your own favorites from the shop!


Design Steps:

1.  I cut all my cardstock and patterned paper pieces:

Pink Cardstock:
• 4-7/8" square
• (2)  2-1/2" x 1-1/4" - scored 1/2" in on each end;  mitered top flaps

White Cardstock:
• die cut the largest Nested Wacky Stitched Rectangles

Lime Green Cardstock:
• 1-1/4" x 4-7/8"
• (2) 5-5/8" x 1-1/4" - score 3/8" in from each end; miter top flaps

Patterned Paper (green):
• 4-3/4" x 1-1/8"

Patterned Paper (pink):
• 1-1/8" x 1-3/8"


2.  I stenciled sun rays onto the Wacky Stitched Rectangle with Squeezed Lemonade Distress Oxide ink.


3.  I mounted my patterned papers and sun rays to their corresponding pieces as shown below.


4.  To assemble the shelves, I used the same technique as my cow box card HERE (follow steps 8-14).


5.  I die cut all my decorative pieces, then colored and assembled them.  

*Note:  I die cut 2 of the lemonade stand, one in a wood pattern and one in white and glue together to make it more sturdy.  

6.  I attached all my pieces!  

*Note:  I stamped "You're as" onto the sun rays panel.  Then glued the Sweet w/ Shadow in place.  I attached the stand, fence and my stamped girl with a piece of heavy acetate that extended an inch below the die cut/image and attached that to the shelves.  You could use cardstock, but the acetate I used is sturdier than c.s.  Here's a couple of process photos.


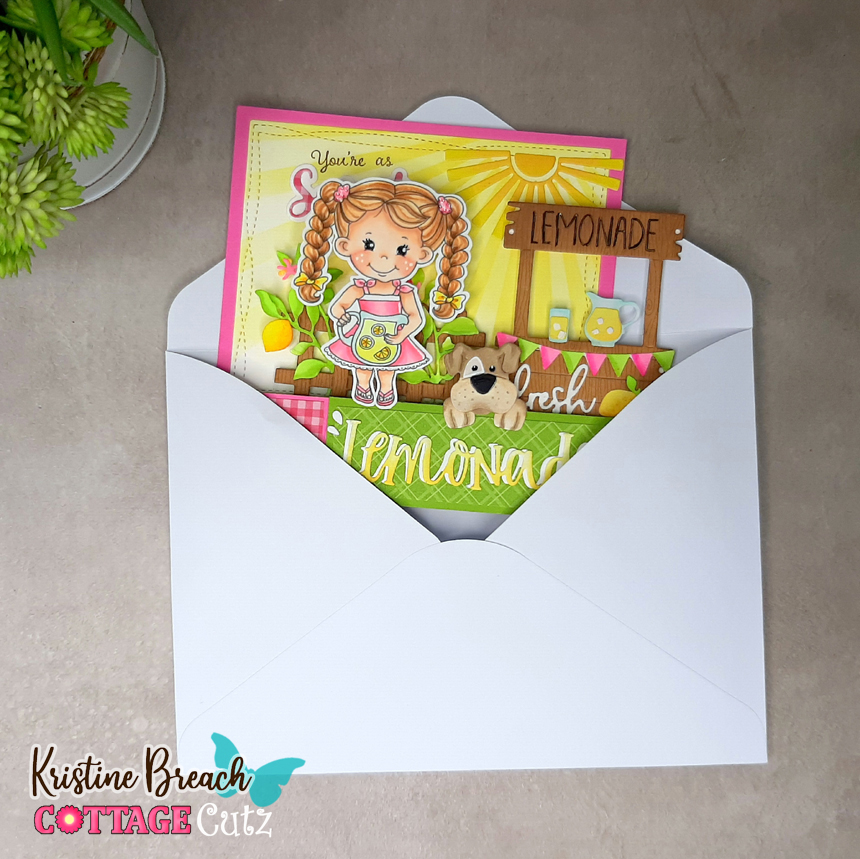
One more look at my finished card.


It folds to the side and fits into a 5" x 7" envelope.


Products I Used:


Thursday, January 12, 2023

Hot Wheels!

Hello Scapping Cottage Friends,

It is Pam sharing with you today!

I am starting off the new year trying to get a head start on some birthday cards.  I have a number of male cards I need to make including hubby!  Masculine cards have always been a challenge for me.  But using the Classic 50's released has really helped with the challenge.  There is everything from cool cars to electric guitars!!  Today, I am using the awesome Motorcycle.


Design Steps:

1.  Using the Motorcycle die cut out the pieces in the following colors of card stock: red, yellow, silver, black, light and dark grey.  Shade the pieces with various inks and a small applicator 
2.  Assemble the pieces using a fast drying fine tip glue
3.  For the base use black card stock in an A2 size 
  • Cut a white panel 4 1/8 x 5 3/8 embossed in brick and inked with light grey
  • A silver panel 1 3/4 x 5 1/4 embossed and layered on black
  • A piece of turquoise cut with the third from the largest Wacky Stitched Rectangle and layered on black.  Wrap the turquoise rectangle with a piece of black ribbon
  • Using the Ring in the New Year die cut out 5 of the hats in the black checked DP for the banner
4.  Glue the white brick panel to the black card front.  Glue the silver strip to the white brick panel slightly to the left as shown above.  Place pop up strips to the back of the turquoise rectangle and then pop it to the front as shown below
5.  Glue the black string to the top of the card as shown above and then add the little checked banners. Add the little red stars and your sentiment and the card is complete

CottageCutz Products 


We have more inspiration on our YouTube Channel check it out HERE

Thanks so much for stopping by!  And I will see you next Thursday.

Blessings and Take Care


Sunday, September 04, 2022

Labor Day SALE and a Bday Box Card

Happy Labor Day Weekend friends!  Kris here with a Birthday Box Card that I made for my daughter who loves cows and she was so excited to get this!  Before I get to it, I want to remind y'all of the BIG LABOR DAY SALE!! Up to 65% OFF so many dies -  Sale ends Thursday, September 8, 2022 at 9:00 PM Pacific Time so HURRY OVER and save!!!  

Also - be sure to check out our NEW CHRISTMAS RELEASE which is also on SALE!

I purchased these adorable Country Farm Cows at last year's Labor Day Sale & right now ALL of the dies I have used on my card today are 40-60% OFF (except the balloon on the back as it's retired.)  I have listed and linked all the products I've used on my card at the end of this post! ☺


This next one is of the BACK of my card - empty space to write a personal message.

And yes it does fold flat to fit into an envelope! 


Design Steps:

1.  I cut a white rectangle using the largest die from the Nested Wacky Stitched Rectangles - then stenciled some clouds with Tumbled Glass Distress Oxide ink.  *Optional:  I then cut off 5/8" from the bottom of my rectangle to fit the size card I was wanting to make, but it's not necessary.


2.  I cut a piece of blue cardstock at 3-1/4" x 4-7/8" and mounted my cloud layer on top.  *If you didn't want to cut the bottom off of your cloud layer in step #1, then you would cut your blue piece at 3-3/4" x 4-7/8" ☺


3.  I cut (2) pieces of green at 2-1/2" x 1-1/4" - then scored 1/2" from each end and mitered the top of flaps.  These are my side pieces.

4.  I cut a piece of green for the front of box at 1-1/4" x 5"


5.  I cut a couple different colors of green (can be all one shade) into strips at 5-3/4" x 1-1/2" and scored 3/8" in from each end.  These are the inside "shelves" that we will attach our cows to later. 


6.  I then used various dies from the Hills Slimline set to cut the very tops off of each shelf piece.  


7.  I then cut the side flaps down along the score line as shown below:


8.  Next, with my 2 side pieces, I glued the left flap to the bottom left edge of my cloud piece, and the right flap to the bottom right edge of same piece as shown below.


* For the next few steps, we're not going to do anything with that right flap.  Just going to work on the left side.

9.  I added glue to the left flap of my side piece and attached the left side of my front piece.


10.  Decide which hill you want to be furthest back and add glue just to the left flap and bump it up to the score line of your side piece as shown below, making sure the flap is below the top edge of your side piece.


11.  Fold that hill over to the right and add glue to just the left flap of your middle hill.  Then attach it up to the scored line of the back hill as shown below.


12.  Fold that hill over to the right and repeat for the front hill.


13.  Add glue to ALL 3 tabs on the hills fold your right side piece over onto them.

14.  Add glue to the flap of your right side piece and attach your front panel onto it.


15. Die cut a fence using the Farm Fence Slimline die.  Add glue to the back leaving the top horizontal beam w/out glue as it will be sticking above your green front piece a li'l bit.  Attach to the front panel. 


16.  Die cut, color and piece together Savanna trees, Country Farm Cows, and Happy Birthday w/ Shadow.


17.  I added glue just to the lower portion of my sentiment and attached it to the top of my card base as shown below.

18.  I attached my die cuts to the various hills as shown.


19.  For the back of card, I cut a white piece as in step 1, cutting off 5/8" from bottom.  Then I cut a piece of green cardstock cutting the top with a Hills die and the bottom portion with the same Nested Wacky Stitched Rectangle die.  I also cut a cute balloon and done!

Here are the Products I Used:


THANK YOU for taking time to visit today!  I hope I inspired you to make a box card with your favorite CotageCutz dies!  

I'll be back tomorrow with a card from the NEW CHRISTMAS RELEASE!

~Kristine