Showing posts with label Melinda Beltran. Show all posts

Tuesday, March 05, 2024

So Lucky Slimline Paper Piecing Card

Hey crafty friends,
Melinda here with you on this Terrific Tuesday! Can you believe it is already March? My goodness how time is flying! Today I am sharing a fun card I created with some cute dies from Cottage Cutz. Take a look.

Here is another view of my card. The base is a 4 x 9 side fold base of Marigold Cardstock. I used some rectangle stitched slimline dies and cut out a white one and a smaller one with the polka dot patterned paper I created. 


Here's a closer look at the cute little "pot of gold". It was actually a "witches" cauldron I made the bubbles in yellow. I cut the shoes in white and then colored them in green and colored the yellow buckles. I also used the Alphabet and the same marker that I used for some of the gold coins I colored the YOU. I also lightly dusted the edges of the black cauldron with white. I then attached it to a white circle stitched die that I cut some of the patterned paper I created.

Here's a closer look at my little Leprechaun. He was actually a Christmas Baker Gnome. I just switched up his colors and then made his hat. I also added him to another circle stitched circle in some more of the patterned paper I create.

Here is a closer look at the darling little rainbow from the rainbow die. I just used a variety of my markers for the colors. I didn't use the typical rainbow colors but rather ones that I thought would work for my card. I also used my blue marker to put some outlines on the little clouds that are a part of the die set.

Here is a closer look at my title So and Lucky. I used the same alphabet I cut in white and then colored with my markers. I then just wrote to have in one of the clouds. I also cut out a variety of more pierced circles in a variety of my patterned papers.

Here are some photos showing how I pieced his little hat together. In the top left, that is the piece that the little bakers hat is. I just cut it down as shown. I then free handed the top of the hat you see it in the bottom left photos. I then traced the piece and then attached them. The bottom right shows the pieces assembled and in the back of the hat.

Here are some more photos showing some additional details for his little clover, I used the flower from the little garden flowers die set. You can see how the die is in white. you can see in my "clover" looking flower I cut the middle point out on each of the four petals to create the clover. On the top right I simply colored a piece of my cardstock anhd then used a hole punch to punch out several more small circles. In the lower right, you see the little leprechaun guy coming together.


Dies Used For This Project

Holiday Gnome Baker


Cauldron


Stitched Alphabet

Folk Art Rainbow 


Pierced Circle Set

Stitched Slimline Rectangle Set


Well, that about covers it for today. Be sure to come back real soon. You will want to keep up with my crafty adventures!  Don't forget to find me on social media too! Links are below.
Until the next time, have a wonderfully crafty day!
Melinda


Head over to Cottage Cutz and do a little shopping today!

Get Social With Cottage Cutz

Wednesday, February 28, 2024

Santa Gnome as St Patrick Let Your Light Shine Card

Hey crafty friends,
So glad you stopped in today!Today I am sharing a fun and cute card I created with some fun Cottage Cutz dies. Check it out.

The size of my card is 5.5 x 5.5. 

Here's a closer look at my cute little gnome. He is actually a Christmas gnome die. Take a look.

Here is the little gnome I used. I pretty much used all the same pieces of him. I did cut the wavy parts of the hat rim to make them straight. I left off the holly and little ball of the hat. I added an extra belt and buckle on the hat. I used the solid portion of the candy cane. Also for the shoes I used the piece that cuts out from the beard. It is a bit larger than the shoes. 


Here's a closer look at the tree trunk and the foliage.

Here's a closer look at the additional foliage.

TIP: I needed some blue cardstock but didn't have the right color blue. Not to fear, I just cut the size I needed and then colored the edges in blue with my marker.

Here is a closer look at my saying. I used the Retro Alphabet for the lettering. I did use the Q for the G in light only because the G in the alphabet is really big. Also, the little lantern is a die cut from the ladder die cut set.


Dies Used For This Project

Santa Gnome w/Christmas Tree


Retro Alphabet

Autumn Ladder ( Lantern)

Spring Foliage Border

Tree Stump and Log For Peekers


Head over to Cottage Cutz and do a little shopping today!

Get Social With Cottage Cutz


Well, that about covers it for today. Be sure to come back real soon. You will want to keep up with my crafty adventures!  Don't forget to find me on social media too! Links are below.
Until the next time, have a wonderfully crafty day!
Melinda

Wednesday, February 14, 2024

Polar Bear Fishing Die Cut Card

Happy Valentine's Day crafty friends! I wanted to share a cute little card I created with one of the cutest cottage cutz dies!
It's the perfect card for my hubby for Valentine's day. He is indeed the perfect catch and he is all mine!


I started by cutting out and assembling all my pieces. For the cutie patootie polar bear, I cut all his pieces out in white cardstock. I then used some markers and chalks to give the pieces some color.

My card base is a standard A4 side fold card from some standard white cardstock. I used some cute patterned papers for the card base as well as for a mat for the scallop stitched rectangle mat as pictured.

Here is a closer look at the sweet little polar bear. He is holding his little fishing pole and he has one little fish on the hook. That fish I made extra sparkly with a touch of Stickles glitter glue.
I also used some of the glitter to color the water hole. The photo doesn't show the sweet little sparkle.

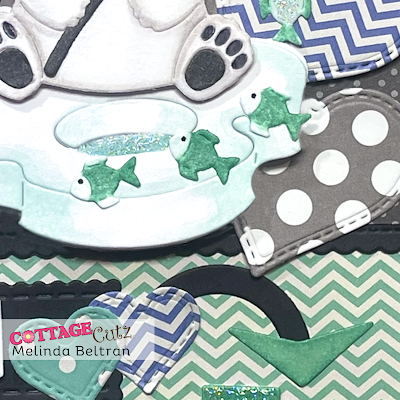
Here's a closer look at the cute little fish and you can also see a variety of the stitched hearts I cut out in a variety of patterned papers. I also used one of the arrows and one of the pieces from the retro alphabet set to make the arrow head look extra large.

here is a closer look at my layered sign. I layered one of the shapes from the Retro Alphabet die set onto one of the black scallop stitched dies. I then used another one of the arrows in the same retro alphabet set and wrote the words: you're, the and perfect. The perfect arrow points to the letters....

CATCH!  The letters are from the retro alphabet set. I cut them in white like the other pieces and then used the same marker color that I used on my little polar bear to color the letters in. I like doing this so that I can get the same colors on my project without having to try and have that particular color paper on hand. I have so many pieces of patterned paper and they are all from different manufacturers and the colors are so varied. This is the easiest, most economical way I have found to craft with a variety of color palettes.


Dies Used For This Project


Scallop Stitched Rectangle


Be sure to head over to Cottage Cutz and do a little shopping today!


Well, that about covers it for today. Be sure to come back real soon. You will want to keep up all the amazing projects the super talented design team shares! Don't forget to also check out the Cottage Cutz YouTube Channel and all our other social media accounts! Until the next time, have a wonderfully crafty day!
Melinda