Showing posts with label Mary Marsh. Show all posts

Sunday, October 01, 2023

Father Christmas (New Die)

Hello CottageCutz friends! Thanks for taking the time to stop and visit with us today. It's Mary Marsh here bringing you the Saturday edition of the Blog.

It's new release time!!! We have our Christmas 2023 release in the online store that has 40 designs. It's an old-fashioned Christmas theme. You can pick up the bundle at 50% off or the individual dies at 30% off for a limited time.

We also have a new Fall 2023 release in the online store with 15 designs. You can pick up the bundle at 50% off or the individual dies at 30% off for a limited time.

Today for your viewing pleasure, I am featuring the new Father Christmas die. I have a collection of vintage Santa images that my mother-in-law passed along to me and this die reminds me of those images. I may just send this card to her for Christmas. So, let's get started with some details of how I created my card.

Design Steps:

I started by selecting the designer papers I wanted to use for my layout. I have an older Christmas pack that had the name of Father Christmas. It contains vintage designs. I picked 2 different patterns and cut them as the background for my image.

Light Green Card Base: 4 1/2" x 5 1/2"
Light Green Image Panel: 3 1/8" x 4 1/8" (I used the largest rectangle die)
Dark Green Layering Panel: 3 1/2:" x 4 1/2"
 
 Next, I cut the Father Christmas image. I used the colors from the packaging as they coordinated well with my designer paper. I wanted a more vintage look to my card so I cut the bow from the Vintage Holiday Lantern die and also used the Corner Flourish die (2016 release) for another corner accent. 
I decided a stamped sentiment would work best for my layout. I stamped in a cherry ink that matches the ribbon and other embellishments on my card. 
Now I am ready to start attaching the panels and the images. I used double sided tape and clear drying glue. 
Next, I secured the Fathe Christmas images with dimensional adhesive. I wanted him lifted off the card slightly. 
I wanted some other embellishment on my card since the vintage style is always a bit busy. So I decided to use one of the images from the new Christmas Ornament die. I think it works well with the other images. 
And that completes my card for this week. I hope I have given you an idea for a way to use the Father Christmas die. See you on Wednesday. We are having a group post featuring the new Fall designs

Reminder: Marla has a new video up on our YouTube channel. There is a giveaway. Click here


Saturday, September 23, 2023

Winter Snowman (New Die)

Hello CottageCutz friends! Thanks for taking the time to stop and visit with us today. It's Mary Marsh here bringing you the Saturday edition of the Blog.

It's new release time!!! We have our Christmas 2023 release in the online store that has 40 designs. It's an old-fashioned Christmas theme. You can pick up the bundle at 50% off or the individual dies at 30% off for a limited time. 

We also have a new Fall 2023 release in the online store with 15 designs. You can pick up the bundle at 50% off or the individual dies at 30% off for a limited time. 

Today for your viewing pleasure, I am featuring the new Holly Frame and the Winter Snowman dies. So, let's get started on some details of how I created my card. 

Design Steps:
I started by cutting the Holly frame die in a Christmas green cardstock. We haven't had a die like this before, and I thought the center opening would work to showcase the new snowman die. 
Next, I cut my snowman from cardstocks and gave him a red Christmas scarf. 
I wanted a sentiment on the card front and I decided to use the Merry Christmas phrase from an older CottageCutz die. It's the Merry Christmas w/Deer family from our 2018 release. 
I am using a white card base behind the frame and for the center cut-out portion I cut another piece of cardstock and stenciled some clouds. 
White Card Base: 4 1/4" x 5 1/2"
Stenciled panel 2" x 3 3/4"
Now that my elements are prepared, I am ready to start card assembly. I attached the stenciled panel to the holly frame. 
I attached the snowman using dimensional adhesive. On his little sign I added a sticker with the word "peace". 
To complete my card, I attached the Merry Christmas phrase and also decided to add some red berries to the Holly Frame.  
That's it for me for this post. See you next Saturday!

Reminder: We have videos on our YouTube Channel. Check out this one from Marla. 


Saturday, August 19, 2023

Fall Leaves


Hello CottageCutz friends! Thanks for taking the time to stop and visit with us today. It's Mary Marsh here bringing you the Saturday edition of the Blog.

Our new Folk Art release is still available in the online store at 35% off individual dies. There are 19 new designs that are so perfect for cardmaking, journaling, and scrapbooking.

In fact, all of the releases from 2023 through Halloween of 2022 are currently on sale. Check them out here if you want to pick up any that you may have missed and still want. The sale won't be on long.

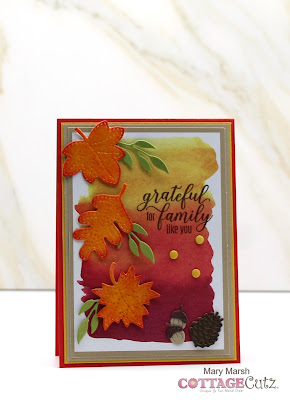
Since we are coming into my favorite time of the year, I decided to make a Thanksgiving card using the beautiful colors of Fall. The die is an older one from the 2018 collection "Stitched Leaves"

For my leaves, I first die-cut the leaves from Bristol smooth cardstock and then ink blended barn door and fossilized amber distress inks. I pressed them in Ranger Perfect Medium and then used clear embossing powder with my heat tool. This technique makes the leaves really pop. Although my camera isn't picking up all the shine that's on the leaves.
My background paper is from a kit I had in my stash.  I really like the color washed background. I layered it on a crumb cake (kraft) panel then crushed curry and my card base is the poppy parade.

Card Base: 4" x 5 3/8" 
Curry Layer: 3 3/4" x 5 1/4"
Kraft Layer: 3 5/8" x 5 1/8"
Image Panel: 3 1/2" x 5"
Next, I stamped my sentiment. I stamped in chocolate chip ink. 
Now that my card elements are prepared, I am ready to start card assembly. I attached all the layers first with double sided tape. 
I secured the leaves with double sided tape. I decided to add some other greenery using the Rustic Wreath die.
To finish off my card I added a pinecone and a couple of acorns and scattered a few curry enamel dots. I also added more leaf greenery to the bottom leaf. 
 
That's it for me for this week. See you next Saturday. 

Reminder: Marla has a video up on the CottageCutz YouTube channel. Click here.


Saturday, July 22, 2023

Celebrate with Folk Art Flowers

Hello CottageCutz friends! Thanks for taking the time to stop and visit with us today. It's Mary Marsh here bringing you the Saturday edition of the Blog.

Our new Folk Art release is still available in the online store at 35% off individual dies. There are 19 new designs that are so perfect for cardmaking, journaling, and scrapbooking.

They allow you to add a beautiful touch of folk art to whatever you may be creating - birthday, thank-you, new home, thinking of you and even Christmas. The design team has featured many creative ideas using these dies so take a look back at our posts for inspiration.

Today, I am featuring the new Folk Art Flowers in a mini slimline design. So let's get started with some details of how I created this card. 

Design Steps:

I decided I wanted a black card base because it's such a striking look combined with bright colors. I embossed the 3" x 6" mat just for added interest. 

Mini Slimline Base: 6 1/2" x 6 1/4". Score in half at the 3 1/4" mark. 
Black Embossed Mat: 3" x 6"
I secured the flower images with clear drying glue. 
I added some greenery to each corner of the image panel. It's cut from the Folk Art Flowers Mixed die. 
For a sentiment I decided to use the Celebrate w/Shadow die. Cut the shadow in a bright pink and the phrase in black. 
To finish off my card, I secured the image panel to the card base with double sided tape and scattered a few enamel dots. 
Well, that's it for me for this post. I hope I have given you an idea for a way to use the Folk Art Flowers die. See you next Saturday.