Showing posts with label Kris Breach. Show all posts

Monday, February 12, 2024

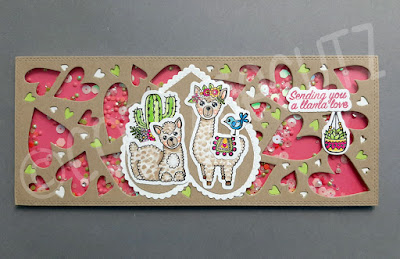
Llama Love Slimline Shaker

Happy Monday friends!

Kris here, sharing one more Valentine card idea for you!  It's a cute & punny SHAKER card!  Who doesn't love a shaker, right?!  

For this one I used the Whimsical Hearts Slimline die and the Llama Love stamps and coordinating dies from Little Bluebird Designs.  I also used the scalloped heart from Be My Valentine Puppies die.


Slimline cards can be hard to photograph, but I just had to sneak in my llama plant stand for this one!  ☺ Also, you may notice my heart focal point is upside down... but I think it totally works with the random whimsical hearts and the placement of my llamas.  However if that bothers you, feel free to turn the heart right side up.

CUTTING & SCORING:

CUT white card base at 7" x 8-1/2" and SCORE along the 7" side at 3-1/2".

CUT a backing from dark pink cardstock cut at 3-1/2" x 8-1/2" and cut a sheet of acetate the same size.

Die cut Whimsical Hearts Slimline die from Kraft c.s., // *Optional:  cut it out of White, and Lime Green c.s.. as well if you want to piece some of hearts back into the die cut front.  Set the white and green ones aside.

Die cut just the scalloped heart from Be My Valentine Puppies die from white and Kraft c.s.

DESIGN STEPS:

1.  Create a shaker by adhering the acetate to back of Kraft heart layer, then add 1/8" foam strips on top of acetate all around the outside border and a few tiny pieces in center.  Add shaker elements inside the foam strips then carefully place the dark pink backing on top, lining up the outer edges.

*Optional:  I inserted some of the white and green tiny hearts back into the die cuts, (adding glue directly to the acetate then inserting hearts.)


2.  Stamp, color and die cut as pictured using the Llama Love stamps and coordinating dies

3.  Using scissors, trim the Kraft heart on the inner stitched line as shown. 


4.  Glue the Kraft heart onto the White scalloped heart.  Turn it upside down (if you wish) and adhere the llamas and other elements as shown below. 


5.  This next part is *Optional... but I wanted a scalloped border but didn't have one larger than my Whimsical Hearts card front, so I die cut (3) of the 2nd largest Scalloped Rectangles dies (currently out of stock). 


As you can see in the finished photo, this size rectangle will leave gaps in between, so I adhered the 2 outer ones first so I could get equal amount of border around the sides, and then I added the middle one. 

*Tip:   I placed it on wax paper below because I put tape all over the back of shaker and didn't want it to stick to my table.  

6.  Adhere to card base and done!  


I hope you liked this tutorial and are inspired to create something FUN with your favorite stamps and CottageCutz dies!  

Hope you have a wonderful Valentine's or Galentine's Day friends!

~Kris


Friday, February 02, 2024

Lovebug Bees - Pop Out Gatefold

Happy Friday Friends!

Kris here, sharing with you a 'new to me' fun fold card design called a Pop Out Gatefold Card.  I've mostly seen this style where the top and bottom center sections are folded to the front but here's a version where they fold backwards so the center panel takes center stage.

I used the Lovebug Bee die along with the Stitched Hearts set and the Fancy Heart


Back of card

CREATING THE BASE:

Grey lines = score
Pink lines = cut

I started with a white card base cut at 5-1/2" x 8-1/2".  With the 8-1/2" side at top in my paper trimmer, I scored at 2-1/8" and 6-3/8" all the way down.  Keeping the long side at top,  I also scored at 4-1/4" just down to the 1" mark, and from 4-1/2" to 5-1/2" .

Next, I turned my cardstock so short side is at top and I lined up right edge at 1" and cut between the two full score lines (so from 2'1/8" to 6-3/8").  Repeated on opposite side as shown below.


With long edge at top, I scored just between the two cut lines at 2-7/8" and 5-5/8".  

Time to fold and burnish.  All score lines are mountain folds except the two short scores in middle at 4'1/4" - those are valley folds. 


View from the top:

CUTTING DECORATIVE PANELS:
The papers I used are from the Bee Mine DSP from Stampin' Up!

 Petal Pink Matting Layers:
(2)  2" x 5-3/8"
(4)  2" x 7/8"
Bees n Flowers print:
(2)  1-7/8" x 5-1/4"
(4)  1-7/8" x 3/4"
Honeycomb Pattern:
(2)  5/8" x 3-3/8"
Sweet Sorbet Matting Layers:
(2)  5/8" x 3-3/8"
(1)  2-5/8" x 3-3/8"
Honeycomb Pattern:
(2)  1/2" x 3-1/4"
(1)  2-1/2" x 3-1/4"


DECORATE:

(2)  Die cut Lovebug Bee & Ladybug & color
(1)  Die cut Stitched Heart set from patterned paper
(1)  Die cut Fancy Heart from white c.s.


*OPTIONAL - DECORATE BACK:

I stamped on middle section.
I cut patterned papers the same size as the front Matting Layers and skipped Matting on the back. 


and I added my 2nd Bee and a small Stitched Heart to the back ☺


This fits into an A2 Envelope!

Fold the 2 side panels to the back like a gatefold card, so they meet in the middle.  Then it will squish flat and slide it into an envelope.

*NOTE:
I did end up moving my bee to the right panel more so none of it overlapped with the white middle section so that it will fold properly and fit into my envelope ☺


I hope you'll give this fun fold a try! Thanks so much for looking!

~Kristine


Friday, January 19, 2024

Garden Butterflies & Flowers

Hi CottageCutz Friends,

Kris here with you today, sharing a split front card featuring the Garden Butterflies and Garden Flowers from our Black Friday Release.


Here's a side view

CUTTING & SCORING:

Berry Burst cardstock 
Cut a 5-1/2" square 
--from that, cut 1-3/4" from one end (card front)
--then cut 2" from the same end, leaving 1-3/4" attached.

White Cardstock
Cut a 5-1/4" square 

Acetate/Window Sheet 
Cut at 5-7/16" x 5-1/2" 

Fresh Freesia Cardstock
Cut (2) at 1-1/2 x 5-1/4" 

SU! Masterfully Made - Fresh Freesia leafy pattern
Cut (2) strips at 1-1/2" x 5-14"

SU! Masterfully Made - Multi-Floral pattern
Cut (2) strips at 1-5/16" x 5-1/16"


DESIGN STEPS:

1.  Open card so the small flap is at the top.  Apply double sided tape to the flap (not too close to the edge, and attach the acetate so that the 5-1/2" is going side to side (horizontally).

2.  Fold the front closed and attach the 1-3/4" Berry Burst panel to the bottom of card front, aligning with the bottom edge of acetate.


3.  With card open, and working on backside of acetate, apply the leafy patterned Freesia paper to cover up the taped acetate panels as shown.


4.  Attach white square inside bottom of card.


5.  Attach floral patterned paper to the Fresh Freesia strips and then onto the front of card as shown.


6.  Stamp a sentiment onto white inside panel.  I added some post-it notes where the front panels ended so I know where to stamp my sentiment.  


7.  Die cut the top layers of Garden Butterflies and the dragonfly from colored cardstock.  Then for the bottom, more solid layers, watercolor using the same color of ink.


8.  Die cut the Garden Flowers from same colors of cardstock plus Perfect Pear.


9.  I used sticky notes again on inside so I know where the solid card front panel ends then I glued my flowers and cut off the bottoms that overhung. 


10.  I gave the wings more dimension by bending the wings up while rolling the ends of wings around my finger, then I glued just the middle of bodies to the card front.  I then added some matching sequins to their bodies.  


and you have a beautiful acetate thank you card! ☺


Thanks so much for looking today!  I hope I've inspired you to get crafty with your favorite CottageCutz dies! 

~Kristine


Friday, January 12, 2024

2 Swinging Monkey Valentines


Hi CottageCutz Friends,

Kris here with you today, sharing 2 Valentine's Day cards featuring the cute Swinging Monkey and the Valentine Phrase & More!.  The first one is a quick & easy valentine's card.  For my 2nd card, I made an interactive swinging card!

CARD #1


DESIGN STEPS:

I cut my A2 top folding card base in a dark pink, then I layered a piece of Doodlebug Design Hearts paper slightly smaller, 5-1/4" x 4".  

I die cut the largest Nested Wacky Stitched Rectangles from white c.s. and stamped half of a sentiment onto lower portion as shown, then mounted it onto card front. 

I also die cut the Swinging Monkey and the Valentine Phrase & More from white cardstock, and the hearts from  2 shades of pink.  I also foiled the 2nd half of my sentiment onto pink c.s.


I colored my monkey and assembled.  Then I cut off his hands so I could glue them on top of the hearts like he's actually holding them.  


I decided to hang him by his tail instead of his arm, so I glued the tail to tree limb and then onto the card.  I added some foam tape behind his body to pop him out a bit.  


Next, I popped up 2 hearts where his hands would be with foam tape, then glued his hands to the hearts.  I then glued the li'l hearts to the tree limbs and around. 


And lastly, I popped up the foiled sentiment with foam mounting tape and Voila!   How stinkin' CUTE is he??!!!  


CARD #2
(This one actually swings!)


DESIGN STEPS:

For this one, I started with a 5-1/2" square top folding card in light pink.  I stenciled on front to add a li'l interested, then stenciled hearts (from the Valentine Phrase & More cut outs) where the dotty lines intersect.

Next, I die cut the largest Stitched Rectangle set from the center of my card front (with the card open).


Next, I die cut a darker pink frame by nesting the largest Scalloped Rectangle and the 2nd largest  Stitched Rectangle set as shown


I glued the frame to the card front. 


I cut a piece of white c.s. to 5" square and cut 2 pieces, also 5" wide and die cut tops with the Grass Slimline dies.  Then I colored with distress oxide ink.


 I glued the monkey's body and arm to an acetate strip.  Then I punched a hole where his hand would be that was big enough to go around a tiny spinner disc (you could also stack 2 round mini foam dots on top of each other if you want) and position and glue it to the center of the inside of your card as shown below.  

*It helps to close the front of card for positioning.  


Then, with the acetate strip around the glued disc, I glued the tree limb to the top of disc (or dimensional dots). Then I glued his hand to the top of the tree limb where his arm is at and glued the hearts to the tree limb.

I then attached my sentiments to the front as shown. 


And lastly, I cut a piece of lime cardstock 5-1/2" x 3" and scored at 1/2", 1-1/2", 2-1/2" then mountain fold, valley fold, mountain fold it.  Burnish score lines, and add Scor Tape to the 2 outer flaps.


Attach the flaps to insides of card at the bottom. 


For the back, I cut a piece of white cardstock 5" square and mounted a piece of dark pink that was die cut with largest scalloped square die.  I then mounted the sentiment and have room to hand write on the white border.  ☺


Thanks so much for looking today!  I hope you get creative with your favorite CottageCutz dies and be sure to check out the Black Friday Release!!!  It's still on sale - individual dies are 30% OFF and has lots of versatile dies for Valentine's, Spring or Summer! 

~Kristine