Showing posts with label Happy Birthday w/Shadow. Show all posts

Monday, August 08, 2022

Golfing Double Z-Fold


Happy Monday ~ I hope you all had a craft-astic weekend!  Guest Designer Kris here with a Double Z-Fold Box Card FORE you!  I love a good pun!  Today I have used 7 dies from the new AUGUST RELEASE!  This release is so great for those masculine cards - especially if they like golf or baseball!  And for a limited time you can get the whole release bundle at 50% OFF!!  Individual dies from this release are 30% off! 


The Z-Fold card is so easy to make, and this one is a step up because I added "shelves" in the li'l corner box to adhere even more images/die-cutz to!  

HOW I MADE IT:

1.  I cut a piece of light blue cardstock at 4-1/4" x 11" - then scored at 2-3/4" (mountain fold) and 5-1/2" (valley fold)

2.  I cut a green strip (for the front Z) at 2-1/4" x 11" and scored at 2-3/4"(valley fold) and 5-1/2"(mountain fold)  See photo below.

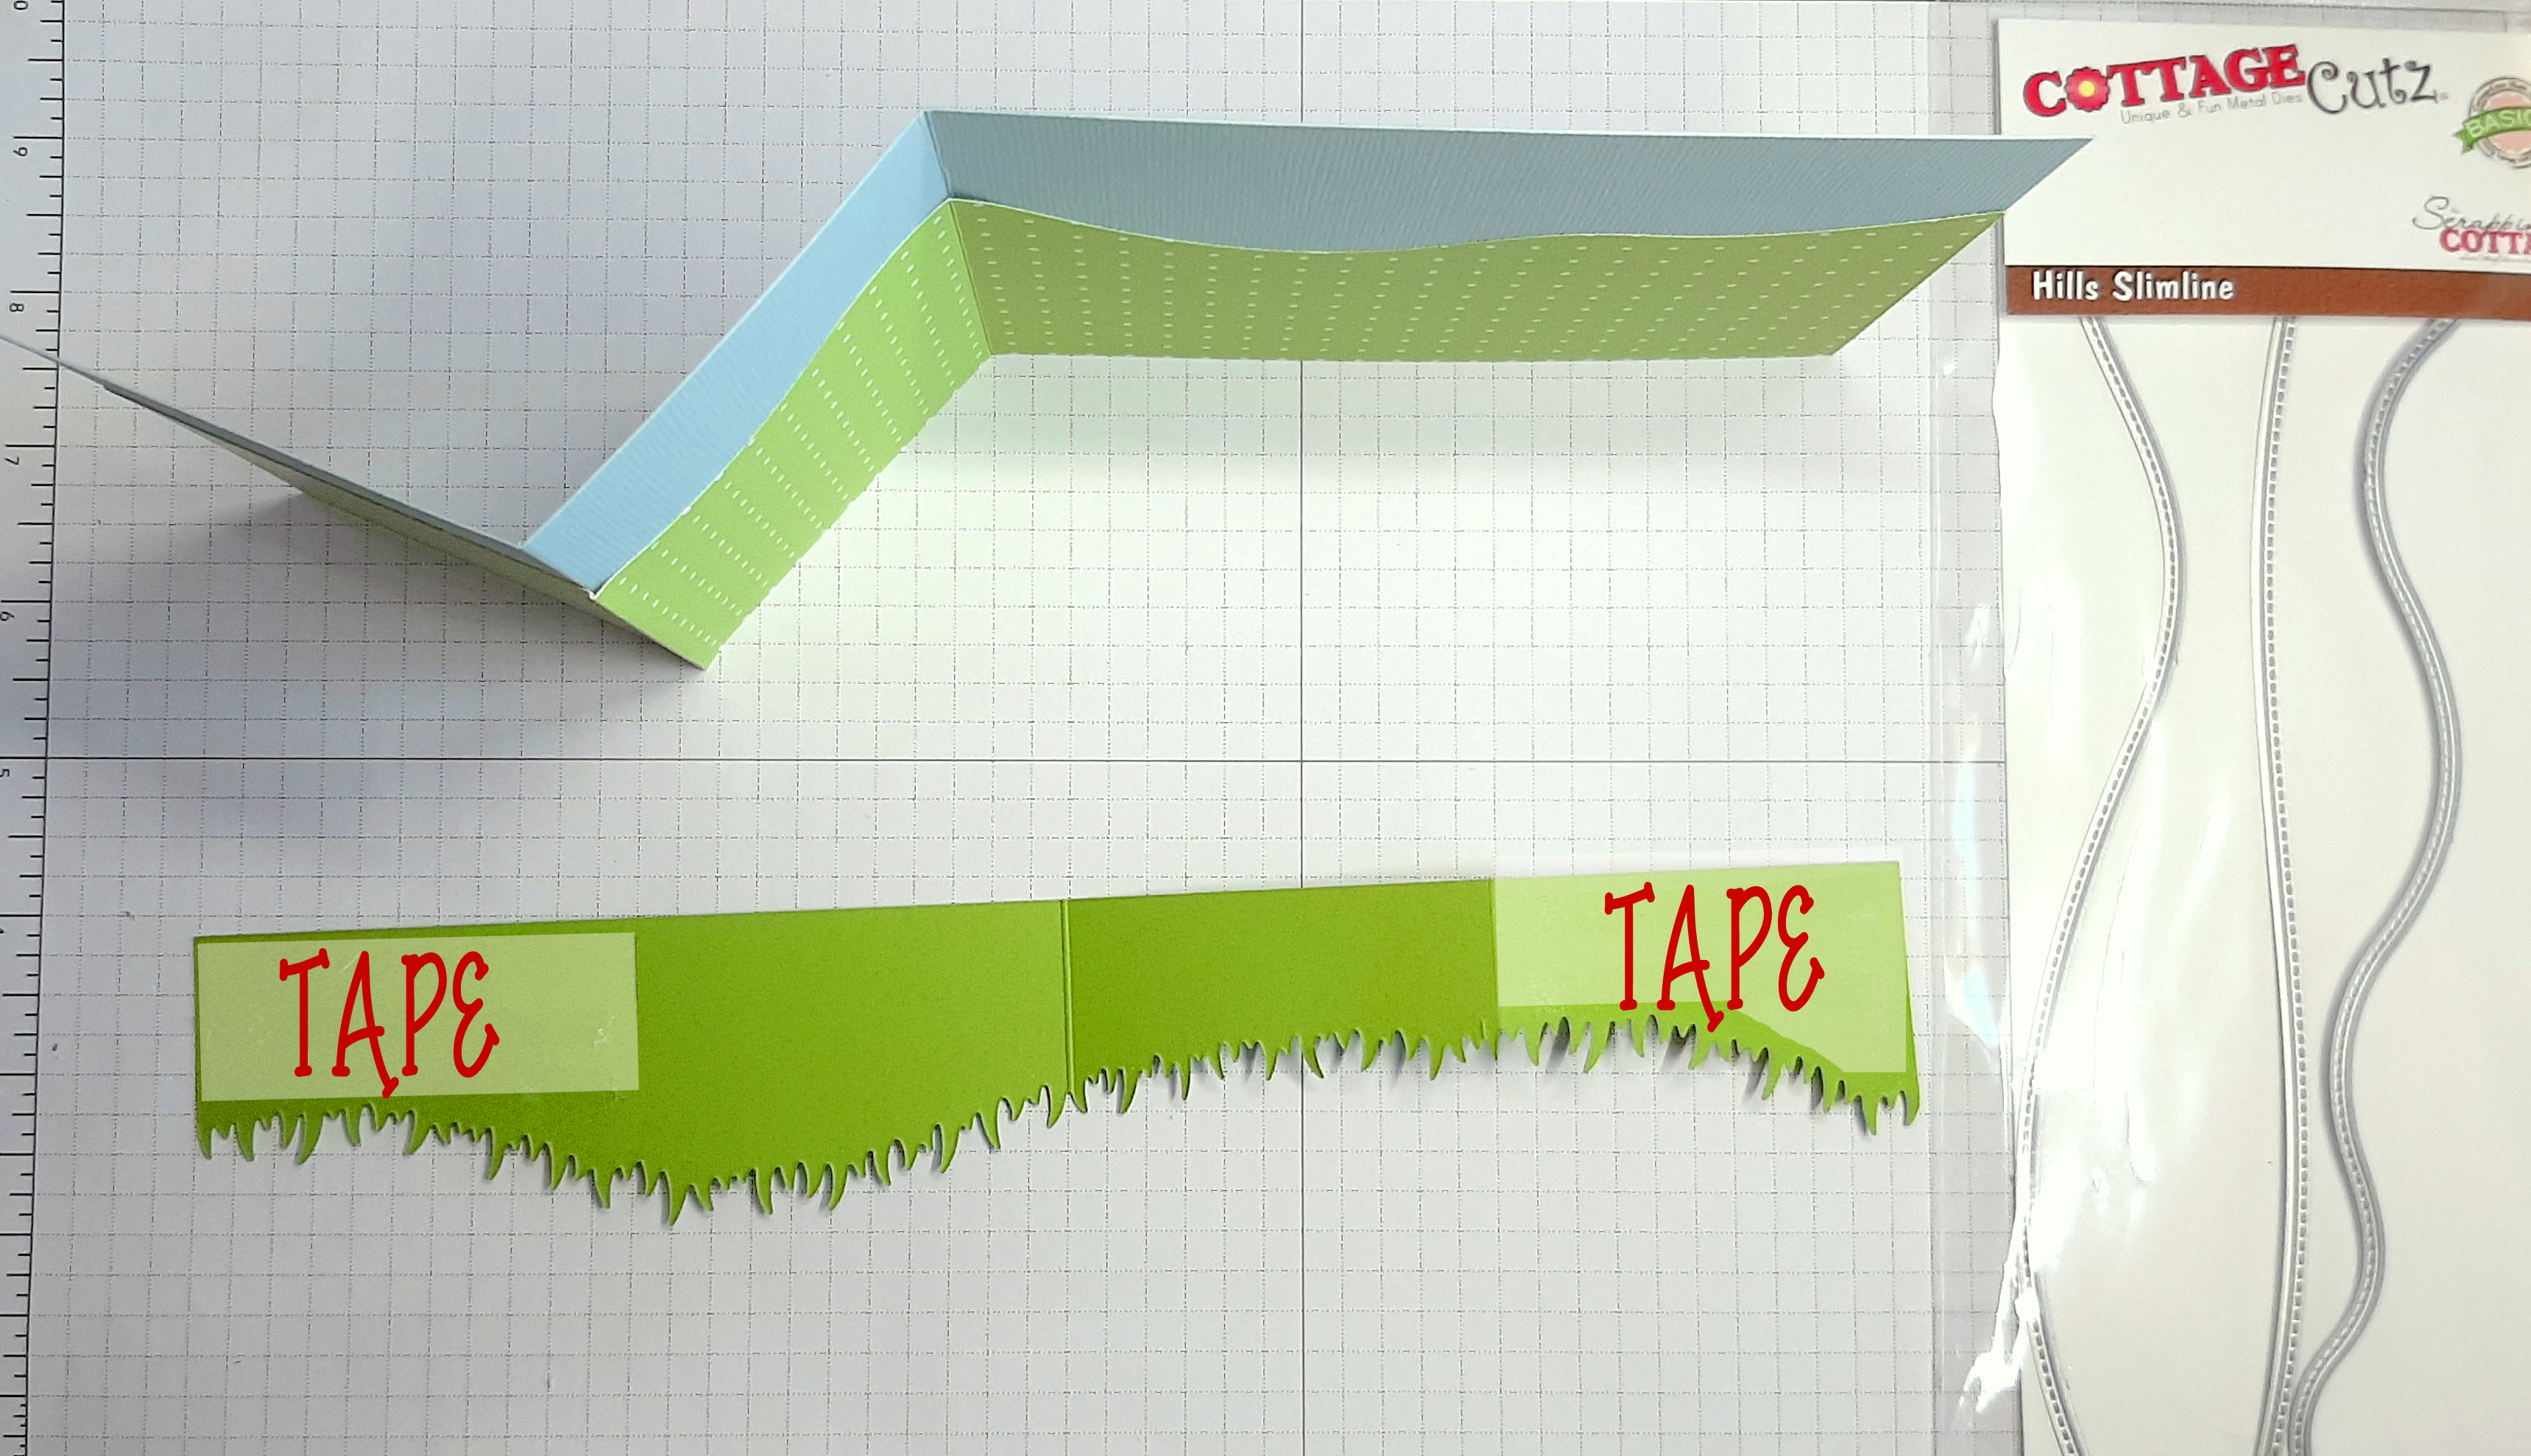
3.  I used the die pictured below from the Grass Slimline set to cut the top of the green Z strip.  The strip will be a bit longer than the die, so I cut to one of the score lines, then moved the die down to cut the rest.


4.  Next, I cut a piece of patterned green paper to 3-1/4" x 11" and scored at 2-3/4" and 5-1/2".  

5.  I used the die pictured below from the Hills Slimline set to cut all the way across the top of that strip, by doing the same technique.... cutting to one of the score lines, then moving the die down and cutting the remainder.  (see photos below)


6.  I attached the patterned paper to the blue card base, aligning edges at sides and bottom.  


7.  Next, I added tape to the sections pictured below on back of the green grassy strip.  You don't want tape to extend past that first score line on your card base, so if it helps, you can place a pencil mark on the backside of your grassy layer at 2-3/4" so you know where to stop taping.  ☺


8.  Adhere to card as pictured below.


9.  Cut 2 or 3 shelves to insert in that "box" that the short Z creates.  I cut (3) at 1-1/4" x 3-3/4" and scored at 1/2" in from each end.

10.  Miter the top of the side flaps.  Then cut the tops using the straightest section of the grass die.


11.  I added glue to the side flaps and (I tried to) evenly space them from back to front of the "box"


12.  If you want, you can cut a piece of cardstock to 4" x 5-1/4" for the back side of card for writing a message.

13.  All that's left is die-cutting my pieces. gluing them together and adhering to my card!  
  • For all the front Z panel die-cuts, I added foam dots to the backs to adhere them
  • For the elements on the shelves inside the "box" I glued them to strips of heavy acetate so I could place them up a li'l higher and provide more stability to them.  
  • For the words and silhouette golfer, I glued them directly onto the card base. 


PRODUCTS I USED:


I hope you enjoyed my card today!  
Have a craft-astic week :) 

~Kristine

Sunday, June 26, 2022

Sweet Slimline Birthday

Hello and welcome back ~ it's Kris here on this sweet Sunday... or shall I say sundae? ☺  This week I'm sharing a yummy slimline birthday card using the Ice Cream Sundae die from the new Sweet Treats release, along with some other funtastic CottageCutz dies! 


Design Steps

I cut a piece of pink cardstock to 8-1/2" x 7" & scored at 3-1/2" along the 7" side.

Next, I die-cut a white frame (I used glittery white cardstock) from the Windows Slimline die.

And then I cut 3 pieces of coordinating patterned papers at 2-1/2" x 2-3/4".  


I glued the patterned papers to the back of window frames, and then glued the frame to card base.


Next, I cut all my pieces with the Ice Cream Sundae and sentiment dies and glued together.  
  • The cupcake liners were cut from patterned papers in the same paper pad as my 3 rectangle frame pieces so they coordinate.  I cut the rest of the die out of pink, brown and white cardstock. 
  •  I gave some shadows to the strawberry & chocolate ice cream and colored all other pieces with Copic markers.  
  • The top layers of the sentiments were cut from glittery white cardstock, like the frame.
  • I added some shaker elements to the ice cream for some sparkly "sprinkles"

And to finish the card, I attached all the die-cut elements to my card front using foam dots.  Easy peasy!


Thanks for taking a peek!  Hope your Sunday is extra sweet!

~Kristine


Here are the products I used:


Sunday, June 12, 2022

Ice Cream Truck Slider

Hello Scrapping Cottage Friends!  

Kris here with my debut as Guest Designer!  With the arrival of summer, I'm excited to be working with this new Sweet Treats release as there are so many occasions for these dies!  

I made a super easy Pull Tab Slider card using Ice Cream Truck.  


You find the list of products I used linked to the store at the end of my post.  But for ease sake I'll list them here along with some other tools needed for this project:

Products:                                            
•  Ice Cream Truck die                         
•  Sweet w/ shadow die                        
•  Happy Birthday w/ shadow die     
•  Wishes w/ shadow die                      
•  Clouds Slimline die                                                
•  Hills Slimline die
•  Pierced Circle Frames die
Other:
•  stamps of your choice  
•  patterned paper                  
•  ruler                                              
•  paper trimmer
•  foam strips/tape
•  low-tac tape     

As always... if you need to see my photos up closer, just click on them for a larger size.

Design Steps:  
  • We all know it's more fun to eat our dessert first.... so I started this project with the FUN stuff!  That is... cutting and piecing together my Ice Cream Truck!  I had this fun paper with blue and pink ice cream trucks, so I matched it.  
  • Next, I cut my main pieces of cardstock.  
    • Card base (grey) is cut at 6" x 12" and scored at 6"
    • Another piece in the same color as base cut at 4-1/2" x 5-3/4"
    • and a dark pink cut at 6" x 6" 
  • To make the frame on the front, I measured in 1/2" on every edge (near the corners) and placed a light pencil mark.  You'll end up with 4 "X"s  near each corner.  (if you don't have an "X" then you might need to extend your 1/2" marks/lines a bit until they intersect with the one parallel.)  I then used my paper trimmer to CUT between each of those "X"s to end up with a frame.  
    • Erase mark lines or turn it over to the other side ☺
  • I cut a piece of white to 2" x 5-3/4" and cut the very bottom using one of the Clouds Slimline dies.
  • I then cut (2) pieces of coordinating designer papers at 2" x 5-3/4" and cut the very top of each with one of the Hills Slimline dies.
  • You want to add glue to the (front) sides and top (NOT the bottom)  of your cloud border and attach BEHIND your frame at the top as shown below.
  • Next, we need to cut a notch out of our frame for our pull tab. (You could do this step before attaching your clouds - I just forgot to do it prior).   I used a small circle from the Pierced Wide Circle Frame Set to cut a PARTIAL CIRCLE from the LEFT edge of your frame as shown below.  It's important that you cut from the left side because it you do it on the right, your truck will be driving backwards!  ☺ 
  • Now we need to cut the same notch out of our card base in the exact spot we cut the frame.  SO... you want to lay your notched frame on top of your CARD BASE making sure everything lines up and fold is at the top, then lightly draw the outline of your notch onto the card base and cut the notch using the same circle die as we did in the previous step.
  • I then taped my 2 pieces of patterned paper together and added adhesive to the (front) sides and bottom (NOT the top!), then placed BEHIND my frame at the bottom ***NOTE:  lay your truck in the middle first so you know how far down to attach your patterned papers.  
  • Next, I placed my 4-1/2" x 5-3/4" grey slider piece behind my frame, but FLUSH with the left hand side and centered between the top and bottom.  You can write or stamp "PULL" where the tab dips down, OR draw an arrow going to the left to let your recipient know to pull.  
  • Now remove your slider piece and set it aside.
  • Reminder - our frame is just sitting on our card base - it is not attached yet!  
  • Decide what you want to have revealed when the truck is being pulled!   I stamped a "YUMMILICIOUS" sentiment and some confetti .  To find the placement, I laid my truck onto my card and off to the left - see photo below for placement.  Now you can see how much space you have and decide what you want to fill that space with!  ***It's best not to have too much dimension as it may prevent the truck from sliding back into place.  Flat stamped images are best!

  • Now we can add our foam tape to the back.  Again, line up the slider (from the front) so that your arrow or "PULL" is lined up in the center of your notch and the edge of slider is flush with edge of frame... and the whole piece is centered between the top and bottom edges of card on the back.  To keep it in place, I added some purple low-tac tape.
  • To the BACK of your frame, add foam tape to the 3 sides close to your slider, but not TOO close or it won't slide well.  (Don't tape the edge where your notch is cut out.)  
  • And now we can add our truck!  You'll want to pop it up with foam strips/tape so it goes over our frame on the edge.  Start your strips in a li'l ways as shown below so that our truck will go over the frame a li'l bit.  That way we know it will reveal our whole stamped image.
  • Attach your truck to the far RIGHT of your card but make sure your foam strips/tape does not go onto the frame! I added some fairly flat sprinkles to fill the space on front and added my "Sweet Birthday Wishes" using the words with shadow dies (linked below).

Here are the products I used on my card today:


Click the pic below to shop the whole release!


I hope my card inspires you to create your own interactive card or something else using the fun new release!   I'll be back next week with a simple-but-cute card :)  
Have a CRAFT-astic day!

~Kristine