Showing posts with label Halloween. Show all posts

Monday, September 11, 2017

Pop-Up Pumpkin . . . and Toad

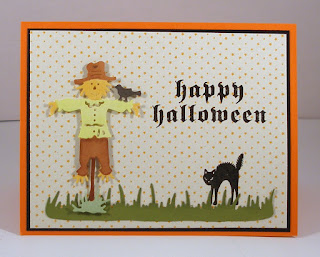
Hi, Lois here in the throes of Hurricane Irma.  But I do have a card for you today.  Halloween  is right around the corner, and I've got another card made with a new CottageCutz Halloween die.  This was a fun card to make.  When you look at the front, it's not very exciting, BUT . . .


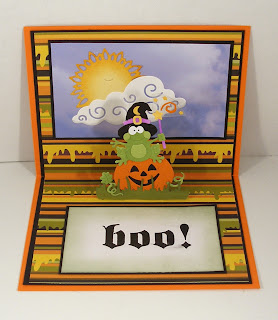
. . . all the fun is on the inside!


To start my base card, I cut cardstock as follows:

Orange - 8 1/2" x 5 1/2"
Black - (1) 4" x 5 1/4", (1) 5 1/4" x 8 1/4", cut in half
Patterned Paper - (1) 3 7/8" x 5 1/8", (1) 5 1/8" x 8 1/8", folded in half


After folding  the orange base in half, I glued down the black mat piece and the smaller patterned paper piece on the front.

I cut all the die cuts from white, orange, black, or green cardstock . . . 


. . . and colored them with either ink or markers.  Then I constructed the frog/pumpkin piece.  Note that the small stars and curly-cue are glued to a small piece of acetate, which was then glued to the large star on the wand with a glue dot.


On the front I stamped the sentiment and the cat in Versafine Black Onyx ink and embossed them with clear embossing powder . . .

. . . and added the scarecrow and strip of grass.


Now came the fun part!  To make my pop-up support on the inside, I cut two 2" slits 1" apart on the patterned paper across the scored center and scored at each end of the strips.


I glued the two pieces of black cardstock to the inside of the card, getting them close to the fold line, but not touching.  This allows the card to close without bending up the edges.  I didn't want to adhere one large piece of black cardstock to the inside because that would tend to "bind" when the card was closed.  Then I added the patterned paper, being careful not to apply glue to the support section in the center.  This section will fold OUT when the card is closed -- with the pumpkin/frog glued to the front of it.


Because the paper is very "busy," I wanted to tone it down a bit by putting a panel on each side of the card.  I cut two pieces of black cardstock, one piece of white, and one piece of "sky" paper.  (These could be any size you wanted.)


I stamped the sentiment on the white piece and sponged a bit of green ink around the edges.


I then cut out the sun and cloud, sponged on some darker color to the sun, and (using a Copic gray marker) added some shading to the under side of the cloud.


I put the pieces together and adhered them to the upper and lower panels of the card.


This photo shows how the frog sits on the pop-up support piece.


CottageCutz dies used on this card are:

http://www.scrappingcottage.com/cottagecutzharvestscarecrowelites.aspx


http://www.scrappingcottage.com/cottagecutzsunandcloud.aspx


The new Halloween die (Happy Toad Wizard), as well as several new series of Christmas dies, will be available for purchase in the CottageCutz store starting September 20th.  Because of the support of their wonderful customers, it has become necessary to move into a larger warehouse.  Because of the move, the store is temporarily on hold.  But that gives you lots of time to decide what you want next!  LOL!


Monday, September 04, 2017

Haunted Mansion


Hi, Lois here.  I hope you are enjoying this long Labor Day weekend.  Now that September has arrived, Halloween is just around the corner.  CottageCutz has some new, really cute Halloween dies.  My card today uses one of them, as well as a couple of older dies.  The name of the Halloween die brings memories of many trips to Disney World -- Haunted Mansion.


I usually start a card by cutting the card base and mats, but this was Halloween -- why not mix it up!  This die has many small pieces to it.  I first ran the die through my Big Shot using gray cardstock.  I was able to color many of the gray pieces with various Copic markers.  Some pieces, like the ghost and the insides of the windows had to be cut from white cardstock because the gray was too dark.


So now I was ready to gather my card base pieces.  I have an old patterned paper pad made up of photographs.  One of the photos is of a dark night sky.  That's the one I used for my spooky house.


I cut a strip of the green to form the ground and constructed my card base.  You can just about see the outlines of the spooky-looking trees in the background.


I decided  to use the photo on the die packaging as a guide for constructing my house.  And the jack-o-lantern is from the Calendar Icons die.  I placed a small piece of yellow cardstock behind his face.


Now I was ready to complete my card.  The trees are from another CottageCutz die called Campsite Clothesline.   And don't look too closely -- I forgot to include the spider webs on the front of the house.  It was too late when I discovered that!  But I did stamp a small sentiment and placed it on a "sign" in front of my house.


The Haunted Mansion die, as well as other Halloween dies and several new series of Christmas dies, will be available for purchase in the CottageCutz store starting September 20th.  Because of the support of our wonderful customers, it has become necessary to move into a larger warehouse.  Because of the move, the store is temporarily on hold.  But that gives you lots of time to decide what you want next!  LOL!

CottageCutz dies used on my card are:


http://www.scrappingcottage.com/cottagecutzcamptfireclothesline.aspx


http://www.scrappingcottage.com/cottagecutzcalendaricons.aspx


Sunday, October 16, 2016

Happy Halloween

Hello everyone,

It's Donna here sharing another one of the newest Fall CottageCutz dies that was released in August. If you missed it, you can find the collection of Fall dies here. I am using the Haunted Castle that has so many possibilities. If you have not looked through the blog, please do there are so many wonderful projects by the talented design team.

 Here is my card:


Closer look from the side. I used pop dots to give the house some dimension. I also cut the ghost out in white so they would stand out. I cut yellow paper so the house looks like there is light inside the house.

Closer look of the ghost and the house. 

How I created my card:

1. A2 size card 4 1/4 x 5 1/2,

2. I cut all my pieces out,

3. Also used water color paint to make my background on water color paper,

4. I cut the water color paper down to 4 3/4 x 3 3/4,

5. I die cut the largest Stitched Wide Rectangle Frame, and adhered it to the water color paper,

6. I cut a 1/2 inch stripe of paper and a thin piece of orange paper and adhered it to the back of the Rectangle Frame,

7. I added the haunted house and the sentiment to the water color paper,

8. I added the frame to the base of the card.

9. I finished the card off by adding some clear sentiments.

Thanks again for stopping by, please stop over at the Scrappin Cottage blog to see all the beautiful designs from the other design team members. Don't forget about our newest challenge that is running right now. The theme is holiday and here is a link for more information.

CottageCutz Dies used:


Monday, September 19, 2016

You're invited on Halloween in Wonderland!

Hello friends!
This is Yuliya here). It's here share some of the new Autumn release with you! I will be sharing how to make this invitations for Halloween using the CottageCutz dies.


Here is list of all supplies 
I used CottageCutz Dies:
- CottageCutz Haunted Castle (Elites)
Other: Sizzix machine, black cardstock, patterned paper, glue, sequins, glossy accents, embossing powder, The essential glue pad
Follow the pictures below for making this invitations step-by step
1. 
2. 
3. 
4. 
 5. 
6. 
7. 
8.
9.
10.
11.
12.
13. Glue the pictures and the words
 14. Ok! Mad Hatter is waiting for you!

Halloween is coming!)
You're INVITED))