Showing posts with label Fun Fold. Show all posts

Sunday, April 16, 2023

Lattice Card with 3D Vellum Butterfly


Happy Sunday friends ღ

Kris here to share with you some crafty inspiration! I had some fun with vellum and metallic foil cardstock with the brand new Spring Butterflies from the new Easter/Spring Release.  

I decided to revisit a very old fun fold (I made some of these about 15+ years ago) but haven't made them in such a long time... it's called the Lattice Fold. 

Design Steps:

1.  I started with a double sided 12" piece of patterned cardstock and cut it to 5-1/2" x 8-1/2" - and scored the long edge at 4-1/4"

2.  I created a lattice template by cutting a piece of  65 lb. paper at 2-1/2" x 5-1/2"

3.  With paper placed vertically in front of me, I measured and made tick marks at 1/2" and 7/8" (from the left edge of paper) and drew straight lines to connect them as shown below.


4.  Along the very left edge of template, I made tick marks at 1/2".... 7/8".... 1-1/4".... 1-5/8".... 2".... 2-3/8".... 2-3/4".... 3-1/8".... 3-1/2".... 3-7/8".... 4-1/4".... 4-5/8"

5.  Along the 1/2" and 7/8" lines, I made tick marks at 1-1/4".... 2".... 2-3/4".... 3-1/2".... 4-1/4".... 5"


6.  I then used my ruler to draw diagonal lines to connect the tick marks as shown below.  Start at the top and connect the top tick mark on the left with the top mark on the 7/8" line.  Then 2nd line will connect to the 2nd tick mark on the left with the 1st mark in the 1/2" line and so on (see photo below)


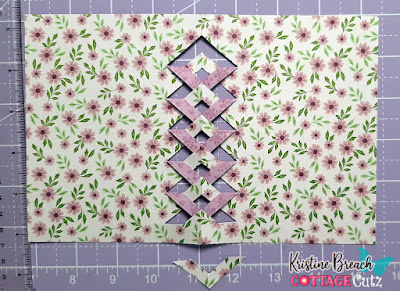
7.  Fold your card base in half and align your template with the left folded edge of card.  Use clips to keep template in place and CUT only the diagonal lines.


8.  Remove the template and open your base.  Carefully cut off the bottom mountain (or upside-down "V") as shown below.


9.  Skip the next mountain, and bend the next one down and fold tip under the mountain that it overlaps as shown.  Continue moving up, and skipping every other mountain.


10.  Next I took that mountain I cut off in the beginning and added it to the TOP to complete that unfinished lattice area, only gluing the top of the "V" on each side.


11.  Next. I cut a piece of coordinating cardstock (green) that is 4-3/16" x 5-1/2" and taped it to the inside right of card.  It's best to apply your tape/glue to the (inside) card base instead of the insert.

*IMPORTANT - do not just adhere tape or glue to your green piece as you normally would, or you'll have adhesive showing thru the lattice on the front of your card and possibly stick to your envelope.


12.  Next I applied some glue to the parts of the lattice that are near the edge of the green cardstock.


13.  I stamped a sentiment onto lavender cardstock and die cut it with the largest of the Nested Scallop Rectangles set, then attached it to a darker purple cardstock that I had cut at 3-1/8" x 4-1/8" and adhered to card front as shown.

14.  I die cut the Spring Butterflies 3x --- once from vellum and twice from pink foiled cardstock, but one of those I ran it thru the machine with less pressure so that it would keep the inner parts in tact.  


15.  I glued all of the pink full butterfly with all the tiny pieces directly to my card front as shown below.

16.  The next pink butterfly, I punched out all the tiny pieces, and only applied glue to the body and adhered to body already there.  Then I slightly bend the wings upwards for more dimension.


17.  The vellum butterfly, I punched out all the tiny bits and applied glue to just the body, then bent the wings upwards even more than the pink one, for a very 3D effect.  The glue I use is Dries Clear by Art Glitter Glue so it won't show under the vellum. 


Thanks so much for popping by today!  
Have a BLESSED Sunday y'all! ♥Kris

PRODUCTS:


Monday, March 20, 2023

Hexagon Pop Up Easter Card


Welcome CottageCutz peeps!

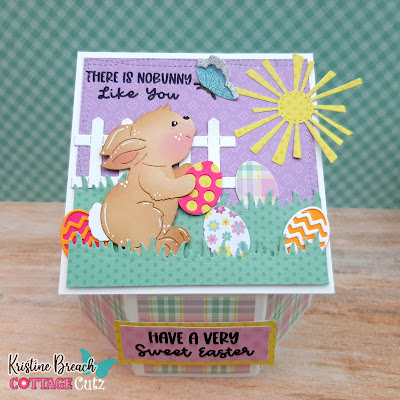
Kris here with some Monday inspiration for you.  My card today is an easy Hexagon Pop Up card featuring some cute Easter dies and more!  This style of card was a li'l harder to photograph, but it's pretty cute when displayed and squishes flat-ish to fit into an envelope.  

I will share my design steps below, but if it's easier to watch a video, you can watch Sam's here.


I used heavy 100 lb cardstock for my springy mechanism that makes it pop out to its hexagon shape, and if you do not burnish the folds, it pops out even more!  However, this also causes the front panel to lean backwards more.  If I had used a lighter weight like an 80 lb. it might stand up more, but then the hexagon would be more wide than deep.  You'll get that idea once you make one.


I've listed & linked all products at end of post.

DESIGN STEPS:

1)   I began with the base of my card that forms the hexagon shape by cutting (2) strips of 2" x 6-1/2" white cardstock and scored at 2", 4", and 6". Mitered the corners of the li'l 1/2" tab on the end. Then I added (3) 1-3/4" squares of patterned paper onto just one of the strips as shown.


2)  I added glue to both 1/2" tabs and glued one tab to a non-tabbed end of the other piece to form a hexagon as pictured.


3) I cut a piece of white cardstock to 2" x 8" and scored at 2", 4", and 6" - fold and burnish score lines. I don't have a photo of this, but add glue to the 2 end sections (the first 2" and then between 6-8") and with it folded in half, insert into base so that it's attached to the center panel of the FRONT of hexagon base and to the center BACK of hexagon base.

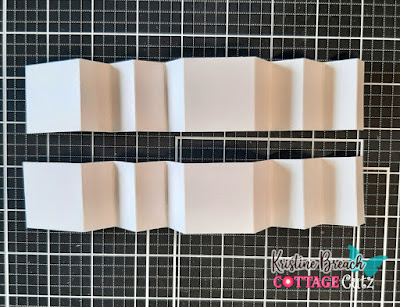
4)  Next, I cut the pieces for the springy mechanism.  Cut (2) strips of 1-1/2" x 9-1/2" and score both strips at 1/2", 1-1/4", 2", 2-3/4", 3-1/2", 5" 5-3/4", 6-1/2", 7-1/4", 8" - Accordion fold as pictured below, but DO NOT BURNISH the folds as it won't pop out as much if you do.  


5)  I glued the small tabs to the opposite end of each strip to make this shape...


6)  Then glue the two together.


7)  Add glue to each of the square ends and insert into the base of the hexagon piece.

8)  I cut my pieces for my main image panel....
--- 4" square from white cardstock.
--- purple patterned paper using the 2nd largest Nested Wacky Stitched Rectangles
--- 2 pieces of green patterned paper using the Grass Slimline die in varying heights
--- die cut the Bunny w/ Butterfly, Spring Bowl w/ Eggs (just eggs), Fence and Grass (just fence) and Stitched Sun, Clouds & Umbrella (just sun)


9)  I glued my purple layer to white square, then the tallest green grass, leaving the very top unattached. Then I glued and tucked the fence and an egg behind that grass.

10)  I popped up the shorter grass with foam strip and glued in the rest of the eggs.  I popped up bunny with foam tape.  I stamped my sentiment in top left corner, then glued my butterfly and sun.


11)  I added glue to the front white mechanism piece sticking up (from the hexagon base) and attached my bunny piece.  I then stamped a 2nd sentiment and attached it to the center of card base.


Here's how it looks from the side...


There's room on the back to write your message. 
 Or you can choose to add patterned paper ☺


Thank you for taking a peek!  

I hope you get crafty with your favorite CottageCutz dies!


PRODUCTS I USED:


And be sure to check out the beautiful 
NEW EASTER RELEASE 
as it's all on SALE!!


Wednesday, February 22, 2023

Double Z-Fold Farm Scene

Welcome CottageCutz friends!

Kris here with some Wednesday inspiration for you!  In honor of our HUGE President's Day Sale going on right now, I've created a fun Double Z-Fold card using lots of dies that you can find on sale - up to 83% OFF! Shop early for best assortment - sale ends this Friday 24th!


This card was so much fun to make!!  We've lived right next door to an upscale ranch for 26 years, and have been lucky that they only keep the baby calves and their mamas in the field that borders our fence.  They're so cute when they frolic and play.  So I just HAD to buy a few cow dies. 

DESIGN STEPS:

1.  I cut a piece of light blue cardstock 4-1/4" x 11" - then scored at 5-1/2" and 2-3/4" (card base).

2.  I cut  a piece of lime green cardstock to 4-1/4 x 11" - then scored at 5-1/2" and 2-3/4" (grass).


3. I cut the lime green panel into (2) pieces of 2-1/4 x 11.  One of the panels I cut off the 2-3/4" end to make it a 2-1/4" x 8-1/4" piece.

4.  I die cut the tops of both green pieces with the Grass Slimline die - 83% OFF!!  ***BE SURE you are cutting the correct edge --- the longer green piece will have the 5-1/2" section on the left and the shorter piece will have the 5-1/2" section on the right!  


5.  I glued the shorter lime green piece to blue card base, clear to the right and aligned with bottom edge.  (You may find it easiest to attach just the part before the score line, then fold your card onto the short scored part so your card will fold flat to fit into an envelope.)  

6.  I glued the longer lime green piece to the front ***ONLY glue 1/2 of the longest scored section... and then the shortest outside edge section as pictured below.

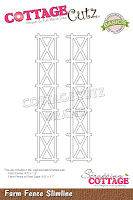
7.  I die cut the Farm Fence Slimline - 83% OFF!!  and scored it at 2-3/4" and 5-1/2" and glued it to the front grass piece as pictured.


8.  Next, I die cut all my design pieces and inked 'em up, and assembled!  

Just LOOK at all these SAVINGS!!  


9.  Glued everything in place and done!  ☺☺☺ How cute is this?


This card folds up to fit into an A2 envelope ☺


PRODUCTS I USED:


I hope you're inspired to see what you can create with your favorite CottageCutz dies!!

~Kristine