Showing posts with label Fence & Grass. Show all posts

Monday, August 21, 2023

Paper Pieced Pumpkin

Hello friends!  

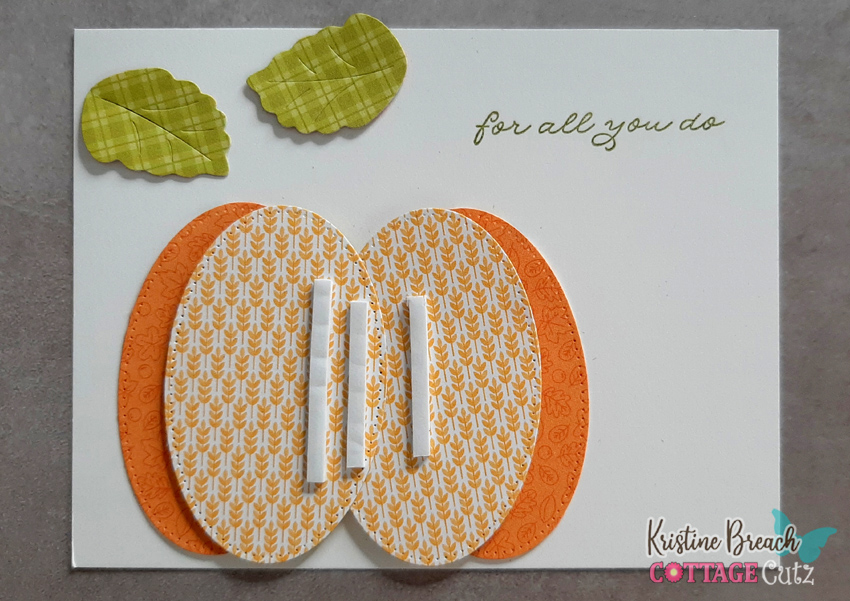
It's Kris sharing with you today this easy-to-make pumpkin card for your inspiration!


I was inspired by some other die-cut and punched pumpkin cards on Pinterest and thought I'd give it a go with some cute Fall-themed papers and of course I got creative with my CottageCutz dies! 

CUTTING & SCORING:

Dove White Cardstock:
•  5-1/2" x 8-1/2" and scored at 4-1/4"
• 3-7/8" x 5-1/8"
• die cut Thanks w/ Shadow (shadow)

Pecan Pie Cardstock (brown):
• 5-1/4" x 4"
• die cut Thanks w/ Shadow (shadow)
• die cut Fence & Grass (fence)

Patterned Papers (Doodlebug Designs: Pumpkin Spice):
• (5)  die cut the 3rd smallest of the Pierced Oval set
• die cut (2) of the large leaves from the Flowers 4x6 die
*Tip... I just cut a piece li'l bit larger than the leaf w/ scissors first then die cut just the leaf
• die cut Thanks w/ Shadow (thanks)
• die cut Fence & Grass (grass)

DESIGN STEPS:

1.  First, I stamped "for all you do" in an olive green in the top right corner of my white layer.


2.  I assembled my pumpkin using foam strips between each of the top 2 layers.


3.  I hand cut a stem for my pumpkin and added some lines with a marker.  I then ran some twine thru a button and glued it to the top over the leaves.  


4.  Next, I decided I wanted more texture on the white layer, so I ran it thru with a lattice embossing folder.  I then smoothed it out with my bone folder, just over my stamped sentiment so it would be easier to read. ☺


5.  I cut apart my fence and grass as shown below so there are 3 slats and 2.


6.  I added my pumpkin with foam strips between the fence.

7.  I offset my brown "thanks" shadow behind the white and then glued my "Thanks" on top and added to the top left corner of card.  Done!


Thanks for looking!  I hope you're inspired to create something CUTE with your CottageCutz dies! 

♡ Kristine


Tuesday, August 08, 2023

Sorry Card With Candy Bouquet

Happy Tuesday crafty friends,
Today I am sharing a fun card I created with some terrific Cottage Cutz dies. Here is what I made.
I created this fun candy bouquet along with this super colorful and fun card.

Here is a closer look at my card. It is a bit larger than my normal size card. It is 5x7 side folding. I felt I owed one of my coworkers an apology and wanted to make a cheerful card to make the best of a potentially awkward situation. She loves chocoloate so I decided a candy bouquet of mini candies would be a great addition to the card.


Here is a close up of the sweet little daschund die cut. I set him on the wacky stitched square. I added a mat of some patterned paper. I set him on some grass. I also added a smaller wacky stitched square with some cute little flowers. I cut all my die cuts out of white paper and then used my markers to color them all in. I created a little boy daschund as my coworker has a little boy daschund.

Here is a closer look at the super cute wood sign. I was going to write something on the sign but decided to leave it plain. I added it to a larger wacky stiched square. I used a coordinating patterend paper for a mat. I also added a fence and some more of the grass. I added some lines on the fenceto make it look like a little older wood.

Here's a closer look at the word SO. The letters are all a part of the stiched alpha die. I added a sweet little lady bug to the top of the letter "O".

Here is a closer look at the word "Sorry". Like all the others, I added it to a wacky stitched square with a patterned paper mat. I added some more of the cute flowers to the letters for an extra decorative touch.

And here is a closer look at the word Very. I again added some flowers and I also added some with ink to the stitching that is already on the dies. As I mentioned before, all of these die cuts were cut from plain white cardstock. I then used my various markers to color them in. I tried coordinating the colors with the patterened papers.

Here is one last look at the candy bouquet. To make it, I went to my local dollar store and hit the candy isle. I bought a variet of candies. I  know my co-worker loves chocolate so I figured I would hit some candy that she likes...lol. To make the bouquet, I bought some wood skewers at the dollar store and then used some double sided tape to add the candies to the skewer. I bought a floral foam square from the same dollar store and then a little plastic square container from there. I added the foam square to the inside of the vase and then began poking my skewers into the foam. I added a little foil tissue to the base to cover up the foam and other mechanics and it was all done! I have to say,  she loved it!


Dapper Dachshund


Spring Chicken
For the sign, little flowers and lady bug


Fence & Grass


Wacky Stitched Square


Stitched Alphabet


Well that about covers it for today. Be sure to stop back by and see what the rest of the super creative designers have to share with you. Don't forget to head over to the Cottage Cutz You Tube channel! So much great inspiration.

Until the next time, have a wonderfully crafty day!

Saturday, June 10, 2023

Group Post Day 2 (Folk Art Dies)

Hello CottageCutz friends! Thanks for taking the time to stop and visit with us today. This post is day 2 of  cards using the new Folk Art release.   There are 19 new designs in this release and are so perfect for cardmaking, journaling, and scrapbooking. They allow you to add a beautiful touch of folk art to whatever you may be creating.

We have had a good response when we do a group post on a new release. It gives you the opportunity to see more card samples from the Design Team. There are 3 samples in today's post and we also showed  3 samples yesterday. See Day 1 samples here.

Also just released is our Patriotic 4th of July release with 12 amazing patriotic designs and bundle pricing at 40% off. If you love making patriotic cards to honor a veteran, to celebrate the 4th of July or to display your love for America, we have you covered with this new release. The DT will begin showing samples starting Monday and continue for the month of June.

Now onto our Folk Art Samples for today.

Card 1:  Our first sample today is from Kristine Breach.  She used the Folk Art Deer, Folk Art Trees, Stitched Alphabet and Hills Slimline dies to create a fun fold bridge card. It's such a beautiful Christmas card and it shows you how easily these dies can be taken into the Christmas season.
 
The use of non-traditional colors are so perfect way for a folk-art design card. This would also be a great home decor piece to display at Christmas. 

Card 2: Our next sample for today is from Marla Harris. She used the Folk Art Rooster, Folk Art Flowers Mixed, Folk Art Egg and the Fence & Grass dies to create a stunning mixed media thinking of you card. 
Her images are colored with distress inks. She splattered with water as well as white gouache to the images. She has captured the folk-art design in such a unique and beautiful way. 

Card 3: Our last sample for today is one that I (Mary Marsh) created using the Folk Art House (small and medium) and the Folk Art Trees dies to also create a Christmas card. I was inspired by Kristine's sample, so I decided to try a Christmas theme using these dies. I thought the house and trees would work well in a snow globe. 

For the globe I used the largest Circle Set die and then embossed with a snowfall folder. For the base of the globe and ribbon I used and old die -Snowglobe w/Fawn. I covered my images with a plastic window sheet. 
The Peace and Joy phrase is a die from last year's Christmas release. 


That's it for our samples for today. I hope we have given you some ideas for ways to use the new Folk Art dies.

Reminder: Marla has a new video on the CottageCutz You Tube channel and there is a giveaway. 

Dies used to create cards:


Tuesday, May 30, 2023

Sweet As Can Bee Gnome Card

Hello crafty friends,
Hope your day is going spectacular. Today I am sharing a cute card I made featuring some Sweet As Can Bee dies from Cottage Cutz. Here is a look at what I created.
My card is a top folding A2 card. It features a white cardstock base.


The star of my card is this sweet little Bee Gnome. He is just adorable. I decided to make this in a different color palette. The typical bee themed palette is yellow and black. Of course my favorite colors are pink and a tealish or minty teal green color.   I started by/ creating the tiny polka dot paper and the diagonal plaid papers. I printed them out and used them as my various mats. I cut all my pieces out in white cardstock. I then colored them in with my markers. For the little gnome, I used a couple of the negative pieces that came from the fench to create some legs for him. Because I used foam tape behind him, I wanted to make sure his little shoes didn't get lost in the mix.  added some stickles glitter gle to his wings and the centers of the flowers.


Here is a closeup of the sweet little home, the fence and the grass die cuts. For the mats I used a couple of the wonky stitched square dies.

Here's a closer look at the cute little twine bos. I wrapped the twine around the patterned paper mat strips and then added a bow with a little gem in the center. 


Here's a closer look at the sweet little bumble bee with his glittered wings. You can also see the three gems I used for a little extra touch.

This closeup shows you the honeycomb slimline die I used to cut out the white honeycomb frame. I added that on top of the pink and white polka dot mat paper I created.

Here is a view of my card standing and at a slight angle. You can see all the dimension between the layers. It really adds so much depth to the card by adding in those extra layers of foam tape.

Here is one last look at my card from the opposite angle. I think this turned out so cute!


Nested Wacky Stitched Rectangles
(Currently out of stock)

Don't forget to also check out the Cottage Cutz YouTube Channel for some great crafty videos!

Well that about covers it for today! Until the next time, have a wonderfully crafty day!