Showing posts with label Christmas 2022 Release 2. Show all posts

Monday, January 02, 2023

Sweet Hearts Slimline Shaker

Happy New Year crafters!

Kris here sharing with you today.  I have a feeling we're in for a very long cold winter here, so I decided to make a cute Snowman Slimline Shaker card for Valentine's Day using the Snowmen Friends and the Cookies & Cocoa dies from the Christmas Release #2.  I've also used the Whimsical Hearts Slimline die - I thought with many open spaces it would be perfect for a shaker card!  (See product list at end for a full list with links.)


- CUTTING -

Dark Teal Cardstock
•  8" x 9" and score the 8" side in half for a top folding horizontal base.
• Whimsical Hearts Slimline (try to keep the hearts in place after they're cut)

Pixie Pink Cardstock
Whimsical Hearts Slimline (punch out all hearts)
 
Patterned paper (teal with white grid)
• 3-3/8" x 8-3/8" (for background behind the sequins)

Acetate/Window Sheet
• 8-3/8" x 8-3/8"

Light Teal Cardstock
• Stitched Hearts (2nd largest centered in middle of largest die to make a frame)

Dark Pink Cardstock
• Stitched Hearts (largest die)

White Cardstock

Black Cardstock

- ASSEMBLY -

1.  Teal Whimsical Hearts Slimline piece - punch out all the large and medium hearts, but try to keep all the tiny & small hearts in place.

    - Turn piece onto backside and place a small dot of glue onto each tiny & small heart.
    - Place acetate onto back of teal piece and press down where glued hearts are.
    - Turn piece over and carefully lift off the Teal background, leaving the tiny/small hearts

2.  Pixie Pink Whimsical Hearts Slimline piece - add glue to the backside and place carefully onto front of acetate, lining up the teal hearts.

    - Glue in any remaining tiny/small hearts that may not have stuck or that fell out after die-cutting so that all the tiny/small hearts are filled in and all the medium/large hearts are empty.

3.  Turn Pink piece onto backside and add 1/8" foam strips all along the 4 edges, getting very close to the edge, but not past it.  

    - Remove backing from foam strips.
    - Add shaker elements (ie. sequins, glitter, beads, etc)

4.  With your patterned paper piece turned upside-down, carefully fit it onto the top of foam strips, lining up the edges.

5.  Add tape or glue to back of shaker and center it onto card front.

6.  Add dimensional tape or foam strips to back of Light Teal heart frame and adhere to Dark Pink heart.

7.  Color Cocoa mug, and 2 of the Snowmen and pop them onto heart with foam tape.

8.  Glue the white "Sweet" onto it's black shadow and adhere to the top left of large heart. 

    - Adhere hearts to middle of shaker.


I hope this project inspire you to get crafty in 2023 with your favorite CottageCutz dies!

~ Kristine

PRODUCTS USED:


Monday, December 26, 2022

Shaker Tag Gift Card Ornaments

Merry Christmas CottageCutz friends!  I hope you had a wonderful holiday with your loved ones. 

Kris here sharing with you today.  I know most of you are done making Christmas projects now, so maybe you want to save this idea for next year's gifts... OR you can always change the theme and use these for gift bag tags (thinking Valentine's... Birthdays...any special occasion!) ☺  

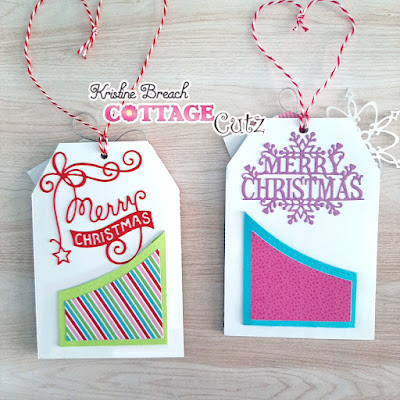
I'm a huge fan of shakers, so I made 2 ornaments that are shaker tags with gift card holders on the back, using the Jolly Santa Gnome from the Christmas 1 Release & I made the other with the Polar Bear Trio with Igloo from the Christmas 2 Release.  


The patterned papers and tiny tags are from 
Winter Wonderland (Polar Bears Tag) and 
 Let it Snow (Jolly Santa Gnome) from Doodlebug Designs

JOLLY SANTA GNOME TAG
White Cardstock:
• cut 5-1/2" x 3-3/4"
• die cut Jolly Santa Gnome
Red Cardstock (back of tag):
Acetate/Window Sheet:
• 3-1/2" x 4-1/4"
Patterned Paper #1 (red with Santas):
• 5-1/2" x 3-3/4"
Patterned paper #2 (green trees):
• 3-3/4" x 3" - then cut the top with a Hills Slimline die
Patterned Paper (tiny tags):
• cut apart one of the tiny tags and punch hole where indicated

HOW TO:

1.  Glue patterned paper #2 to the bottom of patterned paper #1.

2.  Measure along the TOP of the patterned paper #1 and make pencil marks at 3/4", 1-7/8" and 3"

3.  From the TOP, measure down each SIDE and place a mark at 1-1/4"

4.  Make a diagonal cut from the TOP 3/4" marks down to the 1-1/4" SIDE marks.

5.  Punch a hole about 1/2" down from the center (your 1-7/8" mark)

6.  Place that tag over your white piece and use as a guide to cut the corners off of white tag and punch hole in middle. 


7.  Using a rectangle die, (I used the 3rd largest of the Nested Wacky Stitched Rectangles) center it over your Patterned Paper tag and cut.

8.  Turn that tag onto back side and place Scor Tape (or other strong double sided adhesive) close to the rectangle cut-out.  Attach your window sheet.

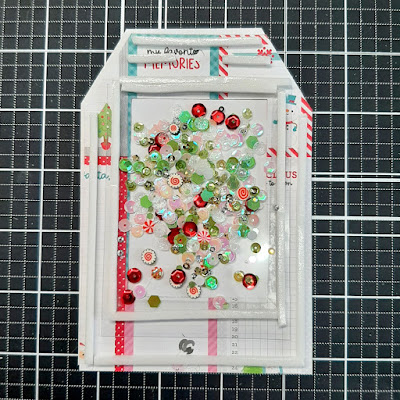
9.  Add foam strips/tape just outside the rectangle and around edges of tag.  (See photo below)

10.  Add sequins/shaker elements.


11.  Carefully place your WHITE TAG on top, lining up edges and the hole at top.


12.  Color your Jolly Santa Gnome and attach to tag front using foam tape for dimension. 

*Optional (but highly suggested):  Add Snow Writer (puffy snow, etc) to the trim on his hat & coat!  LOVE the dimension it gives 😊


13.  Glue the red Merry Christmas Ribbon to back of tag.

*Optional:  Add a pocket to the back for a gift card!


POLAR BEAR TRIO WITH IGLOO TAG
Same cutting measurements as the Santa tag with the following exceptions:
• the 2nd patterned paper I glued to the top of the white tag (inside shaker, instead of the front & cut the bottom with the hills die)
• I used the 2nd largest Nested Wacky Stitched Rectangle (larger than the one on Santa shaker)
• I die cut a large snowflake from the Snowflake Set
• I die cut Merry Christmas w/ Snowflakes (for back of tag) from purple cardstock


How CUTE are these?!!  
♥ these adorable CottageCutz dies!

They are for my girls, so here they are on the tree ☺


Merry Christmas to you all, and wishing you all the crafty goodness in 2023!
~Kristine

PRODUCTS USED:


Monday, December 19, 2022

New Year's Slimline Shaker

Hello crafty friends!  Wishing you a Merry Christmas this week!

Kristine here with you today and shaking it up with a slimline shaker card for New Year's using the cute Polar Bear Trio with Igloo die from the Christmas #2 Release, and the Fifties Phrases #1 die from the Classic 50's Black Friday Release and more!

Let's Party 2023

The SCS color challenge the next 2 weeks is
Basic Black
Metallic Silver
Metallic Gold
And the dessert option is:  NEW Year's

I chose a slimline paper pack called Shine Bright.that has silver and gold with subtle Snowflakes.

CUTTING & SCORING

Black Cardstock:
 • cut 8" x 9", score along the 8" side at 4"-  score & burnish
• die cut Fifties Phrases #1

Silver Metallic (or foiled) Cardstock: 
• cut 8-3/4" x 3-3/4" 
• die cut Stitched Numbers

Gold Metallic (or foiled) Cardstock:
• die cut balloon from Star Windows Slimline set

Patterned Paper (Silver Snowflake): 
• cut 8-1/4" x 3-1/4" 

Patterned Paper (Gold with Snowflakes):

Acetate or Window Sheet: 
• cut 8-1/4" x 3-1/4"

White Cardstock:

DESIGN STEPS

#1  Cut all your layers and die cut pieces.

#2  Adhere your silver layer to card front.

#3  Rub a used dryer sheet or anti-static pouch to both sides of your acetate sheet and attach to back of star cut-out layer with double-sided tape.

#4 Using foam strips, outline the edges of acetate and around the star shapes.  Peel backing off the strips and add shaker elements inside your 3 sections.


#5  With your silver snowflake paper, pattern side down, carefully center it over your star layer, matching up the edges best you can and adhere.

#6  Turn shaker layer right side up and attach to card front.


#7  Color your polar bears and attach all die cut elements to card front as shown.


Wishing you all the crafty goodness in 2023!
Kristine

PRODUCTS:


Monday, December 12, 2022

Peppermint Shaker

Happy Monday Scrapping Cottage Friends!

Kris here to share a tutorial with you on this cute shaker card featuring some dies from the Christmas Release #2 and more! 


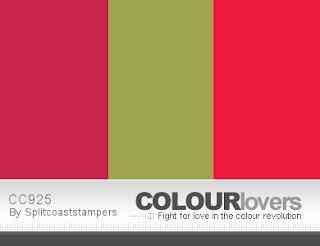
I am a Guest Designer this month for the Color Challenge  at SplitcoastStampers and the colors this week are Real Red, Old Olive and Poppy Parade (CC925).  The dessert option is to use a 4th color.  I added in some Cinnamon Spice for the gingerbread girl. 


DESIGN STEPS:

CUTTING:
Red Cardstock =  Cut a 5-1/2" x 11" - score at 5-1/2"

Gold Cardstock  = Cut a 5-3/16" square
Die cut the bow from the Halloween Wreath 
Die cut the Joy from the Peace & Joy Wreath

White Cardstock = Cut a 5" square
Die cut largest die from the Pierced Wide Circle Frame set 

Crumb Cake (or Kraft) Cardstock =

Peppermint Patterned Paper = 4-3/8" square
Acetate or Window Sheet = 4-3/8" square
Candy Cane Striped Paper = 4-3/4" square


ASSEMBLING:
• Fold and burnish red card base
• Attach gold square in center of card front
• Attach white square "
• Attach peppermint square "


• Using the 3rd largest die from the Pierced Circle Set, cut a circle from the center of your 4-3/4" square patterned paper (Candy cane striped paper).

• Add glue close to the circle opening of that patterned paper, and attach the white circle frame.

• Attach acetate/window sheet to the back of that paper.


• On the back side of your striped paper, add foam strips around the circle opening and around the straight edges, then remove the backing (from the foam strips).


• Add shaker elements to the center of your card front.  I used some of the cookies from the Cookies & Cocoa die, as well as some white and red sequins.


• Optional - use a used dryer sheet on front and back of your window sheet to reduce static and prevent sequins from "sticking" to it!  This really does work!!  :) 


• Carefully center your window layer on top of your card front so that there's equal amount of white border and press down.


• Ink blend Rusty Hinge Distress Ink to your ginger girl.

• Color her bow red, scarf and earmuffs Olive green, and buttons dark brown.  Add white gel pen polka-dots to the scarf and highlights to the bow and buttons.


• Glue "Joy" to the center of your shaker.

• Attach Ginger girl and cup of cocoa with foam dots.


Thanks so much for looking today!  
I hope you are inspired to create something fabby with your favorite CottageCutz dies! 

~Kristine 

PRODUCTS I USED: