Showing posts with label Carol. Show all posts

Wednesday, September 09, 2015

CottageCutz Haunted Mushroom House

Hello everyone.  Today's post is featuring the new release Halloween 2015 dies from CottageCutz.  For today's project the Haunted Mushroom House, Halloween Tag Topper, Bella Leafy Branch, and Witch on Broom are featured on this Halloween card.  Aren't these dies cute!
The following was used to create this card:
Black, White, Brown, and Halloween Card Stock
Old Book pages for the rolled roses
Martha Stewart Punch Around the Page
Piece of Orange Burlap ribbon found at the Dollar Store
Diamond Stickles
Black Soot, Mustard Seed, and Brushed Corduroy Distress Inks 
Round Spellbinders die was used to create the moon 
Thank you so much for stopping by today.  It's really appreciated.  Until next time,  Happy Crafting!
Be sure to leave a comment on all of our post from 9/8/15- 9/23/15 on the CottageCutz BLOG as we are doing a GIVEAWAY to 1 lucky person! You can WIN 2 of the NEW Halloween dies shown below.


Have fun and Good Luck to all!


Thursday, February 28, 2013

CottageCutz Vintage Clock

 Hello friends!  Today it's Carol for the CottageCutz Design Team.  It's the last day of February.  Can you believe it.  I am still working on a Christmas Album....lol    But for today I have the Vintage Clock die from CottageCutz.  This die is perfect for an Anniversary Card, Retirement Card, or Birthday.
This is such a pretty die.  Brushed Corduroy distress ink was used on the die cut to shade it.  The die cut behind the clock is the Tea Time Doily.  There are two more layers behind the doily which include the Circle and Scalloped Circle from Spellbinders.  The punched border is a Martha Stewart punch.  The lace border is lace from Hobby Lobby and the rhinestones are from Recollection.  Crystal Effects was used on the face of the clock to give it a "Mother of Pearl" effect.    These are the dies use:

Thank you so much for stopping by today.  I really appreciate you taken time from your busy day to visit.  Enjoy your day and happy crafting. 


Friday, February 08, 2013

CottageCutz Vintage Bag Tag


Hello friends.   It's Carol here and today I have what is called a bag tag made with the adorable Vintage Lamp and Dress Form Mini Dies from CottageCutz.  What is a bag tag?  It is a cute little paper bag that has been altered to hold a sweet tag.  It's almost like a card and envelope, but it's a bag with a tag and they are super fun to make. This was inspired by ILuvVintageScrap-Ms Juliana on YouTube.  Her's are gorgeous!

 So here you can see the tag outside the bag.  I went with a Shabby Chic theme.  I used a 3-1/2" x 6-3/4" White Paper bag that I had in my stash from Michael's.  I got some regular paper bags out (lunch bags) and used them for the background.  I don't have any precise measurements because I just played with my stuff and did what looked good to me.  Tear the paper bag to cover most of the white paper bag.  Crumple it up, then unfolded and hot glue it to the bag.  I used white paint and brushed some on top of the bag.  Tear a page out of an old book and glue it to the top of the bag.  Cut a piece of white cardstock, run it through a crimper and distressed the edges with Rangers Brushed Corduroy and glue that on top of the book page.
I chose lace, pearls, burlap, chipboard butterfly, buttons, eyelash yarn, feathers and a premade rose and arranged them like you see here.  I wrapped the eyelash yarn in the rose and attached with a little glue.  The top flower is made from a paper bag.  Cut two pieces with the smallest scalloped circle Spellbinders die and four of the next size up (You could use a scalloped punch if you have one).  I rolled and scrunched up the paper, then unfolded, glued together, and added a pearl in the center.  If desired, brush white paint on the flower.  All edges of flowers are stickled with Icicle stickles.  For the inside tag paper doilies and crochet flowers were used to decorate it.

For the lamp, I cut all the pieces on white cardstock and used copic markers to color it except for the lamp shade.  I just distressed it with some of the Brushed Corduroy distress ink on the edges.


The dress form was cut on kraft cardstock and attached to the top of the inside tag.  A little button was glued to the center and a bow was made from white crochet thread.  This is so much fun to make and I invite you to try your hand.  You will love it!


Monday, November 19, 2012

CottageCutz /Christmas

Greetings Friends!  It's Carol today with a new creation from CottageCutz dies.
My card is made with the Fall Vine with Bird Die.  What you don't think this looks like a fall card?  Well, you are right.  I wanted to show you that this die could be used for Christmas and probably and season depending on what you use to compliment the image.  Isn't it cute.
I used Recollection Glittered paper.  Now, I do want to mention  that when you do cut with that type of thicker paper to use your Grand Calibur machine to cut this out.  You get a nice even pressure on your die which makes this cut out nicely.  I used my Martha Stewart craft knife to press the die out.  Easy peasy.
So whether you use this for a Fall card or a Christmas card you are sure to enjoy the beautiful creation you can make with it. 
Thanks for stopping by today.  I really appreciate it.   Have a great day!

Friday, March 09, 2012

Cottage Cutz Watering Can Tulips

Greetings everyone it's Carol today.  Spring is in the air can you feel it.  What better way to welcome spring than with a fresh bouquet of Tulips.  In the language of flowers, a tulip bouquet represents elegance and grace.  What a perfect way to send a greeting to a loved one or friend.
In this picture you can see the dimension created in the tulips.  All you need to do is cut out two sets of the tulip from the die on pink card stock.  Use some deeper colored pink chalk around the edges.  Try fitting different variances of the tulips one on top of the other.  Some work together real well and you will see what looks like an open tulip when you put them together.  Use 1/6" inch foam to mount them together.  Make sure to separate where the cuts are to get even more dimension.  These tulips are sprayed sparkle mist spray.  Not only does that help to seal the chalk but gives it some nice added sparkle.
Cut out your watering can using two coordinating card stocks.  The edges of all the leaves and the watering can were edged with black ink.  See how it makes the image stand out.
Mount your watering can on your favorite die cut and decorate as desired.  As you can see, I have a collection of Tulip toys in my craft room because Tulips are a great way to welcome spring every year!
 
Here is the Cottage Cutz Die I used from The Scrapping Cottage.  You can either click on the picture to go to it or just click here.  This is one go-to-die that you will use again and again.  So many possibilities (Birthday, Spring, Easter, Hello)

Thanks for stopping by today.  It's been a pleasure to spend a little time with you.  Have a great day and I'll see you soon!   Carol

Wednesday, February 29, 2012

Beary Special Tea

Hi everyone, today it's Carol and I am here to show you my "Beary Special Tea", using CottageCutz Springtime Tea die. Two themes in one card that I just adore-bears and tea.  What a winning combination.  Wouldn't this be cute to send a special little girl as an invite to tea.  You can buy very inexpensive chine teacups and teapots and throw a vintage tea party with just a few desserts and classic cucumber sandwiches.  With very little effort you can create memories to last a lifetime!


This was such a fun project.  I cut my bear from white card stock and then used Ranger Vintage Photo and Tea Dye Distress Inks to color this sweet bear.  I used a bit of pink chalk to color the bears cheeks and the inside of the ears.  I cut my cup and saucer with designer paper and the doily with white paper and distress inked all the edges.  The edges have been kissed with stardust stickles.

Just click on the picture above and it will take you right to the die.  As you can see I used the bow from the rabbit on the bear and also the heart and flower.  That's whats so fun about these dies-no rules!!!  Also, I carried the heart design element on my embellishments for matching interest on the card.

Thanks for taking a look at today's project.  Be inspired to create wonderful memories for those special girls in your life.  Until next time-have a great day!

Bear Hugs,
Carol


Sunday, February 19, 2012

Happy Go Lucky Elephant

Carol here!  Today I want to show you my first creations as a Design Team Member of The Scrapping Cottage, using CottageCutz Happy Go Lucky Elephant. This is purely a selfish reason that I chose this sweet elephant as my first creation.  Today is my son Wesley's 26th Birthday.  He loves elephants-always has. 


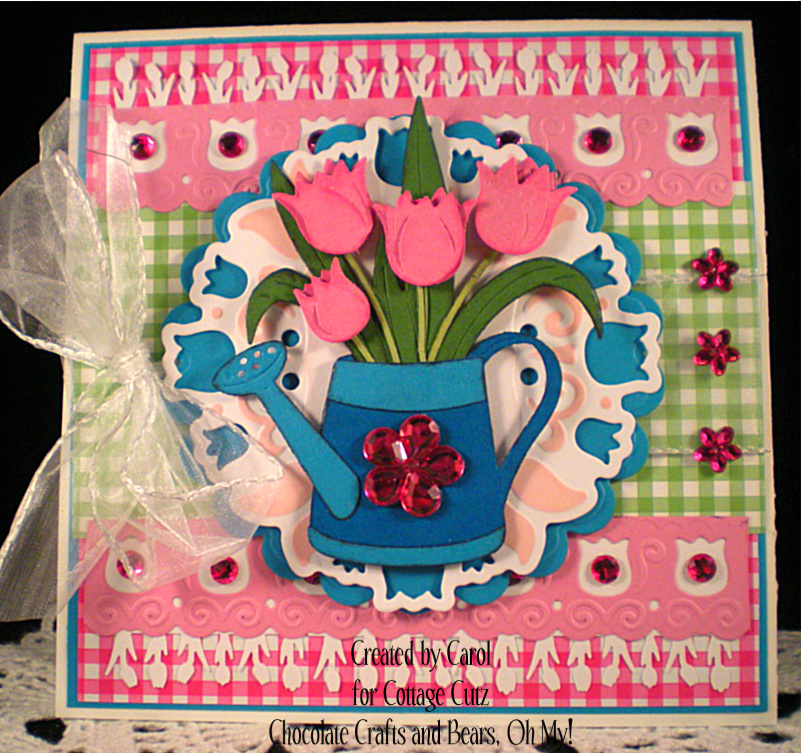
So let's talk about this card a little and I will give you the deets.  The banner was made with the Spellbinders Scalloped Banner die, I free hand cut the straight edge banners that back the pretty pearl ones up.   I also used the banner die cut set for the Birthday sentiment.  The letters were done with the Cuttlebug Baby Face typeset dies.  The scalloped square is Spellbinders and the punched floral border is Matha Stewart.
Now about the image.  In this picture you can see that I have created some dimension.  I don't know about you but I love dimension in a card and look for ways to create it.  It brings the whole project alive.  And I bet you are wondering how I got the image to look exactly like the above picture of the die cut packaging.
It was easy!  Let me share that with you.  I cut out the image with gray card stock.  Then I carefully separated all the cut through areas the die produces when you cut with the die.  To color the image I used chalk-yes chalk!!!  I haven't taken my chalk out in ages.  This was so fun.  I ran the chalk along the edges following the die cut picture that the die came in.  I used my fingers to rub the blackgray (I dipped a cotton swab in both to mix) chalk in sort of creating a smudge effect.  I used pink chalk to touch upon the knees, cheeks, and ears and rubbed that with my finger too.  Before you stamp the eyes on the elephant you can use aerosol hairspray to set the chalk.  I cut the pink toe nails with the die and glued them on the hooves.  Then I ran a little black/gray chalk over the top to tone down my pink card stock a bit.
Here is a close up of the dimension created.  I used a 1/8" foam dot placed behind the elephants cheeks and the eyebrows.  I also placed one betweene the first two creases of his nose.  I then applied the image to the die cut base and actually glued his ears to the card stock.  I used 1/16" dots on the body and legs.
As you can see this is the natural way the trunk lays on the image.  You can also curl it a bit if you want it coming out more.
So that's this project for today.  I hope you check out The Scrapping Cottage for more cute images and designs for your crafting needs.  This sure was fun to create!