Hello Scrapping Cottage friends! Thanks for taking the time to stop and visit today. It's Mary Marsh here bringing you the Thursday edition of the Blog.
Today for your viewing pleasure, I am featuring several new dies set from the June "Home Sweet Home" release. This release is chock full of dies that are all about the home. They can be used in so many creative ways as the Design Team has been showing you for the past week.
I thought I would make a "welcome to the neighborhood" card and also make it an easel card. Here in my neighborhood we have a lot of new families that are moving in. So a handmade card along with a meal or a dessert is what I like to do to welcome them. It is always so appreciated by the busy Mom's and Dad's.
So let's get started with the details on how I created this easel card. Just an fyi - you can click on any photo to make it larger.
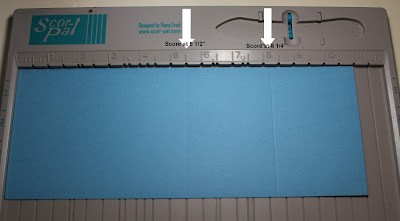
Step 1: cut your cardstock to 4 ¼” x 11”. Score at 5 ½” and then at 8 ¼”. Your card front will measure 5 ½”.
Step 2: Fold your card in half and then fold the other score line in the opposite direction.
Step 3: Use Scor-tape or other strong double sided adhesive
on the small flap. Remove the liner and tape another piece of cardstock cut at
4 /14’ x 5 ½” to the tape lined flap.
Step 4: This creates the easel card base. Now it’s time to decorate the card front.

Since this is an outdoor scene, I wanted to add some sponged clouds to the card front. I have a well used cloud template. Even though its stained with blue inks, it doesn't affect your card. I move it around several times until I get the look I want.
 |
I sponged just a few clouds on the white cardstock panel. This layer measures 4 1/8" x 5 3/8".
Then I started my die cutting. I used the Build-A-House Set 1. This set has the ability to make 3 different style houses. It also includes doors, windows, window boxes, a dormer and a chimney. It's an awesome set of dies, my friends. For the glass panes in the windows and door, I used vellum paper and sponged lightly with yellow distress ink. I wanted to give the appearance of light inside the house.
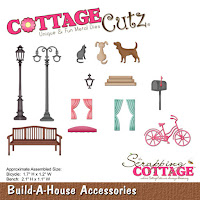
For my outside accessories, I used the CottageCutz Build-A-House and the Garden Accessories dies. I added the lamppost, front steps, a mailbox, a fence and some pretty tulips. I added a sun that was cut from the Springs Stamps die collection. That completed my card front. Love all the detail on the roof.
Now it's time to start the inside and complete the easel look. In order to have the easel card stand up by itself, add an
embellishment or an extra layer to the inside of the card. On my card I used
the welcome word to keep the card from closing. Ideally, place the
embellishment or layer at least 1/3 up from the bottom.
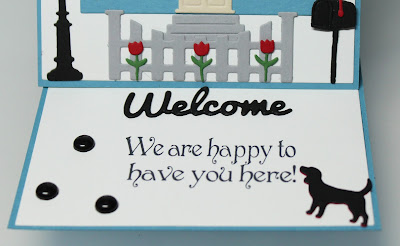
There are several new Expressions dies released this month and the Welcome word is one of them. I used it along with my stamped sentiment for a welcoming message. I added some homemade enamel dots and a little black dog to complete my card. The dog is part of the Build-A-House Accessories dies.
Well, friends that's it for me for today. Just a reminder that our 3rd Challenge is drawing to a close. You have through today to enter your card. You can get info here. Until next time........inky hugs!!!
|


5 comments:
What a beautiful card Mary!! I like this construction!
Mary, this is great. I love your easel card.
I love your easel card Mary! So very cute...great job!!
I really loved this style
I love your clouds, and the mailbox and the whole little scene. Making easel cards is a favorite of mine.
Karen
Post a Comment