Friday, September 30, 2011

Silhouette Party

 It's Party Time!. . . yes . . really. This week I used Vinyl to add a little Halloween charm to this party setting.
 I started by using the Cottage Cutz Haunted House Silhouette 4x4 die to decorate a pillar jar candle. I cut the Haunted House and word EEK! from Black Vinyl. Than using the Cottage Cutz Loops 7" border die I cut two strips to wrap the candle jar. I added a strip of gold Class -a-Peels gold stickers and than the lavish jewels. 
 Using a pedestal style dish, I cut the border from the Cottage Cutz Spooky Frame with Owl 4x4 die. Using the same black vinyl. I cut two oval frames and cut them apart and ran the frame around the dish. The really cool thing about using the dies for this type of craft. . is that it is a temporary way to take clear dishes and add a seasonal touch. When the party is over. . .pull the vinyl back off and . . on to a new seasonal design. Just be sure to wash and rinse the glassware and be carefull not to get any oil from your fingers on the glass. It will create issue with sticking the the vinyl properly.
 As you can see the frame was deigned so it could be cut apart and chained together. The cuts are at the top right and the border at the base is using all four pieces. You can also use the pumpkin that cam with the die to add between the lacy strips. This really is a Build-a-Border die. I flipped the sides to connect to the spider (top of frame) and added the bat (bottom of the frame) at the end.. . than you can start back up with the sides to continue the border as long as you need it for your project.
 The three Cottage Cutz dies that were used for this project were. .
Haunted House Silouette 4x4
Spooky Frame with Owl 4x4
Loops Edger 7" Border
I also had to cut a few bats to fly around the drink cups. O' and the chips I hand painted with food coloring to match the party. Ha! Ha! (not really. . they are Terra Exotic Harvest & Sea Salt Chips) You can find them in the Tree Bark section of the your local Supermarket. Blue Potatoes, Kabocha & Carrots chips. The package did say it was both a treat for the palate and the eyes! . . . No Trans Fat and No Taste (package didn't say NO Taste). .  but you must admit. . it really, really looked cool on the table.

Happy Halloween Party. . . Barry
ps. . .do you know what Kabocha is ?
Kabocha, a Squash. . .also known as Japanese Pumpkin, is popular
for its strong, yet sweet flavor similar to butternut squash. 
Naturally delicious and never, ever ordinary! 

Thursday, September 29, 2011

Halloween Treats


What would Halloween be without treats?? I love all the fun Halloween candy and treats at this time of the year. I bought a few of these candy tubes and filled it with Candy Corn flavored M&M's, added some tuelle, twine and of course a CottageCutz die for decoration.


I used the Jack-0-Lantern w/hat die and then punched a small hole at the top of the hat and put a jump ring through so I could hang it from the twine.
So don't forget to make CottageCutz dies part of your Halloween treats.


Have a wonderful fall Thursday!
Kay

Wednesday, September 28, 2011

Birthday Fun

I love birthdays. Whether my own, or our childrens, birthday are always full of color, surprise and CAKE!!! This sweet tooth sure loves a good piece of cake. Hi Everyone, Erika Taylor here today to share with you a little card I created using the Game Booth dies. This set of dies is so versatile and today I wanted to show you that you can use the game booth as a frame.

I used Pink Paislee Soiree papers and some Donna Salazar glitter to give this card a real girly feel. Then I added a dash more sparkle with Stickles. Hope you like it...


That is it for me today. Be sure to stop by my blog if you have some time as well. I'm having a little blog candy and there will be some great Cottage Cutz dies included.
Until next time

Toodles
Erika Taylor


Monday, September 26, 2011

Ticket to Ride

Good morning  Today I used the ticket booth from the carnival release.  I used softer colors because I love the way Cheryl has used these dies!  I was thinking I could have made it into a baby card by stamping words that are baby related.  There are lots of possibilities when you think outside the box.  I also used the Boardwalk Carnival Silhouette die.  Here is my card.

I used the Sew Easy to punch the stitch lines and then used the blue twine to stitch them.  I inked the edges of everything with Tim Holtz Vintage Photo distress ink.  I cut our some circles of various sizes with my scissors and crumpled and inked them for the flower.  Have a fantastic day!

Hugs and smiles,
Janice

Wizard Wobble

Good morning!  It's a beautiful Monday morning, or at least I hope it's a beautiful Monday morning for you.  Lorie here, and  I'm still in the Halloween spirit, playing with my Cottage Cutz Halloween dies.  Today I bring you a card I made for Barry's challenge this month, which is to create a motion card.  I used this cute Deuce the Wizard die, and I popped him onto an action wobble to create the movement.  Old Deuce has the earth shaking with whatever potion he's got cooking up in that pot!  LOL!!!  I also used the Grass Border die from The Scrapping Cottage on this card, as well as the Ornate Circle Frame.

Deuce was cut with white card stock, and everything was colored with Copic markers, however, I did run the die through the Big Shot a second time, using patterned paper for the robe and hat.  Below, is a short video I took, (trying out my new camera) to demonstrate the movement the Action Wobble gives.  

 
It's not so easy to hold the camera and make the Action Wobble move, but at least you get the idea here.  There's still plenty of time to play along with this months challenge, and there's a great prize being given away to one lucky player!  What on earth are you waiting for?  Get out those Cottage Cutz dies, and get movin' with those motion cards for Barry's challenge!!!!   You can find the details here, or you can click on the blinkie in the top left side bar. 

It's great seeing you here today!  Have a good one, Cottage Cutz fans!


Sunday, September 25, 2011

All Treats. No Tricks!

Fall is officially here! So now it's really time to get crafting all of those autumn inspired projects! I thought this Trick or Treat Puppy from CottageCutz was the cutest thing ever! And I also knew that my five year old nephew would love it - and would want lots of cards made for him with it! And of course, I was right.

I usually cut my images with colored and patterned papers, and piece them together. But, today, I decided to try cutting it from white cardstock, and coloring it with distress inks, like many of my teamies do. This was a really fun way to try - and I'm sure I will use it again. That is one of the really cool things about CottageCutz - there are so many ways to use them.

After I had my sweet puppy all pieced, I added a little Ultra Fine Flower Soft to make him kind of furry. It just made him that much more adorable! My card was made using Trick or Treat Collection from My Little Shoebox.


Saturday, September 24, 2011

Halloween Shaker Easel Card


Hi Everyone...welcome to the weekend.  Today I wanted to inspire you with this Halloween Shaker card I created.  I love creating shaker cards...so much fun.  I wish I could show you better in the photo how the black glitter shakes around in the frame, pictures just don't do it justice. 

You can see bits and pieces here in there that haven't fallen down yet, but you still just don't get the whole effect. 


Want to know all the great dies I used for this card, here is the complete list.

Lamp Post With Sign ( yellow border interior of card)


Have a great crafty rest of the weekend...
Hugs, Lori

Friday, September 23, 2011

Wholesome Pumpkin Bread

Hi Scrapping Cottage fans! Thanks so much for popping by today, it's Angelica here with a recipe card project that is quick, and has so many variations!

Have you checked out all the fun dies The Scrapping Cottage carries for the Kitchen? They are delectable! Today I opted to use the Bread die which is awesome because Fall is definitely in the air! My favorite bread is pumpkin bread and I found a wonderful recipe at Eat Clean Recipes that has wholesome, yummy, clean ingredients that will make you feel A LOT less guilty when you end up eating the whole loaf in one day. Oh, is that just me? ha ha!


This is the "Bread" 4x4 die I used for this project.

I decided to create a 4x6 Recipe card using Basic Grey's "Payrus" line and matched my cardstock to it. For shading this time, I used Color Box Pigment Inks and my Prismacolor pencils. Doesn't the bread look so toasty and warm?


To create the optional pocket, simply put a line of glue on the back of your pocket just around the outside edges leaving the top edge unglued. That will be your opening. You could even snap a photo and slide it into the pocket with the recipe card so you remember exactly how it came out!

I doodled a bit on the front of my card to match the pattern in the paper. I used my Faber Castell Pitt pens. LOVE them!


See? Once you tuck the card back in your quick pocket, it lays pretty flush against the card, making indexing a complete breeze. Hope you enjoyed today's project - what's your favorite fall treat? Have a great weekend, everyone! :) Angelica

Thursday, September 22, 2011

Happy Halloween

Hello everyone and Happy Thursday to all! Today I wanted to share a card I decorated inside and out, using the DARLING Halloweeen Collection Cottage Cutz.
For my card today I used The Scrapping Cottage die cutz listed below. I'm  LOVING this DARLING Halloween Collection, they are all just tooo CUTE! To see the entire collection please visit The Scrapping Cottage here.
Cottage Cutz I used:
Halloween Stacked Frogs( 1 on the outside 1 inside)
Lantern Tree(for the little Ghost) 

Others- copics, dusting, airbrushing,ribbons,flower, gems, silver frame.

For the frogs I just dusted them with 3 colors of greens, starting with the lightest like I show in my video with the pumpkin. The candy corn was white and I used copics to color the yellow and orange.

I love doing the insides of cards. On this one I kept it pretty simple. Ive added 1 of the stacked frogs, and used part of the Haunted House Border. The pumpkin is a sticker from My Little Shoebox.com

Thank you for looking and have a lovely day! 

Hugs to all,
Cheryl

Wednesday, September 21, 2011

Spooky Haunting !

Hi again , everyone ! 
Pearl , in Sunny Singapore here .
I trust all our blogging friends have been enjoying 
all the different wonderful Halloween ideas all month long so far.

I have a simple decor idea to share today -
we have a Japanese dollar chain store over here ( called Daiso ) 
and this year they have a lot of adorable Halloween decor / costumes for sale
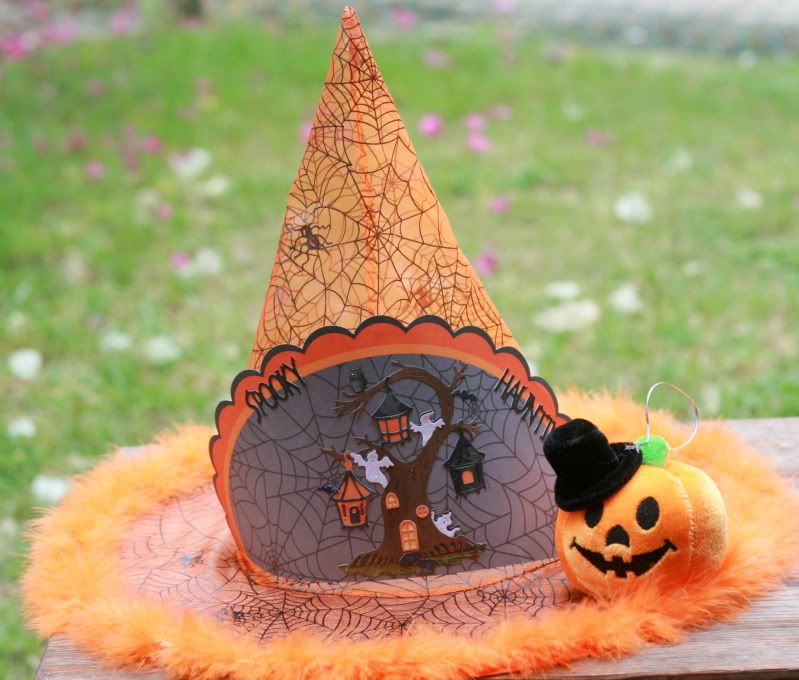
and when I saw these gauzy hats in different Halloween colors - I just had to bring one home with me to try an altered witch's hat . ;) 
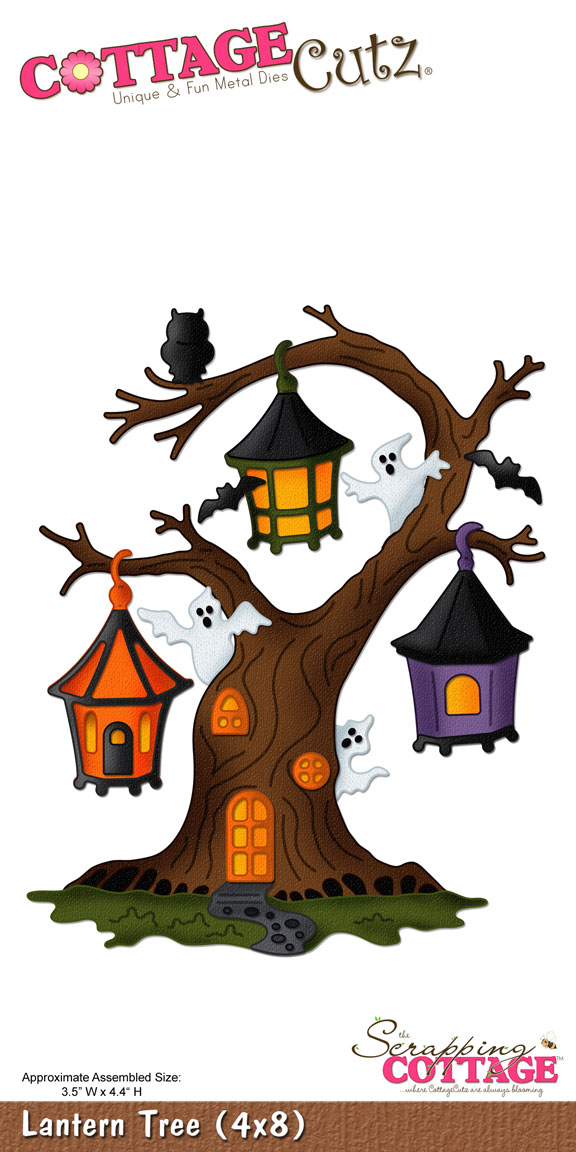
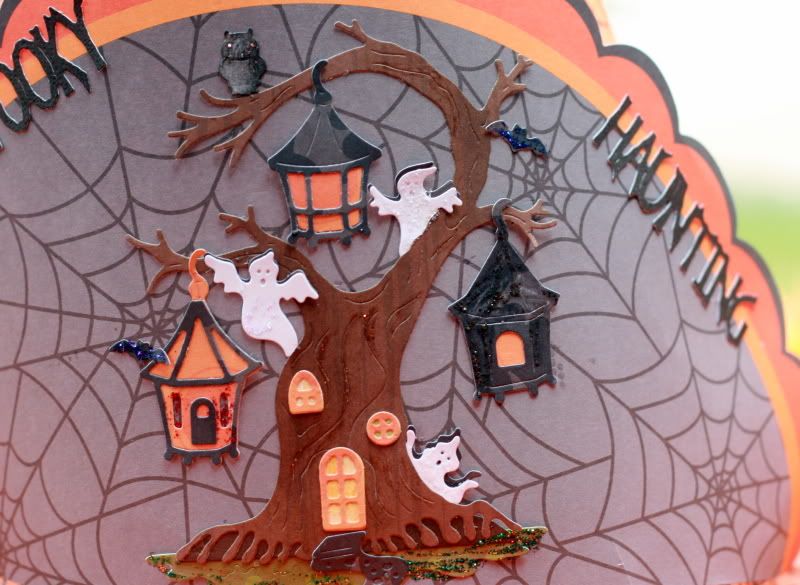
I diecut this Lantern tree using at least
 4 different My Little Shoebox patterned papers 
in the colors I want - some of them I inked in the color I wanted 
to make piecing this come together easier. 


The little Ghouls were shadowed with extra black ones and then given a little textured Stickles treatment.
 To make the little bats stand out more I also stickled them in royal blue. 
Finally I adhered my entire Lantern tree on half a circular diecut from the My Little Shoebox Trick or Treat line. 
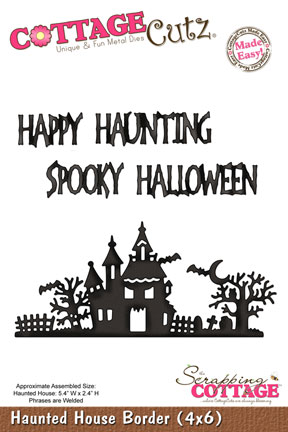
The Spooky Haunting sentiment is from our Haunted House border die.
Finally , when I was happy with my outcome I carefully adhered my entire piece around the brim of the hat 

If you've had a great time with us jumpstarting your Halloween projects, 
you will be as thrilled as I am to know that our Christmas release is available 
for pre-order NOW !!! woohoo ! Gotta love them all ! 


Tuesday, September 20, 2011

Build a Jack-O-Lantern

 Building a Jack-O-Lantern, Cottage Cutz has made it so easy to create the Pumpkin in their new Cottage Cutz Pumpkin Carving Die. The Jack-O-Lantern above was made in all orange, but below. .
 I have shown you the breakdown of the Pumpkin on the die. If you start at the top left you will see a android key thing-y. . Well that is the piece of paper that can save you a lot of work. When mounted on the black die cut. . you see it is like a puzzle. It can than be glued under the jack-O-Lantern .  .and WOW!. . .  you have all your shadows in the face of the pumpkin. Cottage Cutz as just replaced eight tiny pieces of paper with two. There is no worry if all your shadows are in the correct place. Just text fit the black card stock that has the yellow and glue on the back. I highlighted the Jack-O-Lantern with Memento Tango Orange Ink and Copic Markers. Orange, Yellow and Brown #YC04, Y17, E77.
Here I used the Cottage Cutz Carved Pumpkin die on a Halloween treat box. I also used the Cottage Cutz Stamp Frame die as my frame/boarder.

Thanks  Barry


Monday, September 19, 2011

A Halloween Display


I bought me one of these trays over a year ago and kept meaning to put something cute inside to display. With all these cute Halloween diecuts from the Halloween release I couldn't resist. I used papers from MLS and cut each paper I chose to size and then added some embellished dies. I love the look of tuelle so added a double bow to the top.
I secured each card piece to the windows using tacky putty so I can remove them and display other holidays in my tray. When Halloween is over I can simply remove the cards and put them in a bag for next Halloween.


I used the Jack-o-Lantern w/Hat die, Broom mini, Potion Bottle Mini, Frog mini, Scaredy Cat mini, Spider mini & Cauldron Peeker dies.
I wish you could see this in person, it's so much cuter!
I also used the ghost from a previous release. The cat and spider are also from previous releases.
I used the Haunted House Silhouette die and the cloud punch out is from MLS.
The pennants are also from MLS.
I used some Glossy Accents to make some things more dimensional even though the picture makes it look kind of white, it's really just shiney...I even used it to make a wart on her nose.

Remember to keep CottageCutz dies in mind for your holiday decor this season!
I'm lovin' this fall weather here in Utah, it really gets me in the mood for Halloween craftiness.
Have a great day!
Kay