Friday, January 31, 2025

Warm Hugs

 Hello Friends

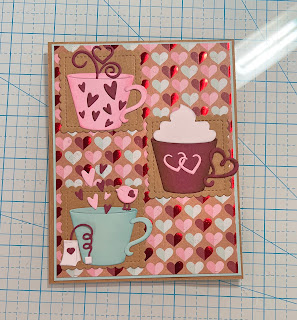
It is Pam sharing with you today.  I am making my last Valentine cards today. I need to get them in the mail.  I am using the Cup of Love die and some pretty heart background paper.  

 Background Photo by Freepiks

Design Steps:
1.  Using the Cup of Love die cut out the following colors of card stock: red, pink, blue and white.  Shade the pieces and then assemble using a fine tip glue
2.  Use a Kraft A2 card base cut a piece of blue card stock 4 1/8 x 5 3/8, cut a piece of heart DP 4 x 5 1/4 and cut 3 kraft Scalloped Squares (use the second from the smallest square)
3.  Glue the blue piece of card stock to the kraft card base and then glue down the heart DP.  Add the scalloped squares
4.  Add the cups as shown above.  Stamp the sentiment and layer it onto blue glue as shown below and your card is complete


Thanks so much for stopping by! 

Blessings and Take Care


Head over to Cottage Cutz and do a little shopping today!

Get Social With Cottage Cutz

Sunday, January 12, 2025

Valentine Truck

 Hello Friends

It is Pam sharing with you today.   

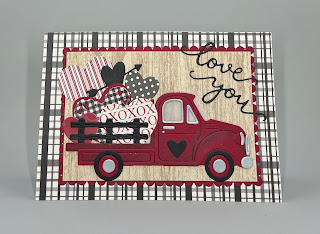
I am getting ready to send out my Valentines in a couple of weeks so I am finishing up a few more today.  The one I am making today is more of a guy's card. So maybe to my hubby or brother!  It is a little more masculine with the deeper reds, wood and truck. The dies I used are: The Flatbed Truck w/AccessoriesPuppy with Valentine and Valentine Phrase and More (Hearts from both of them)

 Background Photo by Freepiks

Design Steps:

1.  Using the Flatbed Truck cut out the following colors of card stock and a piece of vellum: black, silver, and deep red (I decided to cut out the fencing in black instead of brown)
2.  Use black ink and a small applicator to shade the truck.  Glue together with a fast drying, fine tip glue.  Do not glue on the fencing yet.  Cut out the hearts using Puppy with Valentine and Valentine Phrases and More
3.  Use a white card base measuring 4 1/4 x 6 1/4.  Cut a piece of black checked DP the same size as the base card, Cut a piece of wood DP 5 x 3 1/2 and layer it onto a deep red scallop rectangle

4.  Glue the checked DP to the white card base and then glue down the wood rectangle as shown above

6.  Glue down the truck and add arrange the hearts in the back of the truck.  Glue the hearts down and then add the black fencing

7.  Using the Valentine Phrase and More die cut out love you in black and glue to the front of the card as shown above.  Your card is complete

Thanks so much for stopping by! 

Blessings and Take Care


Head over to Cottage Cutz and do a little shopping today!

Get Social With Cottage Cutz

Tuesday, December 31, 2024

Hello Valentine!

Hello Friends

It is Pam sharing with you today. I hope you had a wonderful New Year's celebration! Our after Christmas Sale is still going until January 3rd!  Stop by now for terrific savings HERE!

One of my crafting new year's resolutions is to use up some of the supplies I have on hand.  I am really bad at throwing scraps away especially designer paper.  So today I am using up some of my scraps with these background designs.  They are not new in fact I see them all over YouTube but it gets the job done and makes a really fun background. 

I am working on my Valentines.  I used two really cute and fast dies for the cards.  They are the Typewriter and Telephone.

  Background Photo by Freepiks

Design Steps:

1.  Cut up your scraps in a variety of widths making sure they coordinate with each other 
2.  I had some old Full Sheet Clear Labels that were turning yellow so I put them to use.  Cut the 8 1/2 x 11 sheet into 4 pieces measuring 4 1/4 x 5 1/2
3.   Use one of the pieces and peel the backing partially off.  Begin to layer your strips at an angle as shown above
4.  When the sheet is completely covered flip it over
5.  Cut around the edges and it will look like the picture below

6.  Use a deep red A2 card base.  Cut the diagonal DP piece down to 4 x 5 1/4.  Cut a piece of white card stock 4 1/8 x 5 3/8.  Glue the white to the card base and then glue down the DP piece to the white
7.  Use the Typewriter die and cut it out of gray, white, red, light blue and white.  Use the Telephone die and cut out hello in pink.  Glue the pieces together as shown above.  Cut a red scalloped square and a slightly larger scalloped white square
8.  Glue the red and white scalloped squares together.  Then pop up the typewriter on the square.  Stamp Happy Valentine's Day on white and layer it onto deep red.  Pop up the sentiment and your card is complete

Here is another card made with a very similar background and the Telephone die


Thanks so much for stopping by! 

Blessings and Take Care


Head over to Cottage Cutz and do a little shopping today!

Get Social With Cottage Cutz