Sunday, May 16, 2021

Burger Time

Hi!

It's Anja here. I have a burger card for you today. My inspiration was homemade burgers we made for friends visit yesterday. So on today's menu is the paper version.

For this card I used:

- Cottage Cutz dies (Build-A-Burger, Windows Slimline),

- Distress Inks,

- white card base (10x21 cm), 

- green card stock for background (9,5x21 cm) and die cuts,

- patterned paper for background (9x21 cm),

- white card stock for die cuts, 

- white paper for printing,

- printer,

- adhesive foam pads,

- paper glue. 


First I cut and colored the burger and the fries.

Next I cut background paper and the windows. I cut for windows pieces, one from dark green cardstock and three from white. I wanted to give the windows more dimension. I also left two cut rectangles to glue inside of two windows.  

Then I printed the sentiment and cut it out with the banner die. I also cut one in green.

When all the pieces were ready I glued the card together. I used adhesive foam pads to glue the banner in the middle window. And my card was done. 


That's all form me for today. Have a nice Sunday and see you again on next week. 

Anja Z.


Cottage Cutz dies I used:


Saturday, May 15, 2021

To My Favorite Gnomie

Happy Saturday!  It's Jeanne today with a card for you and your favorite gnomie.  I love the new Slimline dies - they offer such fun options for card layout.  I've used dies from both Slimline and Spring release on this card.

To begin this card I cut the gnomes and flowers from white cardstock using the Bunny Gnome 1, Bunny Gnome 3, and Spring Bloom Cottage dies from the Spring release.  I used Distress Oxide ink to colors the images.

I cut the back panel using the largest of the Nested Rectangle dies and the scalloped panel using the largest of the Scalloped Stitched Rectangle dies.

For the scene panels I cut two rectangles from white and a green pattern using the third largest of the Nested Rectangle dies, and a frame with the Windows die.

I made a stencil with the Cloud dies to ink the blended sky.  For my ground, I cut a gentle curve using the Hills dies on the green patterned paper. 

 I then assembled all the layers and stamped my sentiment in the center panel.

After all my panels were assembled I added my gnomes and a few 3D flowers.  A fun card to let friends know you care!

I hope you've enjoyed my card today!  Be sure to visit the online store where the Slimline dies are on sale right now for a limited time!  Slimline cards are really on trend and now is a great time time to add to your stock of basic dies!

Products used:


Thanks for visiting today.  I hope you have a wonderful weekend!


Friday, May 14, 2021

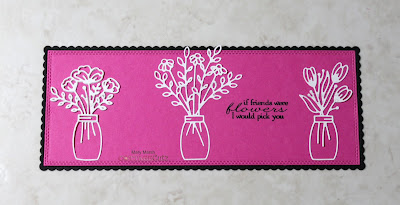
If Friends Were Flowers Slimline

Hello Scrapping Cottage friends! Thanks for taking the time to stop and visit with us today. It's Mary Marsh here bringing you the Friday edition of the Blog.

We have a brand new release of dies in the online store. Your slimline cardmaking is going to get a lot easier. We have 9 Slimline designs and they are on a 25% off sale. These are wonderful, basic dies that should be a part of every card maker's collection especially if you are liking the new slimline style.

Have you ever needed to make a last minute card for a gift or a birthday or anniversary that you forgot about? Well, today I have for your viewing pleasuring a CAS style card that would be very easy to reproduce.  

I am using the Spring Flowers in Jar 1, 2, 3 dies and I created a card in the slimline style. So let's get started on some details of how I created my card. 

Design Steps:

I started by cutting the images in white cardstock. I thought they would standout nicely against a bold and bright background. 
Next I cut the image panel. I used just the double stitched rectangle from the new Lift Flaps Stitched Rectangle Slimline die and cut it from a bright magenta cardstock. 
I wanted an additional layer so I used the largest of the Scalloped Stitched Rectangle Slimline and I cut in black cardstock to continue with the bold look. 
I stamped my sentiment in black ink directly on the magenta image panel.  With this sentiment I will be able to use this card for a variety of occasions by stamping another sentiment on the inside. 
Now I am ready to start card assembly. I attached the image panel to the black scalloped layering panel with double sided tape. Then I attached the Flower jars using Ranger multi medium matte. 
To complete my card I cut a white card base measuring 3 1/8" x 8 1/2". I will add another sentiment on the card inside. 
I attached the image panel with double sided tape and scattered a few white faceted enamel dots. 
And that's it for me for this week. I hope I have given you an idea for a slimline card using both the Spring and Slimline dies. See you next Saturday.

Dies I used to create card:


Thursday, May 13, 2021

Father's Day Gnome

Hello Scrapping Cottage Friends

It is Pam on the blog this fine Thursday!

Just like Mother's Day snuck up on us so will Father's Day!  I am getting a little head start with this fun little gnome just relaxing in his hammock perfect for a Father's Day card!


Design Steps:
1.  Start with a white slimline base use a cloud stencil and blue ink to create the sky
2.  Using the Grass Slimline die cut out all three designs in green card stock
3.  Glue the grass to the card base starting at the bottom only putting glue at the very bottom of the grass.  Next slip in the next layer of grass again only putting glue on the bottom of the grass.  Lastly slip the third layer of grass behind the second layer again only putting glue on the bottom of the grass.  You will add glue to the layers after you slip in the little gnome and the letters
4.  Using the Gnome Sleeping in Hammock die cut out all of the pieces in navy, brown, orange, green, kraft, white, tan and orange polka dot DP.  Shade the pieces using a variety of inks and a small applicator

5.  Using the Stitched Alphabet die cut out the work relax in white and orange polka dot DP.  Glue the DP to the white letters and then ink the edges with orange ink.  Assemble the gnome and slip him in the grass as shown.  Next slip in the letters as shown

 
6.  The last step is to cut out 5 orange flowers using the Gnome Sleeping in a Hammock die and gluing them to the card front as shown.  I added some little orange sequin flowers on top of the cardstock flowers for a little dimension and shine

CottageCutz Products


We are so happy you have taken the time to stop by today!  We really love and appreciate it!

Take Care and Blessings
Pam