Friday, January 15, 2021

Ringmaster of My Heart

Happy Friday! It's Jeanne today and I have another Valentine's card for you.  However, this would also be wonderful for an anniversary or just an "I love you" card.  I adore the new release of Circus dies; they make for some really fun cards!  And they are on sale right now for a limited time!

I started by cutting my Ringmaster from white cardstock and coloring the face, hands and hair with Distress Oxide inks.

For his suit, hat, megaphone and staff, I used various colors of cardstock including gold foil for the top of his staff.

 I assembled the Ringmaster.

I used a stencil and Daffodil Delight ink to create a background.  I wanted a burst and although this is a sun burst I knew the sun would get covered up.

Using the largest of the Wacky Stitched Oval Dies I cut an oval from my stenciled background. I also cut an A2 panel from Poppy Parade (a red-orange color) and a white panel 4 1/8 x 5 3/8 inches.

Before adhering the white panel to the red I used a corner punch to give some visual interest to the panel.

Next I heat embossed my sentiment in white and created a banner by fishtailing the ends of the strip.

I assembled all the elements on the card.  With its bright colors and fun theme this makes for a very happy card!

Dies used:


Thanks for visiting today!  I hope you have a fun and creative weekend!


Thursday, January 14, 2021

Bananas for You!

Hello Everyone

It is Pam creating with you on the blog today!

So excited to share this wonderful New Circus collection with you today.  I must say it was a sad day when Barnums and Bailey Circus went into the history books.  It certainly was a form of entertainment in the days gone by.  But this cheerful and playful group of dies brings back fond memories.  The new release has 16 bright, happy and detailed dies.  They are on a special bundle price right know in the online store.  Just click this highlight store to check them out.

The dies can be used for just about anything from a kids birthday, fun thank you or a Valentine like I am showing today. 


Design Steps

1.  Using the Juggling Monkey die cut out the pieces with Kraft, tan, yellow, red and blue card stock
2.  Shade the pieces and assemble them using a fine tip glue
3.  Use a A2 white card base, cut a piece of corrugated kraft card stock 4 x 5 1/4, cut 3 strips of DP with hearts 1 1/2 x 3 3/4 and last cut a piece of white card stock with the 2nd from the largest Pierced Rectangle die
4.  Glue the corrugated kraft card stock to the front of the white card base.  Equally lay out the DP hearts paper across the corrugated kraft card stock as shown and glue down.  Pop the white rectangle up using dimension tape.  Add the Juggling Monkey, bananas and the sentiment.  To Finish add the twine

CottageCutz Products


Thanks so much for stopping by today!  We love seeing you here and don't forget to leave a comment and check out this fabulous new release!

Blessings
Pam


Wednesday, January 13, 2021

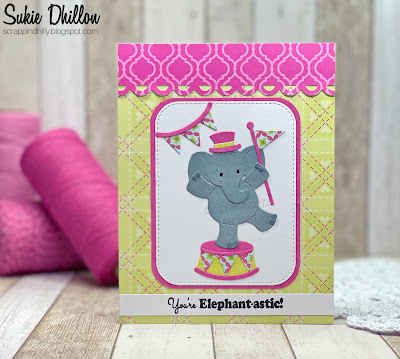
You're Elephant-astic!

Hello!  This is Sukie and today I'm sharing a whimsical card for my design team day! There's a brand new Circus die release in the on line store consisting of 16 new die sets.  They are all currently on sale and I'm showcasing one of them on my card this week.

I cut out the all of the pieces from the Balancing Elephant using some bright colored card stock.  The elephant was shaded with my Oxide Inks.  I cut out an extra banner to use as an embellishment on my card. I also cut out a Stitched Rounded Rectangle using basic white card stock.
The card stock for my card base is from my stash and coordinated perfectly with the hot pink paper.  I'm really liking this bold color combination.  The whimsical sentiment was stamped on a strip of card stock.
Using the corner rounder punch, I created a layer for the die cut rectangle.  A second punch was used to create an accent border for my card.
The layered rectangles were adhered to my card based and topped off with the punched border.
The elephant was affixed inside the rectangle on top of the stand.  I tucked the extra banner into the corner as an embellishment.
The sentiment strip was stretched along the bottom of my card base, it is such a fun play on words and perfect for my card!
Here are the die sets used on my card, available in the store

Monday, January 11, 2021

Family Circus

Happy Monday!  It's Jeanne with the Monday post this week and I have a special box card that uses nine of the new Circus dies!  These dies are stupendously cute and are on sale for a limited time.  

When I saw this release I thought of this sentiment that I had in my stash and never used.  I love box cards so I couldn't resist making a FULL BLOWN CIRCUS!

The card folded:

There are many tutorials out there to make box cards.  This one folds to a 5 x 7 size but it could be scaled to an A2 size by placing the elements closer together or not using as many.

I limited my colors to what I think are classic circus colors - red (two shades), yellow and blue (two shades) along with neutrals and used many of the color combinations that are on the packaging.  This cut down my choices when putting my pieces together and made it go a bit quicker.  On some cards I cut everything in white and color with either Copic markers or Distress Oxide ink.  On others I use colored cardstock.  I employed all three techniques on this card!

Although I had a fun sentiment for the front flap, if you do not have  a sentiment you could easily place either the megaphone and "Show Time" or the arrow and "Big Top" across the front while using more of the Circus Snacks (cotton candy and corn dog) on the other small flap. 

The juggling monkey may be my favorite item in the box.  To create the illusion of the clubs in the air I used a 1 1/4 inch acetate circle behind him and glued the clubs to that.  If you look closely at this photo you can see it.  Since he is standing on one foot, I also stabilized him by gluing an acetate strip to his back.

Here are a few more details of the box.

 
This box could also be done with just the clown dies.  The Clown with Balloons could be made to juggle just like the monkey!

In my extended family we don't exchange birthday gifts, so I love making special cards like this one.  These are my gifts to the people I love and I know that they appreciate and cherish them.

Dies used:


Be sure to stop by the online store for great discounts on this release!  But these discounts are only for a limited time! 
 
Thanks for visiting today.  I hope you have a wonderful week!


Sunday, January 10, 2021

Hello

Hi!

It's Anja here. I have a simple card for you today using a bunch of Safari dies. I placed the animals in the garden. 


For this card I used:

- Cottage Cutz dies (Safari Camel, Safari Ostrich, Safari Giraffe, Hello, Trellis w/Vines, Pierced Rectangle Set),

- Distress Inks,

- craft card base (15x15 cm),

- white card stock for die cuts,

- green card stock for background (9x12 cm),

- black pen,

- white pen,

- paper glue. 

First I cut and colored all three animals. 

Next I cut and colored the trellis and the sentiment.

Then I cut the largest rectangle from the set and trimmed a bit bigger rectangle from green cardstock.

When I had all the pieces cut and colored I placed it on the card base and glued it together. And my card was done.


I wish you all a nice Sunday and see you again next week. 

Anja Z.


Cottage Cutz dies I used: