Friday, October 23, 2020

Baking Spirits Bright

Happy Friday!  It's Jeanne today with a card that was very hard to make - but only because it made me hungry while making it.  All I could think about were freshly baked cookies! 

Gingerbread is one of my favorite Christmas themes and although these are snowmen in this die they fit that general idea.  I had some gingerbread themed patterned paper and knew that combined with this die it would make the perfect stand up card!

To begin I cut my pieces from white, red, crumb cake and a small patterned paper and cardstock.

I used Copic markers to color the nose and holly leaves and I shaded the snowman, cookies and cupcake with Distress Oxide inks.

Next, I cut a piece of crumb cake cardstock to 4 1/4 x 11 inches, then scored and folded it at the 5 1/2 mark (in half, top folding).  On the top flap I scored at the 2 3/4 mark and folded this, essentially folding the top of the card in half.  This will become my easel for the image.  I cut a piece of patterned paper to 4 x 5 1/4 inches and folded it in half at the 2 5/8 inch mark.

I cut two white rectangles using the 2nd largest of the Stitched Scalloped Rectangle dies, one red rectangle using the 3rd largest of the Stitched Rectangles, one white oval using the 2nd largest of the Stitched Scalloped Ovals and one crumb cake oval using the 4th largest Stitched Oval.  I like the Stitched dies but the plain, pierced or double stitched dies work too!

To build the easel, I glued the patterned paper to the top of my card matching up the folds.

I stacked the two white rectangles and adhered the red to the top.  The two pieces of cardstock allow the folded front to have a barrier to stand against when you open the card.

Using a fine tipped glue pen, I glued down my sentiment and a few extra sweets and baking tools.

 I glued my completed sentiment to the inside of the card, about 1/8 inch from the bottom.

I assembled the medallion for the front of the card...

and glued the bottom of it to the lower half of the front of the card.  I left the top free to pop up when the card is opened as an easel.

Finally, I tied a narrow ribbon behind the medallion on the upper part of the card for a little bit of interest when the card is closed.

I hope you enjoyed my card today!  This card would be perfect for someone who loves baking! Be sure to visit the online store where the new Christmas Release (Parts 1, 2 and 3) and the new Halloween release are on sale for a limited time!

Dies:


Thanks for stopping by.  I hope you have a fun and creative weekend!


Thursday, October 22, 2020

Frosty Snowman

Hello Scrapping Cottage Friends,

It is Pam creating with you on the blog today!

I am continuing to work on my Christmas cards and I send some special ones out to my little niece and nephews.  I thought this Joy Snowman is just the perfect card for the younger kids! And it was pretty fast and easy!


Design Steps:

1.  Cut out all of the pieces using the Joy Snowman die.  I cut out 3 J's and Y's in red.  I also used DP for the scarf and hat band.  The other card stock is brown, green, white, black and orange
2.  Glue the 3 J's and the 3 Y's together.  Assemble the snowman with a fine tip glue.  Also cut a piece of silver glitter card stock with the second largest Pieced Rectangle die

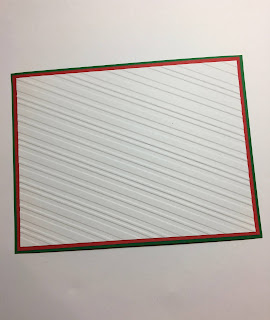
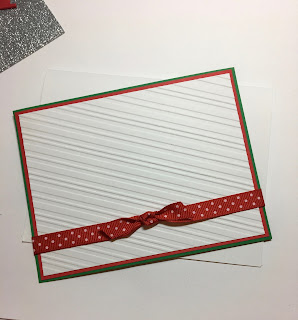
3.  Cut Green card stock 4 1/8 x 5 3/8,  red card stock 3 7/8 x 5 1/8, white card stock 3 5/8 x 4 7/8.  Before glueing the pieces together run the white piece through a diagonal striped embossing folder

4.  After the layers are glued together attach a knotted ribbon and then glue to an A2 white card base
5.  Use dimension dots to glue down the snowman making sure that he is centered.  Then use dimension dots to add the letters J and Y.  For a little extra fun add some snowflakes and your card is finished

Cottagecutz Products


We have 3 releases of Christmas dies in the online store.  I know you will find something you love for your Christmas cards.  So please click here to check all of the adorable dies we have.
Blessings
Pam


Wednesday, October 21, 2020

Holiday Hugs

Hello!  This is Sukie and today I'm sharing a holiday card with one of the newest releases in the online store.  There are 4 new die releases with a variety of dies for the upcoming holiday season.  The best part is they are all currently on sale!

I started playing with the latest Christmas die release and cut out the pieces from the Snowman Smore die set. The tags are from the Mail Tag Set.
I embossed a piece of kraft card stock with the Swiss Dots Cuttlebug embossing folder.  I selected a red card base for a pop of color.
The embossed card panel was flipped over to the "debossed" side and inked on the edges.  The panel was then layered on the card base.  The finished piece looks more like a graham cracker than the embossed side.
Next, the three tags were tied together with some twine and adhered on my card base.  I offset the tags a bit so each of the colored tags would show just a bit.  The twine brought all of the colors together beautifully!
The Snowman Smore was centered on the top tag fitting perfectly as the focal point of my card. 
The sentiment was stamped on a hand cut flag and adhered on the bottom edge of my card.  The sentiment was perfect for the sweet snowman who appears to have his arms out for a holiday hug!
Here are the dies used on my card, available in the store:

Tuesday, October 20, 2020

Snow Babies


Hello Scrapping Cottage friends! Thanks for taking the time to stop and visit with us today. It's Mary Marsh here bringing you the Tuesday edition of the Blog. 

We have four brand new releases in the online store. It's Christmas Part 1 (22 new designs), Christmas Part 2 (21 new designs) and a Halloween release (14 new designs). They are all currently on sale and you can save 25% on the individual dies. 
Christmas Part 3 has just been released and is also on a limited time sale. This one also has savings of 25%.

Today, I have for your viewing pleasure a card featuring the new Snow Babies die. This die is just so cute and I couldn't resist making a card for my sweet little 5 year old niece. 

We all look for card ideas that we can put together quickly and reproduce multiples of at Christmas. This one was one of those cards with the help of my designer paper.
 And, this die it could be used for winter birthday, thinking of you or thank you cards. It's one of those versatile dies.

I have in my collection some winter themed scenic designer papers and I thought this die would be perfect to sit in the middle of one of the scenes. And, I could coordinate the colors to match my paper. The papers are a 6 x 6 size. I didn't want a square card so I cut the designer paper to 4 1/2" x 6" and then each layer I added an 1/8". It's a different size than I usually make but it will work in a 5 x 7 envelope and I shouldn't have to pay extra postage to send it. 

I cut the little girl image in 3 shades of purple cardstock. The Husky or Sled Dog is cut in a gray cardstock. I stamped my Merry Christmas sentiment in a grape ink and this card is completed. 

Well, that's it for me for this post. I will be back again on Saturday with another Christmas card for you. 

die I used to create card:


Sunday, October 18, 2020

First Class Mail


Hi!

It's Anja here. I have another Christmas card for you today. This time I used Mr. & Mrs. Claus Car die from the Christmas Part 1 release.

For this card I used:

- Cottage Cutz die (Mr. & Mrs. Claus Car),

- Distress Inks and Oxides,

- craft card base (12,5x17,5 cm),

- silver pigment ink,

- water spritzer,

- white acrylic paint,

- brush,

- sponge,

- embossing ink,

- white embossing powder,

- sentiment stamp,

- acrylic block,

- heat gun,

- paper glue.

First I cut and colored the car. I used Distress Inks.

Next I started on the background. This time I used Distress Oxides.

After coloring with Distress Oxides I spritzed it with water and dried it. After that I sprinkled the paper with white acrylic paint and dried it again. Last I used a small sponge and tapped white paint to the bottom. Again I dried the paper with the heat gun.

Last I added the sentiment. I embossed it directly on the card and used white embossing powder.

After that I added the card and my card was done.


That's all from me for today. Have a nice week and see you again next Sunday. 

Anja Z. 


Cottage Cutz die I used: 

Saturday, October 17, 2020

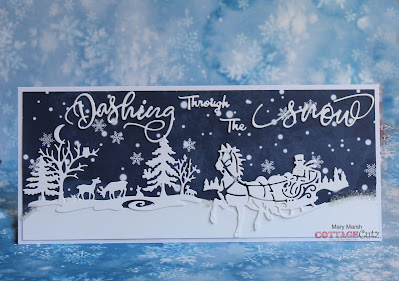
Dashing Through The Snow

Hello Scrapping Cottage friends! Thanks for taking the time to stop and visit with us today. It's Mary Marsh here bringing you the Saturday edition of the Blog. 

We have four brand new releases in the online store. It's Christmas Part 1 (22 new designs), Christmas Part 2 (21 new designs) and a Halloween release (14 new designs). They are all currently on sale and you can save 25% on the individual dies. Christmas Part 3 has just been released and is also on a limited time sale. This one also has savings of 25%.

Today, I have for your viewing pleasure a card featuring  the Dashing Through The Snow (Christmas Part 1) and the Winter Forest (Christmas Part 2) dies. We all look for card ideas that we can put together quickly and reproduce multiples of at Christmas. 

Today, I am showing you a way to do just that and it's using a slimline design. This design has found a resurgence of popularity in the card making world. 
So let's get started with the details of how I created this card. 

Design Steps:

I started off by selecting the designer paper I was going to use for my background.  I wanted something snowy and I had several papers in my collection to choose from. I thought this dark blue one would work great for a nighttime scene. Now you could create your own snowy background but if your looking to make multiples quickly a designer paper is the way to go. 

White Card Base: 9 1/4" x 4"
Designer Paper Layer: 9" x 3 3/4"  
I decided to cut the images and the sentiment from white cardstock because it would make a nice contrast against the dark blue background.  I also cut 2 snow slopes from white cardstock. 

I am ready for card assembly. I attached the snow slopes to the designer paper with double sided tape. I let them overlap a bit because that's where I intended to place the one leg of the horse. 
I used a combination of Ranger multi medium matte and mini glue dots to attach the images to the designer paper. I like the Ranger glue because it dries clear and makes a secure bond. 

Next, I attached the sentiment. I decided to cut another set to make it really pop against the blue background. I used just the Ranger multi medium matte. 
To finish off my card I attached the image panel to the white card base. I added some glitter to both ends of the snow slopes for a bit of an icy look. I am not sure why I did that or even if I liked it once it was done, but it's there now. All in all I am pleased with the way the card turned out.

Well, that's it for me for this week. I hope I have given you a fresh idea on a way to use two of these new dies. I will be back on Monday with another sample for you.

dies I used to create card: