Tuesday, December 17, 2019

Happy Holidays

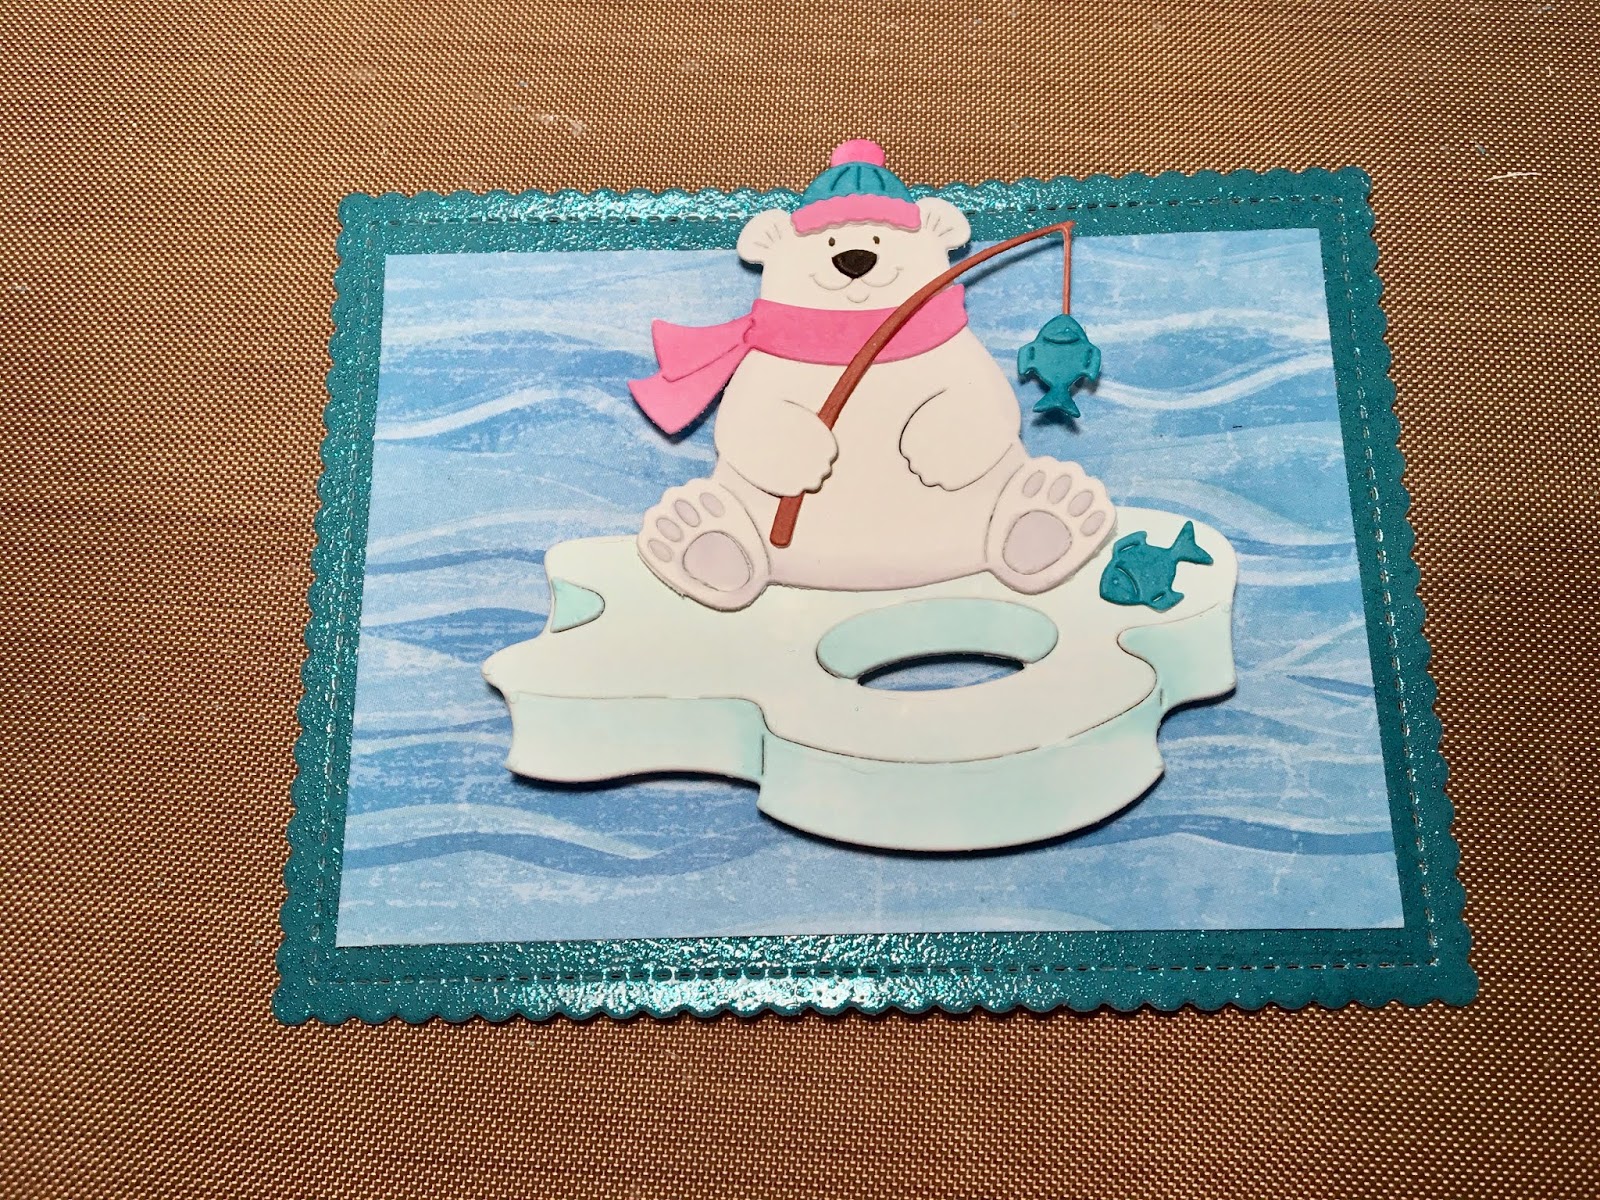
Hi! Janja here with you.
I made a holiday card that I want to share with you today.


- CottageCutz dies: Arctic Moose & Polar Bear, Moose in Forest, Polar Bears w/ Birch Trees (scarf), Christmas Mice (presents)
- white card blank: 4.25 x 5.5" (10,8 x 14 cm), folded
- white cardstock: 4 x 5.2" (10 x 13,2 cm)
- colored cardstock
- colored ink pads
- glue, double-sided adhesive tape, self adhesive foam pads

Cut all the pieces out of colored cardstock. To add shading to pieces, I used colored ink pads.


Cut off a white cardstock for the background. Use different shades of ink pads to color the sky.


Use a pair of scissors to cut off the white cardstock for a snowy hill.
After that, start building a scene.
First attach the conifers to the background with glue.
Paste a snowy hill to the bottom edge with double-sided adhesive tape. 
Attach the following items with self-adhesive pads. 
The last step is pasting the background onto a blank card. 


Have a nice day.
Janja 


Sunday, December 15, 2019

Warm Winter Wishes

Hi!

It's Anja here. I have another card for you using one of the new dies. This time I used different technique for coloring that I usually use. And this is the card that came out.


For this card I used:
- Cottage Cutz die (Polar Bear Fishing),
- Zig Water color brushes (Numbers: 010, 302, 065, 038, 070, 050, 028, 044, 099, 093),
- white card base (15x15 cm),
- craft card stock for background (14x14 cm),
- white water color paper for die cuts,
- watercolor pencils (blue shades and white),
- water brush,
- wash tape,
- black pen,
- printed sentiment,
- heat gun,
- paper glue.

First I cut the bear. I used washi tape to adhere all the pieces on the back side. I find it easier to color if all the pieces are not apart.


Then I used watercolor brushes to color.


When I finished coloring the bear, I started on the background. This time I used watercolor pencils and craft card stock for background. First I colored the water. I used different shades of blue. When I was happy with the shade I used watercolor brush to blend all the colors together.


Then I did the sky. I used light blue and white pencil and watercolor brush for the end.


Then I printed and trimmed the sentiment. I adhered it on craft background first and then used it on card base.


And in the end I added the bear and my card was done.


Thank you for stopping by. I wish you all a lovely Sunday and see you again next week.

Anja Z.


Cottage Cutz die I used for this project:


Saturday, December 14, 2019

Nativity with Donkey

Hello Scrapping Cottage friends! Thanks for taking the time to stop and visit with us today. It's Mary Marsh here bringing you the Friday edition of the Blog. 
The new release of Artic Animal dies are in the online store. There are 13 new designs in this release and they are currently on sale. You can get these super cute dies at 25% off for a limited time. These new dies are so versatile, and can be used for a variety of occasions. 

The baby Artic animals  would make a cute congratulations card,  baby shower invitations, a welcome new baby card, a child's birthday card or cards for our animal loving friends. The other dies are great for a winter birthday, thinking of you, thanks and let's not forget our Christmas cards. 

Today, I am featuring Nativity w/Donkey die. It's part of the Christmas Part 2 collection. I actually do a combo of religious and whimsical for my Christmas cards. Today, for your viewing pleasure, I am going religious with this beautiful die. My design is on the clean and simple side because I wanted the die to be the center focus on the card. I cased this layout from fellow DT member Anja. 

Steps 1:  This week I started my card with the card colors. Jeanne is hosting the color challenge on Splitcoaststampers and she wants us to use so saffron (yellow), pretty peacock (blue) and rococo rose. I thought this nativity die would work. These are different colors for a Christmas card but I always like the chalenge of making a Christmas card with non-traditional colors. 
pretty peacock, so saffron, rococo rose
Initially I was going to sponge a nighttime sky with the challenge colors. But, then I decided to use the peacock cardstock, cut a circle (largest stitched circle die) and stencil the sky with stars. I use blue painters tape to hold my stencil in place. 
This is the finished stenciled work. 
Next, I cut the Nativity and Donkey images. I used an ivory cardstock for the stable and sponged with walnut stain distress ink. For the straw, I used so saffron (yellow) cardstock and sponged with so saffron ink and dried marigold distress ink. The donkey is cut in 2 shades of gray cardstock. 
I stamped my sentiment in pretty peacock ink on white cardstock. The white panel measures 4 1/8" x 5 3/8". I didnt have room for all the words because of the size of the starry circle. So I taped off everything after the word Savior, inked up the stamp, removed the tape and then stamped.
Step 2:  Now that all the card elements are cut, colored and stamped, I am ready to start card assembly. 
The images are attached to the starry circle with dimensional adhesive. I wanted them lifted slightly off the background.
Added the image panel to the white sentiment panel with double sided tape. I also used 3 rococo rose enamel dots to cover that color in the challenge. 
Finished off my card by attaching the image panel to the peacock card base (4 1/4" x 5 1/2"). I hope I have given you an idea of a way to use this new die. This one would be easy to make multiples of for this Christmas. 

That's it for me for this week. See you next Saturday!

dies I used to create card:


Friday, December 13, 2019

Warm and Cozy Hugs

Happy Friday!  It's Jeanne today with a card intended to send warm hugs to a friend.  I created this card for the color challenge this week at Splitcoaststampers.  The colors are Rococo Rose, So Saffron and Pretty Peacock.  The option was to show your favorite warm beverage - perfect for this die!   My favorite warm beverage is coffee, so although this die is Warm & Cozy Cocoa, I'm saying there is a nice warm cappuccino is in that mug!
To start, I cut all the pieces from white cardstock and colored them using the challenge colors plus two neutrals for the cookies and cinnamon stick - Chocolate Chip and Crumb Cake.
I then embossed an A2 white panel using a knit look embossing folder.
I stamped my sentiment in Pretty Peacock on white then cut it out using the second smallest die from the Nested Scallop Circle set.

I adhered the dies cuts to the panel and used copper ribbon to tie a small bow underneath.  For me that was the hardest part of making this card - not a bow maker here!
I glued the  panel to an A2 card base and popped the sentiment up using foam dots.
An easy card that will surely brighten someone's day!

Dies:
http://www.scrappingcottage.com/cottagecutzwarmandcozycocoa.aspx

http://www.scrappingcottage.com/cottagecutznestedscallopcircleset.aspx

Be sure to stop by the online store where for a limited time there is a discount on the Arctic Animals new release!

Thanks for stopping by.  I hope you have a fun and creative weekend!

Thursday, December 12, 2019

Polar Bear Fishing

Hi Everyone!

We are less then 2 weeks from Christmas and I am finishing up a few more cards.  I have mailed most of my cards out because they go cross country!!  As soon as I finish up a few things we pack up and head up to Ohio for Christmas.  We spend most of our Christmases there because my brother and sister still live in my home state.  I have one other sister who lives in New York and I am hoping she will make it down to Ohio for our celebration!

Today,  I am continuing to use our little critters from the Arctic Animals release.  They can be used in so many different ways.
Design Steps:

 1.  Cut all of the pieces out of white card stock using Polar Bear Fishing die
2.  Color the pieces using your favorite markers.  I used my Copics
3.  Assemble the pieces using a fine tip quick dry glue such as Combo
4.  Place dimension square on the back or you can use dimension tape also
5.  Using the Nested Stitched Scallop Rectangle die (the largest one) cut out a piece of glitter blue card stock and a piece of water DP 3 x 4

6.  Glue the water DP to the glitter rectangle and then pop on the fishing polar bear
7.  For the base use a white A2 piece of heavy card stock and cut a piece of snowy DP just slightly smaller then the base.  Add the scalloped rectangle with the polar bear plus your sentiment and your card is complete
CottageCutz Products


I hope you are enjoying the days before Christmas and not letting it get to stressful.  Remember crafting is a wonderful way to relax!!

Blessings
Pam